Ability strategy analysis: Last Stand
hive-13323·@beaker007·
0.000 HBDAbility strategy analysis: Last Stand
 # <div class="phishy">Introduction</div> This week we have a look at the last stand ability. This is a very rare unit. At the moment of writing this post i only had one. After this post i got two 😍 This ability can be an life saver when you last unit is boosted and killing the enemy before they kill you :) https://images.hive.blog/0x0/https://files.peakd.com/file/peakd-hive/beaker007/23wM4MRD5JGWraj7ftc8HBzQSBZSs3PH9V4oU9q8VWFm9Xo92Vk2fZTcfN1LE1FBofrc3.png # <div class="phishy">Ability</div> https://d36mxiodymuqjm.cloudfront.net/website/abilities/ability_last-stand.png Gains +50% to all stats if it's the only Unit on the team alive. Last Stand will increase all stats of a Unit by 1.5X (rounded up) when the Unit is the last standing. Official ability information from splinterlands: [List abilities](https://splinterlands.com/?p=gameplay) #### <div class="phishy">Synergies / strategy </div> <code>Abilities benefits</code> https://images.hive.blog/50x0/https://d36mxiodymuqjm.cloudfront.net/website/abilities/ability_taunt.png **Taunt** - Direct attacks away from the unit you intend to have its last stand by focusing your opponent's attacks elsewhere https://images.hive.blog/50x0/https://d36mxiodymuqjm.cloudfront.net/website/abilities/ability_stun.png **Stun** - If your opponent uses stun, your unit will not be able to attack even if Last Stand is in play. <code>Be aware of abilities </code> https://images.hive.blog/50x0/https://d36mxiodymuqjm.cloudfront.net/website/abilities/ability_forcefield.png **Forcefield** - A double-edged sword - your Unit with Last Stand will benefit from extra protection from attacks of 5+. However, if your opponent plays a card with forcefield, your last standing unit's attack of 5+ will only deal 1 damage. https://images.hive.blog/50x0/https://d36mxiodymuqjm.cloudfront.net/website/abilities/ability_deathblow.png **Deathblow** - When you last stand unit is boosted also you enemy with deathblow that does 2x damage when there is only one enemy left. <code>Ruleset benefits</code> https://images.hive.blog/50x0/https://d36mxiodymuqjm.cloudfront.net/website/icons/rulesets/new/img_combat-rule_fog-of-war_150.png **Fog Of War** - With Sneak, Snipe, and Opportunity disabled, your intended Last Stand Unit is more likely to make it to the end - full health stat intact! <code>Be aware of ruleset</code> https://images.hive.blog/50x0/https://d36mxiodymuqjm.cloudfront.net/website/icons/rulesets/new/img_combat-rule_reverse-speed_150.png **Reverse Speed** - Consider whether the boost in speed to your Unit with Last Stand will harm the outcome of your battle. <br><br><hr> #### <div class="phishy">Select / favorite</div> Mine last stand units: https://images.hive.blog/150x0/https://d36mxiodymuqjm.cloudfront.net/cards_by_level/rift/Tinderlock_lv6.png https://images.hive.blog/150x0/https://d36mxiodymuqjm.cloudfront.net/cards_by_level/rift/Runemancer%20Atuat_lv3.png https://files.peakd.com/file/peakd-hive/beaker007/23vhqCE5upePaQ7pUm8aHRtTpzcmNUbdwYwnbsqbPC6ABjdn2otoAKgKks1yqz3Vmh1td.gif This week it was not hard to pick a favorite. While writing i bought a Runemance Atuat for 4.5$ to get him at a level where it gets last stand. This ability is very powerful. battle stats of this unit: 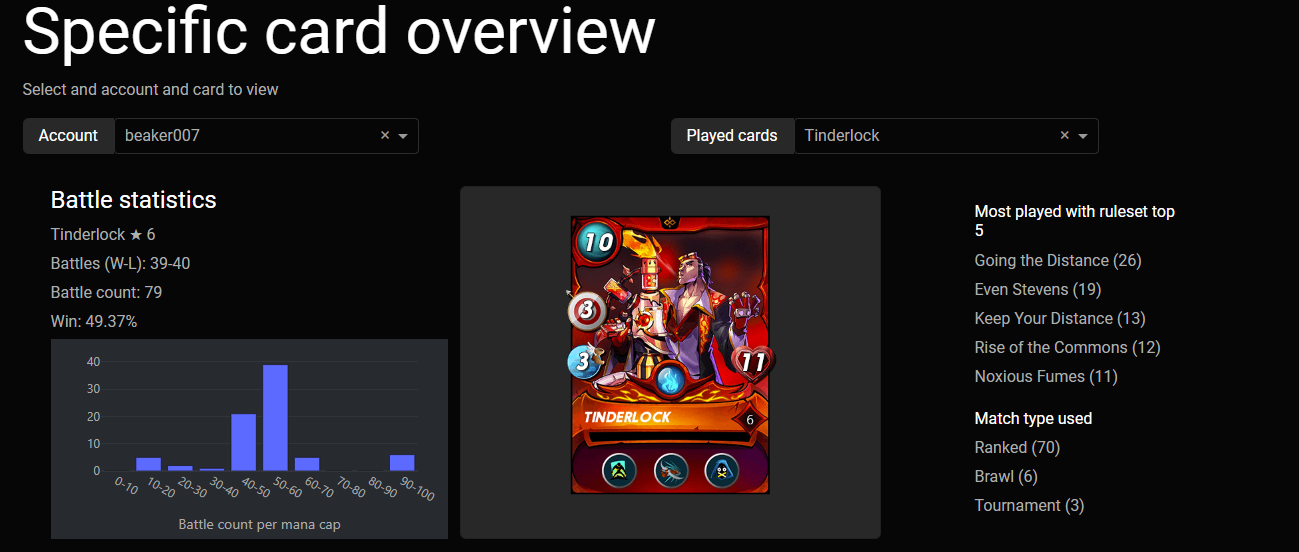 As you can see i do not use it often. and only high mana battles. https://images.hive.blog/0x0/https://files.peakd.com/file/peakd-hive/beaker007/23wM4MRD5JGWraj7ftc8HBzQSBZSs3PH9V4oU9q8VWFm9Xo92Vk2fZTcfN1LE1FBofrc3.png # <div class="phishy"><center>Strategy</center></div> https://files.peakd.com/file/peakd-hive/beaker007/23xKjen72ZtFbzLzQ5YzBfq77DmvWDKeiJ1z22yqMQR71WtTBoLLEHtFZkLZc54RHvL7b.png High mana game with only ranged units that are all poisoned. ## <div class="phishy"><center>Rulesets</center></div> https://files.peakd.com/file/peakd-hive/beaker007/AK58VN4HC9Z2JQBBgKLAgefSo7mvE3KuikKVQPnGVHuRyGqgNLGW82XV4nMTxUj.png **Going the Distance**: Only range units may be selected. https://images.hive.blog/0x0/https://d36mxiodymuqjm.cloudfront.net/website/icons/rulesets/new/img_combat-rule_noxious-fumes_150.png **Noxious Fumes**: All units are poisoned at the beginning of the match. Note units with immunity are not poisoned and it can be cleansed. https://images.hive.blog/0x0/https://d36mxiodymuqjm.cloudfront.net/website/icons/rulesets/new/img_combat-rule_fivealive_150.png **FiveAlive**: Only five units can be selected. https://images.hive.blog/0x0/https://files.peakd.com/file/peakd-hive/beaker007/23wM4MRD5JGWraj7ftc8HBzQSBZSs3PH9V4oU9q8VWFm9Xo92Vk2fZTcfN1LE1FBofrc3.png ## <div class="phishy"><center>The Lineup</center></div> ### <div class="phishy"><center>Summoner</center></div> | Card | Reason | | - | - | | https://images.hive.blog/150x0/https://d36mxiodymuqjm.cloudfront.net/cards_by_level/chaos/Quix%20the%20Devious_lv4.png| Logically with going the distance it always good to pick Quix for the -1 range attack. You know you will be facing ranged attackers lol | ### <div class="phishy"><center>Units Lineup</center></div> | #1 | #2 | #3 | #4 | #5 | |-|-|-|-|-| | https://images.hive.blog/150x0/https://d36mxiodymuqjm.cloudfront.net/cards_by_level/rift/Runic%20Skyclaw_lv6.png| https://images.hive.blog/150x0/https://d36mxiodymuqjm.cloudfront.net/cards_by_level/reward/Lava%20Launcher_lv6.png| https://images.hive.blog/150x0/https://d36mxiodymuqjm.cloudfront.net/cards_by_level/soulbound/Drybone%20Raider_lv2_gold.png| https://images.hive.blog/150x0/https://d36mxiodymuqjm.cloudfront.net/cards_by_level/soulbound/Firecaller_lv10.png| https://images.hive.blog/150x0/https://d36mxiodymuqjm.cloudfront.net/cards_by_level/rift/Tinderlock_lv6.png| <hr> **Runic Skyclaw** (lvl 6) Even it cannot attack i placed it here because of the high speed in the hope for many misses. <hr> **Lava Launcher** (lvl 6) Second unit is a closed ranged unit so it can attack in the front. The stun should help reduce the potential closed ranged unit of my opponent <hr> **Drybone Raider** (lvl 2 GF) It made the team for the double strike and it will be boosted before its killed <hr> **Firecaller** (lvl 10) With the martyr it in the team in this position to boot **Tinderlock**. I Don't mind the low health on this one its mend to go down in one or two rounds. <hr> **Tinderlock** (lvl 6) Star of this week i hope it will survive the poison. It has 11 health so that should give him some rounds https://images.hive.blog/0x0/https://files.peakd.com/file/peakd-hive/beaker007/23wM4MRD5JGWraj7ftc8HBzQSBZSs3PH9V4oU9q8VWFm9Xo92Vk2fZTcfN1LE1FBofrc3.png # <div class="phishy"><center>The Battle</center></div> ## <div class="phishy"><center>Reference</center></div> Link to the battle: [Link to battle](https://splinterlands.com?p=battle&id=sl_c5db0a63abde2b205c297d0165099cd4&ref=beaker007) https://images.hive.blog/0x0/https://files.peakd.com/file/peakd-hive/beaker007/23wM4MRD5JGWraj7ftc8HBzQSBZSs3PH9V4oU9q8VWFm9Xo92Vk2fZTcfN1LE1FBofrc3.png ## <div class="phishy"><center>Rounds</center></div> <hr> **Start :** 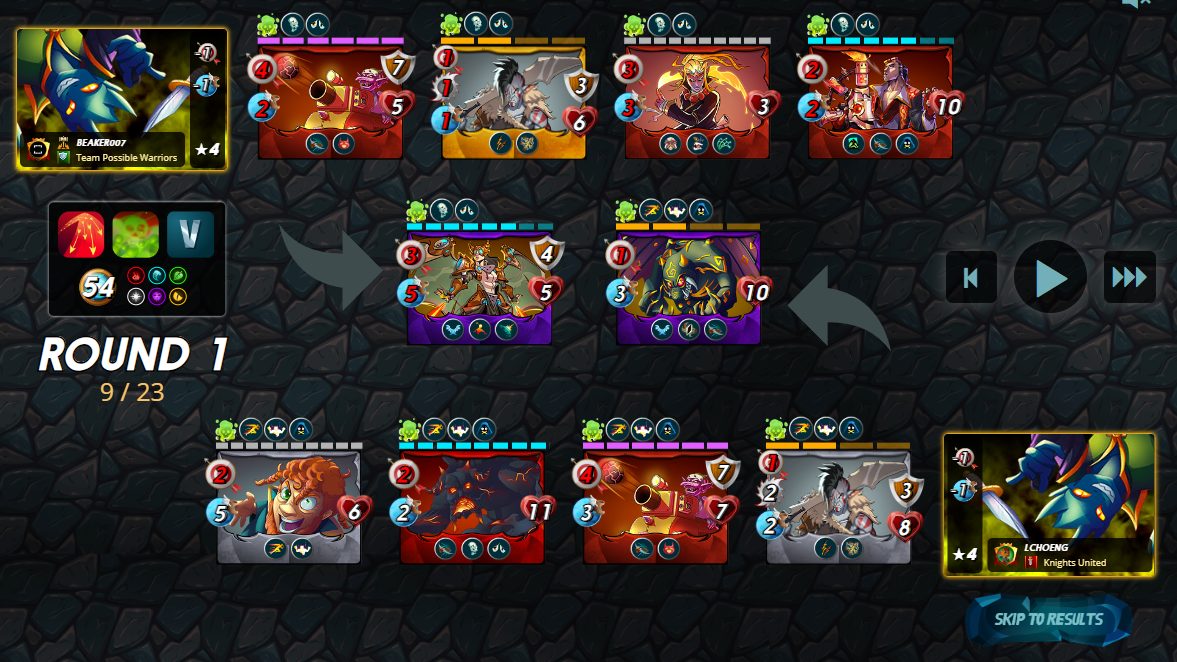 There we go... some similarity in the line up. all front attack so that is great for my **Tinderlock** to unleash it last stand. I got some nice evade chance. my opponent has some extra close ranged units. I dislike his supply runner that is a good choice for its swiftness and strength. <hr> **Round 1:** 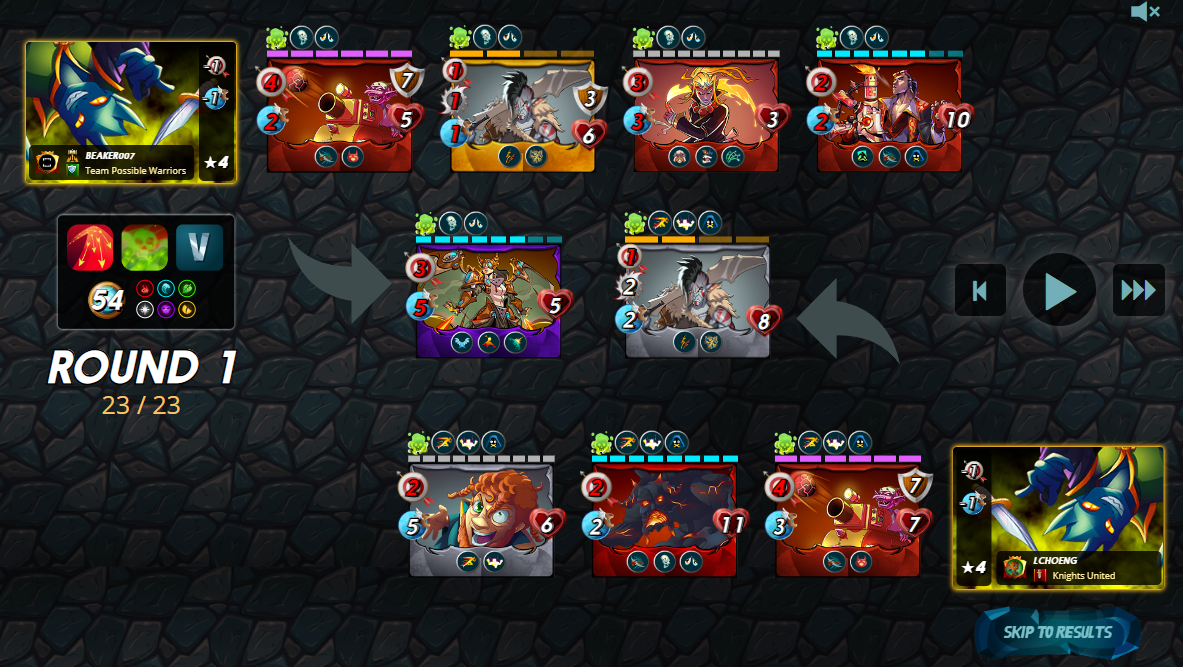 4 misses, the first part of the plan is working. With this speed i wander if the last stan is needed. Still some high health unit left to kill. <hr> **Round 2:** 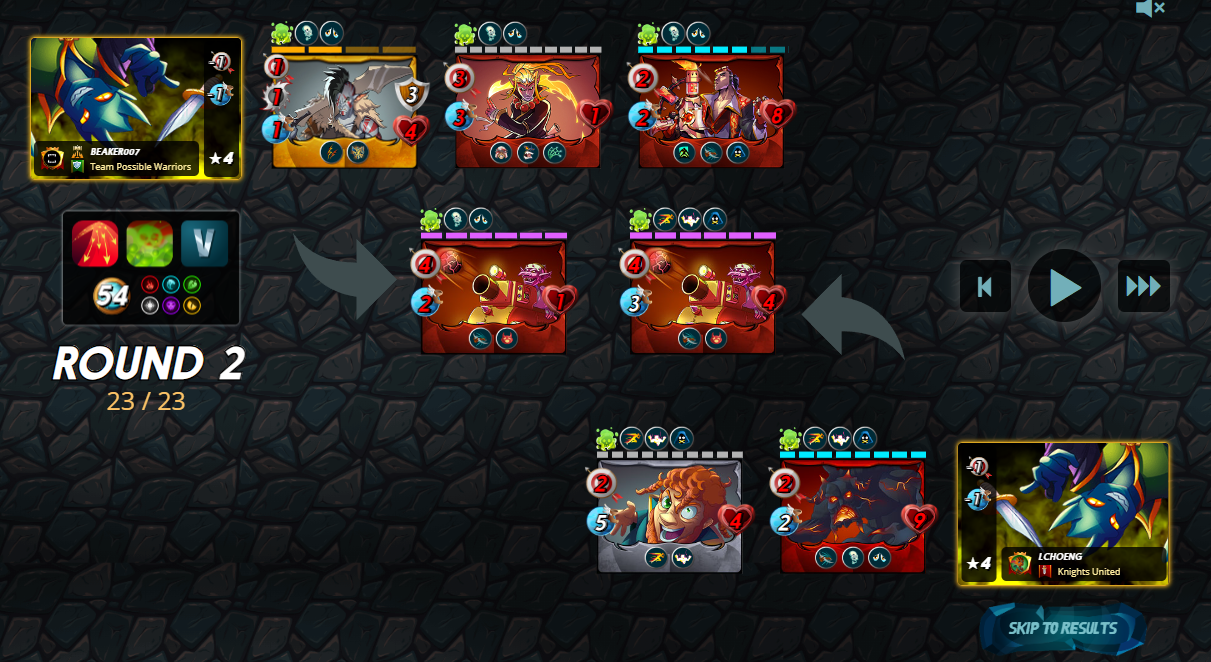 Forgot about the poison that hurts. pretty close to the team some will die next round by the poison. Then it will come down to part 2 and 3 of the strategy. Martyr and as last the last stand. The last stand will bring up the health and will keep it alive for somewhat long against the poison. <hr> **Round 3:** 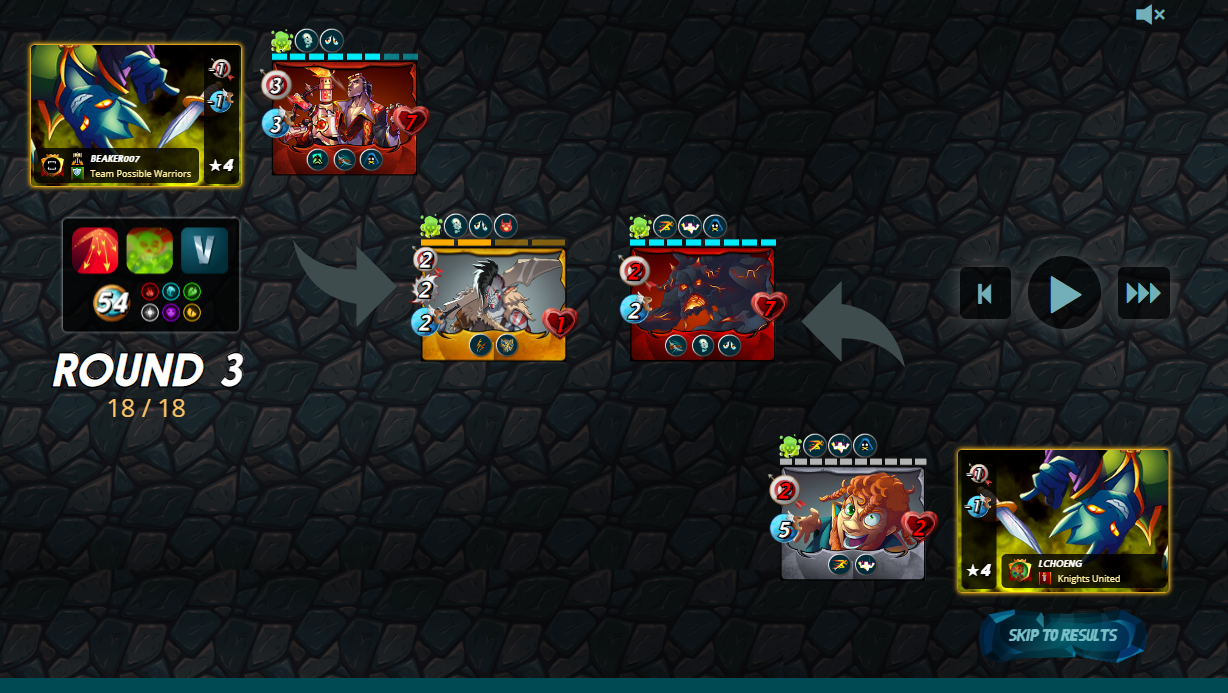 Part 2 is executed the martyr has done its part. Poison will take out another two units next round. Then the last stand will be needed to kill of the last unit. <hr> **Round 4:**  From 5 health to 11 health and in one blow my **Tinderlock** kill the **Molten Ash Golem** which makes it a win. <hr> https://images.hive.blog/0x0/https://files.peakd.com/file/peakd-hive/beaker007/23wM4MRD5JGWraj7ftc8HBzQSBZSs3PH9V4oU9q8VWFm9Xo92Vk2fZTcfN1LE1FBofrc3.png # Conclusion At the moment of writing this post i noticed again how rare the last stand ability is. In very specific cases this is a very use ability that can just swing the battle your way. In the end a pretty sure victory: 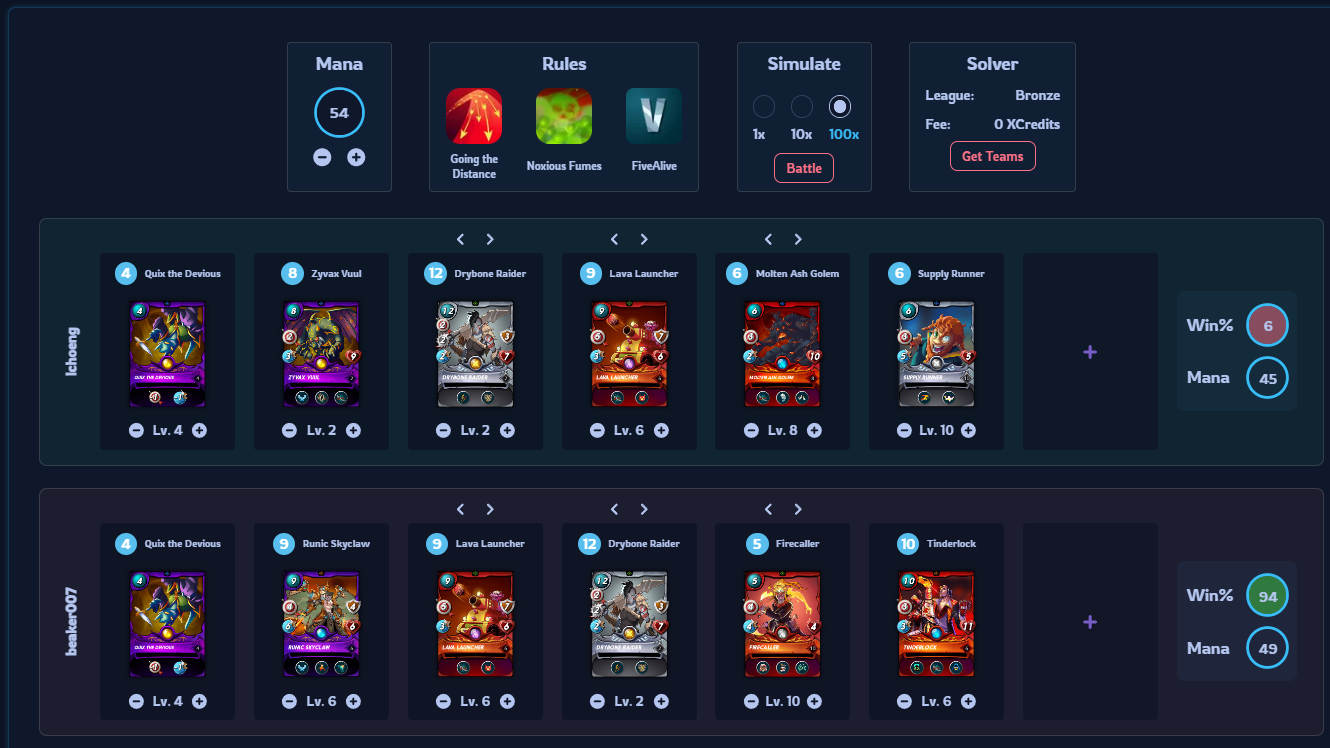 https://images.hive.blog/0x0/https://files.peakd.com/file/peakd-hive/beaker007/23wM4MRD5JGWraj7ftc8HBzQSBZSs3PH9V4oU9q8VWFm9Xo92Vk2fZTcfN1LE1FBofrc3.png # <div class="phishy">Previous ability strategy posts</div> Below you will find references to the other ability strategies / analysis posts. | Ability | post | |-|-| |https://images.hive.blog/50x0/https://d36mxiodymuqjm.cloudfront.net/website/abilities/ability_affliction.png Affliction | [Ability post: Affliction ](https://peakd.com/splinterlands/@beaker007/ability-strategy-analysis-affliction)| |https://images.hive.blog/50x0/https://d36mxiodymuqjm.cloudfront.net/website/abilities/ability_amplify.png Amplify | [Ability post: Amplify](https://peakd.com/publish?edit=beaker007%2Fability-deep-dive-amplify)| |https://images.hive.blog/50x0/https://d36mxiodymuqjm.cloudfront.net/website/abilities/ability_backfire.png Backfire | [Ability post: Backfire](https://peakd.com/hive-13323/@beaker007/ability-strategy-analysis-backfire) | |https://images.hive.blog/50x0/https://d36mxiodymuqjm.cloudfront.net/website/abilities/ability_blast.png Blast | [Ability post: Blast](https://peakd.com/hive-13323/@beaker007/ability-strategy-analysis-blast)| |https://images.hive.blog/50x0/https://d36mxiodymuqjm.cloudfront.net/website/abilities/ability_blind.png Blind | [Ability post: Blind](https://peakd.com/hive-13323/@beaker007/ability-strategy-analysis-blind) | |https://images.hive.blog/50x0/https://d36mxiodymuqjm.cloudfront.net/website/abilities/ability_bloodlust.png Bloodlust | [Ability post: Bloodlust](https://peakd.com/hive-13323/@beaker007/ability-strategy-analysis-bloodlust) | |https://images.hive.blog/50x0/https://d36mxiodymuqjm.cloudfront.net/website/abilities/ability_camouflage.png Camouflage | [Ability post: Camouflage](https://peakd.com/hive-13323/@beaker007/ability-strategy-analysis-camouflage) | |https://images.hive.blog/50x0/https://d36mxiodymuqjm.cloudfront.net/website/abilities/ability_conscript.png Conscript | [Ability post: Conscript](https://peakd.com/hive-13323/@beaker007/ability-strategy-analysis-conscript)| |https://images.hive.blog/50x0/https://d36mxiodymuqjm.cloudfront.net/website/abilities/ability_close-range.png Close Range | [Ability post: Close Range](https://peakd.com/hive-13323/@beaker007/ability-strategy-analysis-close-range) | |https://images.hive.blog/50x0/https://d36mxiodymuqjm.cloudfront.net/website/abilities/ability_cleanse.png Cleanse | [Ability post: Cleanse](https://peakd.com/hive-13323/@beaker007/ability-strategy-analysis-cleanse) | |https://images.hive.blog/50x0/https://d36mxiodymuqjm.cloudfront.net/website/abilities/ability_cripple.png Cripple | [Ability post: Cripple](https://peakd.com/hive-13323/@beaker007/ability-strategy-analysis-cripple) | |https://images.hive.blog/50x0/https://d36mxiodymuqjm.cloudfront.net/website/abilities/ability_deathblow.png Deathblow | [Ability post: Deathblow](https://peakd.com/hive-13323/@beaker007/ability-strategy-analysis-deathblow) | |https://images.hive.blog/50x0/https://d36mxiodymuqjm.cloudfront.net/website/abilities/ability_demoralize.png Demoralize | [Ability post: Demoralize](https://peakd.com/hive-13323/@beaker007/ability-strategy-analysis-demoralize) | |https://images.hive.blog/50x0/https://d36mxiodymuqjm.cloudfront.net/website/abilities/ability_dispel.png Dispel | [Ability post: Dispel](https://peakd.com/hive-13323/@beaker007/ability-strategy-analysis-dispel) | |https://images.hive.blog/50x0/https://d36mxiodymuqjm.cloudfront.net/website/abilities/ability_divine-shield.png Divine Shield | [Ability post: Divine Shield](https://peakd.com/hive-13323/@beaker007/ability-strategy-analysis-divine-shield) | |https://images.hive.blog/50x0/https://d36mxiodymuqjm.cloudfront.net/website/abilities/ability_dodge.png Dodge | [Ability post: Dodge](https://peakd.com/hive-13323/@beaker007/ability-strategy-analysis-dodge) | |https://images.hive.blog/50x0/https://d36mxiodymuqjm.cloudfront.net/website/abilities/ability_double-strike.png Double Strike | [Ability post: Double Strike](https://peakd.com/hive-13323/@beaker007/ability-strategy-analysis-double-strike)| |https://images.hive.blog/50x0/https://d36mxiodymuqjm.cloudfront.net/website/abilities/ability_enrage.png Enrage | [Ability post: Enrage](https://peakd.com/hive-13323/@beaker007/ability-strategy-analysis-enrage)| |https://images.hive.blog/50x0/https://d36mxiodymuqjm.cloudfront.net/website/abilities/ability_flying.png Flying |[Ability post: Flying](https://peakd.com/hive-13323/@beaker007/ability-strategy-analysis-flying) | |https://images.hive.blog/50x0/https://d36mxiodymuqjm.cloudfront.net/website/abilities/ability_forcefield.png Forcefield | [Ability post: Forcefield](https://peakd.com/hive-13323/@beaker007/ability-strategy-analysis-forcefield)| |https://images.hive.blog/50x0/https://d36mxiodymuqjm.cloudfront.net/website/abilities/ability_fury.png Fury | [Ability post: Fury](https://peakd.com/hive-13323/@beaker007/ability-strategy-analysis-fury) | |https://images.hive.blog/50x0/https://d36mxiodymuqjm.cloudfront.net/website/abilities/ability_giant-killer.png Giant Killer | [Ability post: Giant Killer](https://peakd.com/hive-13323/@beaker007/ability-strategy-analysis-giant-killer)| |https://images.hive.blog/50x0/https://d36mxiodymuqjm.cloudfront.net/website/abilities/ability_halving.png Halving | [Ability post: Halving](https://peakd.com/hive-13323/@beaker007/ability-strategy-analysis-halving) | |https://images.hive.blog/50x0/https://d36mxiodymuqjm.cloudfront.net/website/abilities/ability_headwinds.png Headwinds | [Ability post: Headwinds](https://peakd.com/hive-13323/@beaker007/ability-strategy-analysis-headwinds) | |https://images.hive.blog/50x0/https://d36mxiodymuqjm.cloudfront.net/website/abilities/ability_heal.png Heal | [Ability post: Heal](https://peakd.com/hive-13323/@beaker007/ability-strategy-analysis-heal)| |https://images.hive.blog/50x0/https://d36mxiodymuqjm.cloudfront.net/website/abilities/ability_tank-heal.png Tank Heal | [Ability st: Tank Heal](https://peakd.com/hive-13323/@beaker007/ability-strategy-analysis-tank-heal) | |https://images.hive.blog/50x0/https://d36mxiodymuqjm.cloudfront.net/website/abilities/ability_immunity.png Immunity | [Ability post: Immunity](https://peakd.com/hive-13323/@beaker007/ability-strategy-analysis-immunity) | |https://images.hive.blog/50x0/https://d36mxiodymuqjm.cloudfront.net/website/abilities/ability_inspire.png Inspire | [Ability post: Ispire](https://peakd.com/hive-13323/@beaker007/ability-strategy-analysis-inspire) | |https://images.hive.blog/50x0/https://d36mxiodymuqjm.cloudfront.net/website/abilities/ability_knock-out.png Knock Out | [Ability post: Knock Out](https://peakd.com/hive-13323/@beaker007/ability-strategy-analysis-knock-out)| |https://images.hive.blog/50x0/https://d36mxiodymuqjm.cloudfront.net/website/abilities/ability_last-stand.png Last Stand | | That's all for this week hope you enjoyed reading this ability strategy/analysis. See you all on the battlefield. https://d36mxiodymuqjm.cloudfront.net/website/splinterlands_logo.png Do you also want to be part of this amazing play to earn game consider using my [referral](https://splinterlands.com?ref=beaker007) link.
👍 limka, splinterboost, terraboost, sorin.cristescu, takeru255, carl05, crypt0gnome, holdeck2, glimpsytips.dex, malos10, reazuliqbal, monstermarket, antoniarhuiz, mafalda2018, helengutier2, elamaria, marianaemilia, funnel, gabrielrr17, pedrocanella, dosh, gomster, caaio, anjanida, carlosro, brando28, emd012, hkinuvaime, kojiri, mcrahman91, lobaobh, elfino28, highfist, scrubs24, unlikelysurvivor, bastter, goliathus, seuamiguto, brucolac, endrius, adulruna, jpleron, lucasqz, bteim, canellov, dudeontheweb, deggial, beaker007, giemo, heutorybr, kakakk, leidimarc, terracore, martusamak, portugalcoin, pablo1601, darwinjj, ak08, fallen.angels, dracrow, mvl2304, vvgm, reycelpl, critical99, pablocss, iasplan, jerson1231, jats-0, tggoficial, amaillo, danideuder, slaifer-red-01, javivisan, torari, crimianales, aleister, hivebuzz, lizanomadsoul, manncpt, jnmarteau, crypticat, bdvoter, zaku, bdvoter.cur, zaku-spt, zaku-ag, yousafharoonkhan, steemmonsters, drillith, gannibal, nozem01, annabeth, ghostlybg, reseller, hadley4, bscrypto, monstermother, gurseerat, gerjer, dirego1, malnavi, goldmonsters, djrockx, petterch, priyabariya, dreamryder007, teamvn, monster-mountain,