How to “Lay a Concrete Path or Area”
interior·@bubblysnowflake·
0.000 HBDHow to “Lay a Concrete Path or Area”
**Things you need** Spirit level, Concrete hoe, Shovel, Garden hose, Float, Bull float (for large areas), String Line, Broom, Screed Board (100 x 20mm), Steel and Timber Float, Wheelbarrow, Sponge, Edge boards (100 x 10mm), pegs, reinforcement mesh (for large areas), Chairs (mesh supports), Sand for a 50mm layer under concrete, builders plastic, rubber boots. Concrete Mix: (Purchase ready mix concrete), or Sand, Cement, Aggregate: (purchase raw materials and mix yourself) **Design** You should start by designing your planned concreted area on a piece of paper. Be sure to include all of the following: **Where is the concreted area going to be situated?** 1. Is there anything in the way? (services, tree roots, plants, etc.) 2. Dimensions to the area to be concreted 3. Which way will you slope the concrete? (to drain away any surface water) 4. Thickness of concrete slab 6. Placement of edge boards 7. The type of finish do you want 8. Placement of expansion joints 9. How long it will take? 10. Clean up 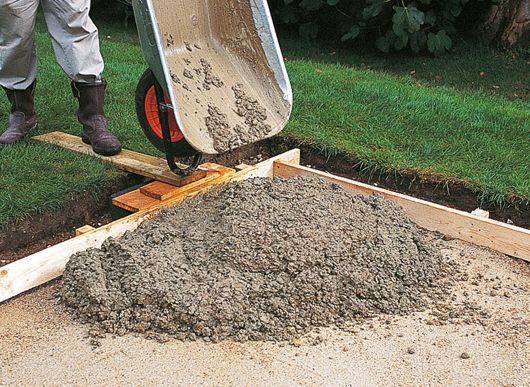 **Quantities** To work out the amount of concrete you require to follow the example below: If the area to be concreted is 4 meters long by 3 meters wide and has a depth of 100mm (Length x Width) x depth (4 x 3) x .1 = 1.2 meters cubed of concrete **Preparation** Be sure to remove any turf or vegetation from the area to be concreted. Most jobs require some type of forming, edge boards or an excavated or a combination of both is usually the case. Place the edge boards to the edges that need forming. Use pegs to support the edge boards. Nail the edge board to the peg. Be sure to set the level of the edge board to slope away from any walls and slope to drainage points, and allow for a 50mm layer of sand below the concrete. Place a 50mm layer of sand over the area to be concreted. Place the builder’s plastic in the formed area. This creates a vapor barrier and protects your concrete from rising moisture. **For large areas** Cut the reinforcement mesh to the area needed, and ensure all reinforcement to be lapped at a minimum of 150mm. Place chairs (supports) under the mesh to raise it at least 30mm of the ground. **Working the concrete** When ordering concrete, be sure to state the quantity and strength you require. Ask your supplier for the best type of concrete for your purpose. Once the concrete arrives, get your boots on! To start, simply wheel-barrow the concrete in the formed or excavated area. Be sure to work the concrete by poking it to bring up any air holes. Level out the poured concrete with the shovel first. Then Screed the concrete, working to the edge boards. Work the screed with a side to side action, pulling it towards you. There are many types of finishes you can now choose from **For stencil finishes** Apply the stencil by laying it down and then work it into the concrete with a bull float. Apply the desired color by sprinkling or spraying it on the surface and then trowel it in well with a wood float. Remove the stencil before the concrete sets. It is ideal to seal your stenciled concrete floor with a concrete sealer once it dries. For a Broom finish: Lightly drag a stiff-bristle broom on the concrete. This will give you a non-slip finish. For a Steel Float finish: Work the trowel to the concrete in a circular motion. This will give you a slippery and shiny surface. For a Timber Float finish: Work the trowel to the concrete in a circular motion. This will give you a slippery and shiny surface. Many other finishes can be achieved by applying oxides for color and using stamps to imprint into the surface before the concrete sets. **Finishing** Once you have applied the finish to the concrete it is time to let the concrete cure. All concrete needs to be cured properly. Once the concrete has set, it is a must to keep the surface wet. Hose or mist the concrete area on a regular basis. Place a piece of plastic over the concreted area to help hold the moisture in cures for 3 to 4 days. For more home-related ideas, do check some of the top references below - 1. https://www.houzz.in/ 2. https://indiahousing.com/ 3. https://www.thespruce.com/by-room-4127972