Mapping your EOS tokens for dummies - step by step walkthrough
eos·@bulleth·
0.000 HBDMapping your EOS tokens for dummies - step by step walkthrough
<center></center><br> I just did a post on how [EOS tokens are a bargain](https://steemit.com/cryptocurrency/@bulleth/eos-is-a-bloody-bargain-right-now-conservative-price-targets) at the moment and everyone seemed to agree. There was another common thread in the comments though: people seem to be intimidated and confused by the mapping process you need to complete in order to eventually receive tokens on the actual EOS blockchain. The aim of this article is to make the process as simple as possible, as such, we will be using the recommended setup: Google Chrome, MetaMask Ethereum Wallet and the EOS Token Distribution App. You can use any Ethereum wallet that is compatible with the EOS Token Distribution App, but if you are reading this, it is probably a good idea to just use the recommended setup. Also this guide is only concerned with setting up MetaMask and mapping your EOS keys to your Ethereum address - I assume you have already purchased EOS tokens and have them stored on exchange or in an incompatible wallet. If you already have your EOS tokens in an Ethereum wallet which *is* compatible with the EOS Token Distribution App (MyEtherWallet, Exodus* etc), you can skip straight to the final section of this guide. **Thanks to @mike-power below for letting me know the Exodus wallet is now compatible with the EOS Token Distribution App. I haven't used this wallet myself, but sounds like it may be the easiest way to buy and register EOS tokens - once you have purchased/stored EOS tokens in Exodus, you can skip straight to the last part of this guide!* ## Creating a MetaMask wallet <br> 1. Open Google Chrome (You can [download here](https://www.google.com.au/chrome/browser/features.html) if you haven't already) 2. Go to the [MetaMask Chrome Plugin](https://chrome.google.com/webstore/detail/nkbihfbeogaeaoehlefnkodbefgpgknn) page, click 'Add to Chrome' and then "Add Extension" 3. Once the plugin installation is complete, you will be taken to the metamask.io website (you can watch the introduction video here if you like) 4. There should now be a little fox icon to the right of the Chrome address bar. Click this icon, scroll down and accept the terms of service. 5. Enter a strong 8 character password, confirm the password and click 'create' 6. Record your 12 recovery words and store them somewhere safe - this is the **only** way to recover wallet access if you forget your password! 7. Repeat step 6 and click "I've copied it somewhere safe" 8. Welcome to your new MetaMask Ethereum wallet! <br> <center>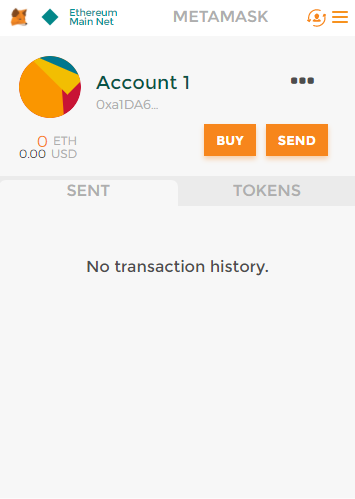</center> <br> ## Adding and depositing EOS tokens to your MetaMask Wallet <br> *Token Address: 0x86fa049857e0209aa7d9e616f7eb3b3b78ecfdb0 Token: EOS Decimals of Precision: 18* 1. Click the "Tokens" tab, click "Add Token", enter the info above and click the "Add" button (you will receive no confirmation the operation has been successful) 3. Click the " . . . " menu button and select "Copy address to clipboard" 4. Your new EOS-ready Ethereum address has been copied to the clipboard - send your EOS tokens from exchange/incompatible wallet etc to this address 5. Wait about 5 minutes (depending on network traffic) and your EOS tokens should arrive in your wallet: <br> <center>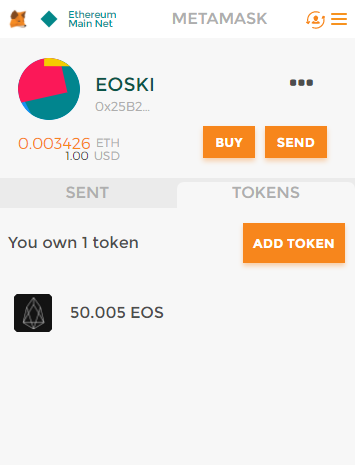</center> <br> ## Generating your EOS keys and mapping to your MetaMask Ethereum address <br> *Note: you will need a little bit of Ether in your MetaMask wallet to complete the following stage. It's annoying I know - this is why we are all switching to the fee-free world of EOS* 1. Go to eos.io, click "Tokens" and click "Get EOS" 2. Agree to the "EOS Token Purchase Agreement" by ticking the 4 check boxes and clicking "Continue" 3. Scroll down to the heading 'Recommended Configuration' and click "EOS Token Distribution App" 4. Once the interface is loaded, click "Generate EOS Key" 5. Scroll down to see your new EOS public and private keys. Back these up in multiple safe locations. 6. Repeat step five and click "I have safely backed up my private key" 7. You will receive a notification in MetaMask - click "Submit" 8. Wait a few minutes for the transaction to be confirmed and then refresh the EOS Token Distribution App 9. Success you should now see a public EOS key linked to your Ethereum address as below: <br> 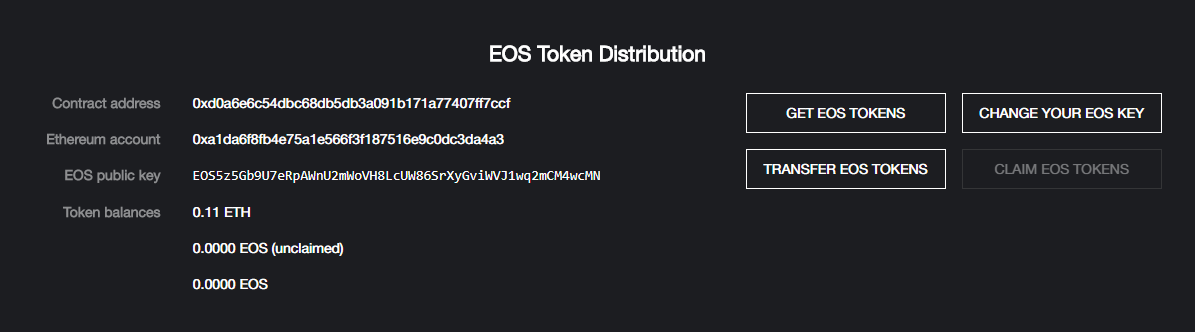 <br> *Note: If you did not have enough Ether in your account to register your key at step 7, you will have to fund your account with the required Ether, refresh the EOS Token Distribution App and start again at step 4.* <br> --- Thanks guys, I hope you found this step by step walkthrough helpful. If so, I'll gladly accept donations of Ether or EOS to the following address: 0x25b2debc0cf1f2ddcdc85f076edea58f3004e54a ### Sources twitter.com/eos eos.io <br> --- <center>**As usual, 20% of the rewards from this post will be split with @centerlink for the communal benefit of #TeamAustralia**<br>Team Aus footer by the amazing @bearone --- <br>**This post was brought to you by @msp-creativebot** </center>
👍 streetstyle, cryptoclan, networkallstar, ewuoso, jamjamfood, kimmie, spencec6, thecryptodrive, choogirl, forexbrokr, starflyer-9000, cryptomancer, gordonovich, drwom, carlosd15, reggaemuffin, sunhwa, ameis, aaalejandro, msp-creativebot, scooter77, steembusiness, stsl, mrsquiggle, jasonstaggers, retrac, pfiffel, kainmarx, centerlink, furious-one, manuel78, msp-lovebot, frostfractal, donald2, sinbaad, taylor.swift, davidk, moksamol, writer1, mikenevitt, zantylyo, fosfor, atozimin, transportir, darad, black-eye, kavez, majinchis, mazal, dgorbunov, sovok, judasp, lenionvap, benedikt, riddles, quentinmccollum, zeriodt, vauganchi, remnikh, forcebrew, danilisa876, joshuamatthe, trafalgar, zamir, ysajike, pertusin, moghmanikojind, tolpiach, stonewalker, windwindgragda, allyouneedtoknow, emimev, liavanhorn, ekpezu, volgobesti, akhybin, vlemon, gamersclassified, beulahlandeu, hedge-x, doonaberlin, sinta, africa, n3r0, sbrys, zimtente, catherinebleish, lincolnkelley, eddiekitsner, tolkatore, pugriffs, lexiconical, banjo, minnowsupport, drotto, spikedgiraffe, urs, goaln, ryivhnn, buzzbeergeek, pharesim, lucky.digger, wakeupworldnews, fiber.god, truthfreedomlove, fathin-shihab, eltomos, mdquixil, nadhora, kongwynn, namct, bengineering, kona, ogochukwu, ausbitbank, followbtcnews, goodfoods, family.life, familylife, tomshwom, hkjn, j-raza, sandwich, daniel007, up4more, alexpmorris, crypto-calipso,