Install your own local SteemNova server in a few minutes
utopian-io·@cryptoriddler·
0.000 HBDInstall your own local SteemNova server in a few minutes
#### What Will I Learn? If you want to play with your own SteemNova server, you could get it in a few minutes, when following the steps below. You will learn how you can run your own SteemNova Server under the new ubuntu 18.04 LTS. If you don't have this OS running, you can install it in a virtual machine, before starting whith this tutorial. - download the sourcecode - install the required tools - create a database - install steemnova #### Requirements - a running computer or virtual machine with a standard installation of ubuntu-18.04 (http://releases.ubuntu.com/18.04/) #### Difficulty - Basic #### Tutorial Contents To make the installation as easy as possible, I have listed the individual steps. The individual steps consist of a short description and the commands to be executed. The commands can be easily copied and pasted in the terminal window. Follow the steps below to set up your own SteemNova server in a few minutes. 1. Open a terminal window in which you have to enter the following commands. 1. Before you could get the source from GitHub, you have to install Git: <br>`sudo apt-get -y install git` 2. Get the source code from GitHub:<br>`git clone https://github.com/steemnova/steemnova` 3. Add an additionally repository<br>`sudo add-apt-repository -y ppa:ondrej/php` 4. re-synchronize the package index <br>`sudo apt-get update` 5. install all needed packages<br>``sudo apt-get -y install apache2 php7.0 php7.0-gd php7.0-fpm php7.0-mysql php7.0-curl libapache2-mod-php7.0 mysql-server php-pear php7.0-dev php-xml php7.0-xml`` 6. install the ds extension with efficient data structures for PHP 7 <br>``sudo pecl install ds`` 7. enable the extension<br>``sudo /bin/sh -c 'echo "extension=ds.so" >> /etc/php/7.0/apache2/conf.d/30-ds.ini'`` 8. install HTML_BBCodeParser2<br>``sudo pear install HTML_BBCodeParser2-0.1.0`` 9. start mysql<br>``sudo mysql`` 10. create a new database <br>``create database DB;`` 11. create a new database user<br>``create user USER identified by 'PASSWORD';`` 12. give the new user all privileges to the new database<br>``grant all privileges on DB.* to USER;`` 13. exit mysql<br>``exit`` 14. copy the whole steemnova directory to /var/www/html/<br>``sudo cp -r steemnova /var/www/html/`` 15. create an empty file with the name ENABLE_INSTALL_TOOL to enable the steemnova install tool<br>``sudo /bin/sh -c 'echo >> /var/www/html/steemnova/includes/ENABLE_INSTALL_TOOL'`` 16. some directorys need writeaccess, so you can give this rights with the following commands<br>``sudo chgrp www-data /var/www/html/steemnova/includes/``<br>``sudo chgrp www-data /var/www/html/steemnova/cache/``<br>``sudo chmod 775 /var/www/html/steemnova/includes/``<br>``sudo chmod 775 /var/www/html/steemnova/cache/`` 17. Now you can open a browser and enter 127.0.0.1/steemnova at the adress bar to start the steemnova install tool You schould get the following screen: 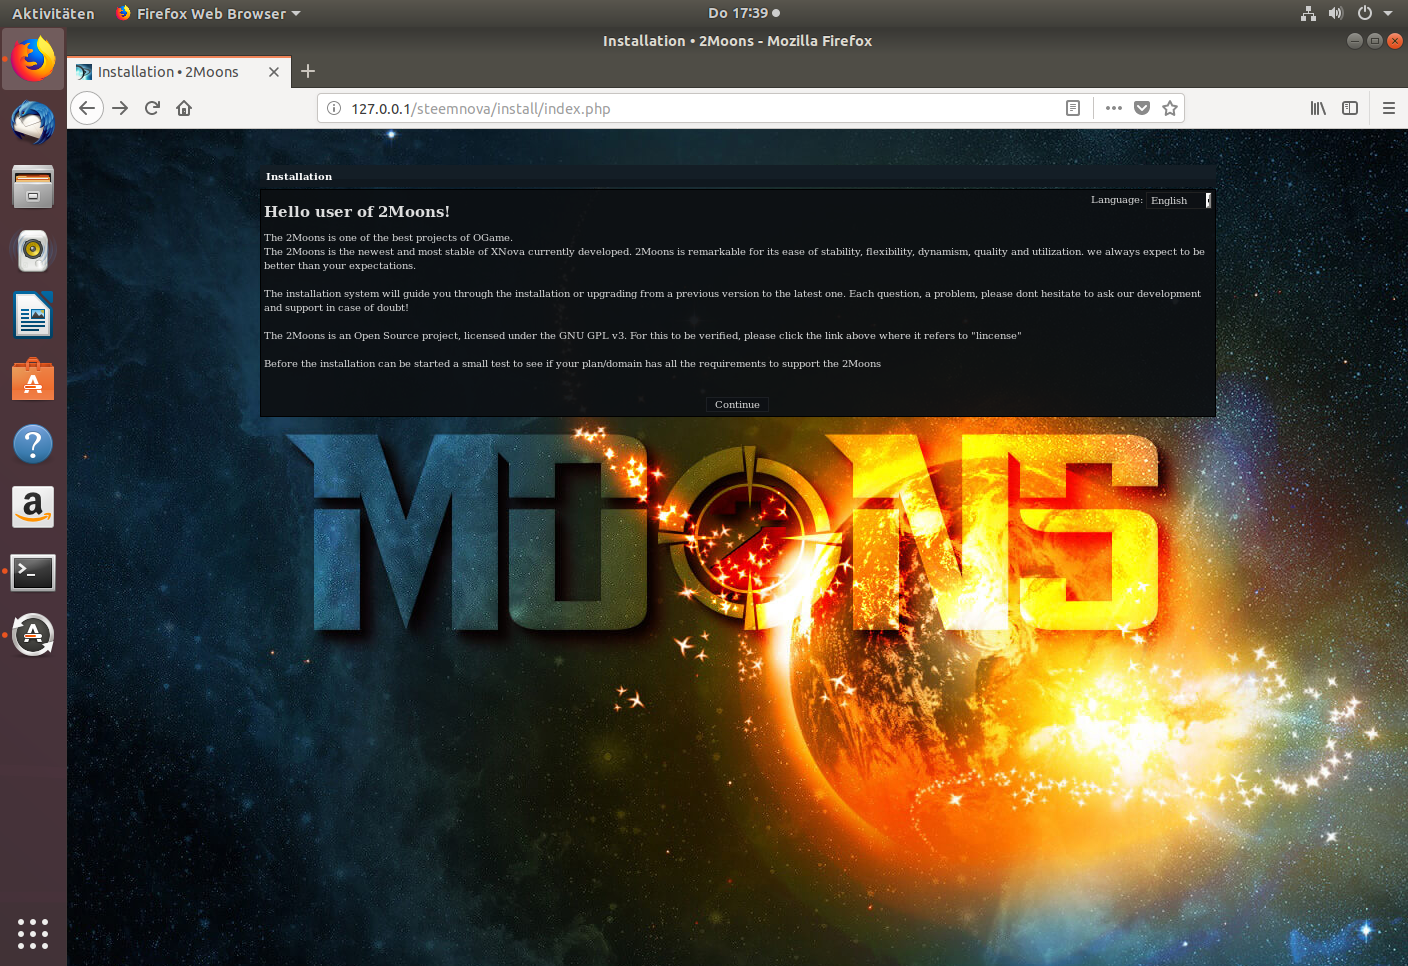 In step 2 of the SteemNova install tool all needed System requirements are shown. If you have successfully completed all the above steps, all requirements should now be met. 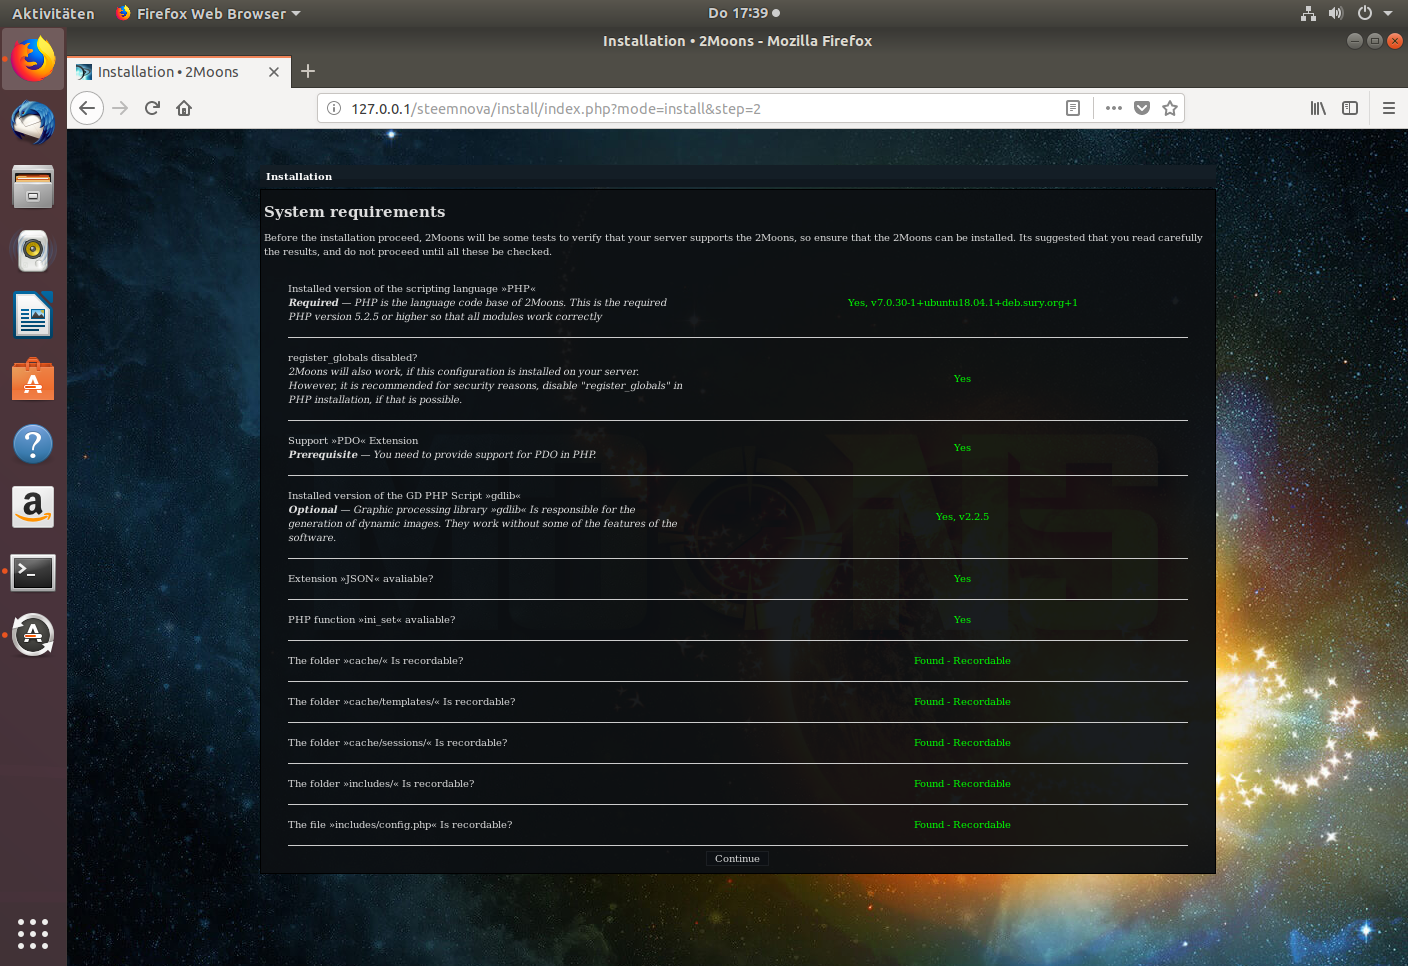 In step 3 you have to configure which DB should be used. If you use the settings from above, you have to enter: ||| |-|-| |Database server or DNS|127.0.0.1| |Database port|3306| |Database user|USER| |Database Password|PASSWORD| |Database name|DB| |Table prefix:|uni1_| 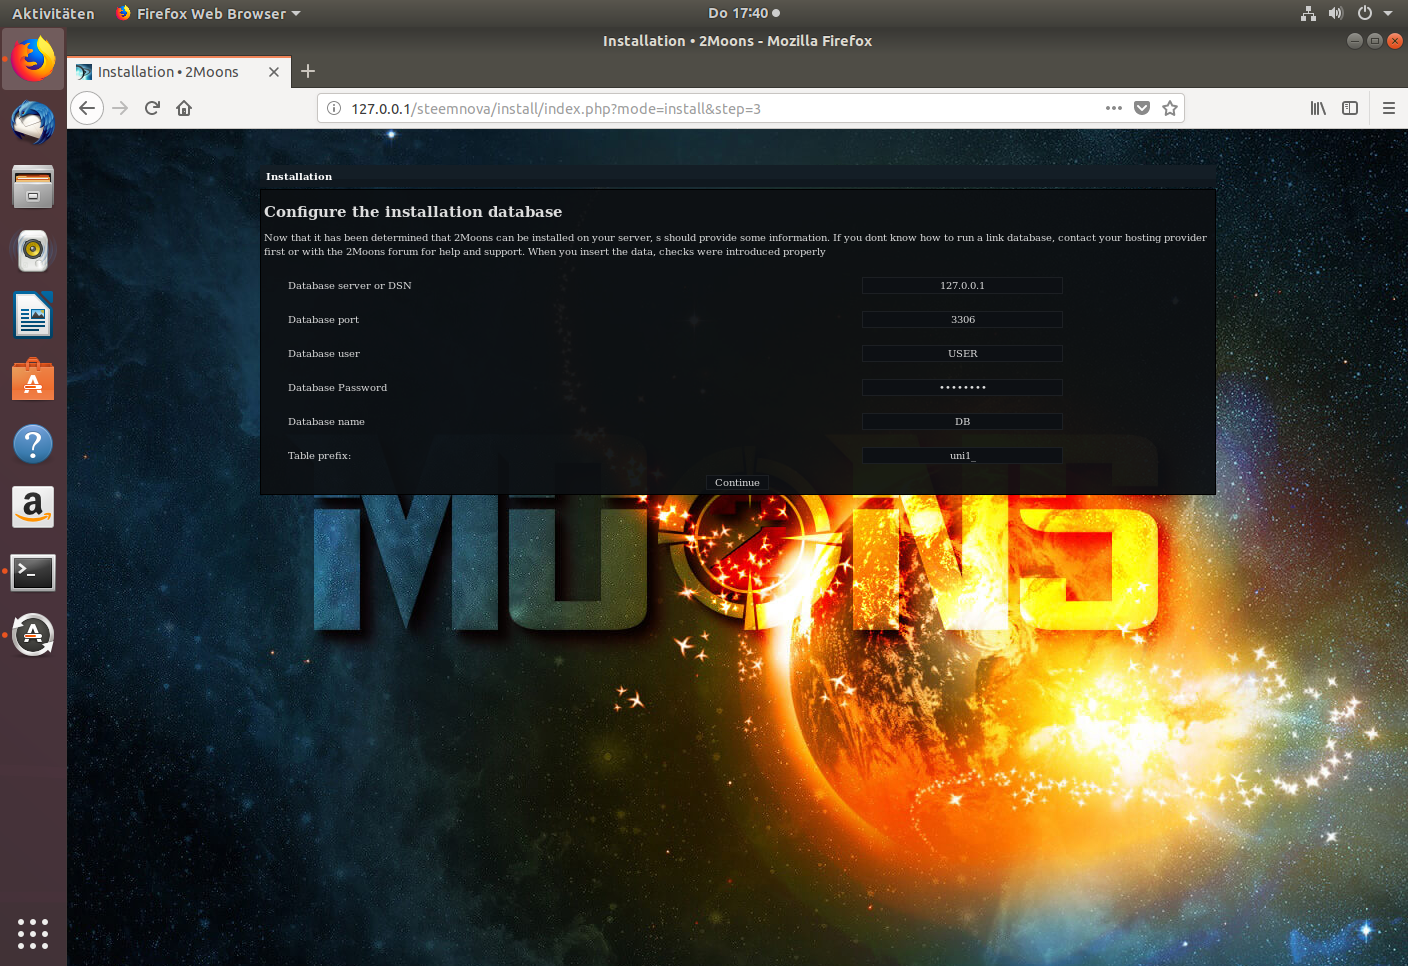 Finally you have to create an administrator account  After that you should be see the administrator panel. Here you can change some settings of the game, or just click on 'Back to Game' to start the game with standard settings. 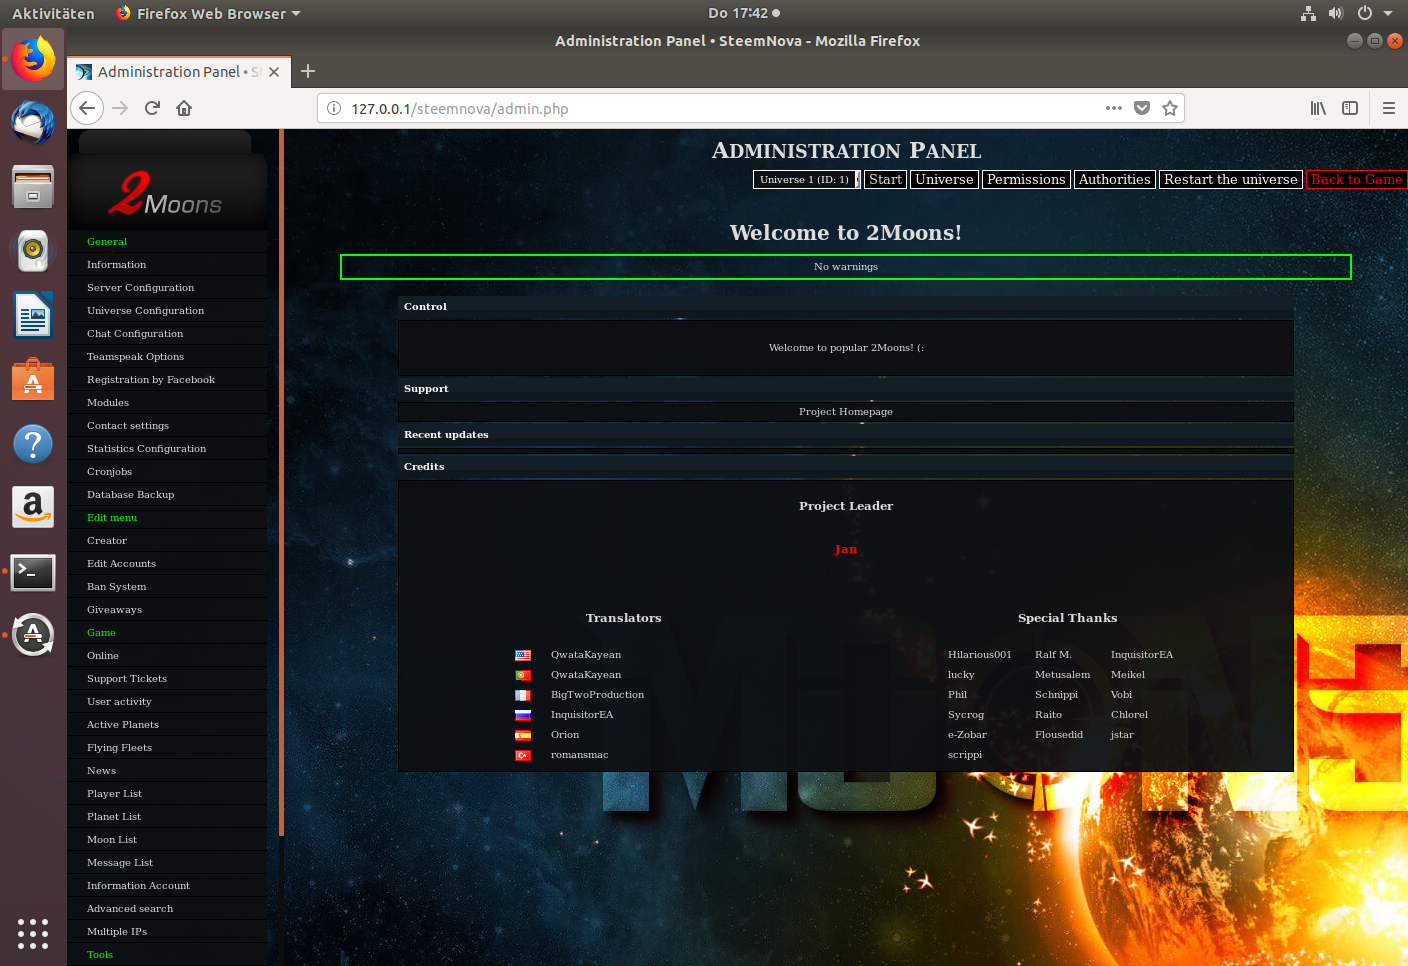 Now you can play. 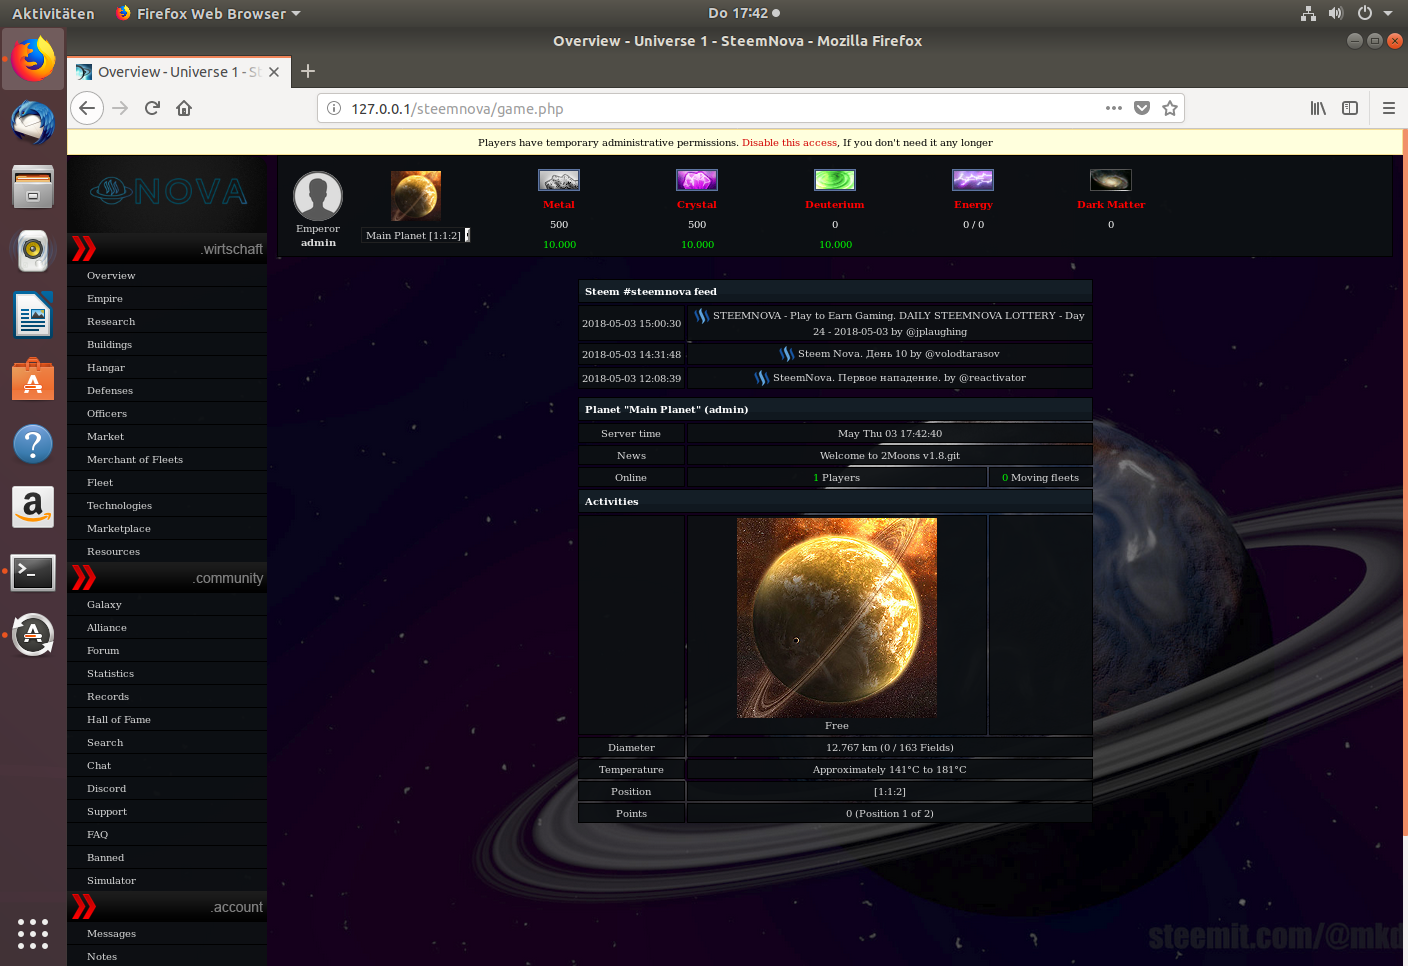 --- <br> <a href="https://steemnova.intinte.org/index.php?ref=682"><img src="https://steemitimages.com/DQmetR7Dvaue2buNMr4Xga3VvpzzX2DghWkKoyVtpzVnivg/image.png"></a>
👍 shariaislam, stomatolog2, rafaljakobsen, laijihua, duaduagenerasi, nanocheeze, hanakarukaru, inoer, moesrizal, khushbakhat, satorid, olvio, julistar, shintamonica, whale.aceh, snackaholic, kasperr, adviser, emmanueltare, francelismm, alkadre, mysearchisover, steemnova, feuerfuchs, masternemo, s7effen, ciberghost, cybernodle, akane92, dannyl, kausarm23, jeanpi1908, dovetail, cryptoskate, zazelpop, alexisimperial, meddyboulom, dreday20, chenlocus, nuttynice, samvan, murilog, krilinbotak, lifetoday, missninaholy, psygambler, diegolopezr, g4r3m, unrared, mys, filipino, cryptomeme, guidom, rsmartt777, kaziraselabedin, louis88, jfitmisc, subornadebi, pele23, dannynature, muhammadarif, ade17, pattoounlimited, mayapada, utopian-1up, helo, mahdiyari, ronimm, simonluisi, thinkkniht, stoodkev, ansonoxy, eastmael, jamesbarraclough, espoem, odebgaming, moorkedi, kslo, nathalie13, not-a-bird, bitopia, berkaytekinsen, evilest-fiend, navx, family.app, maphics, phgnomo, amosbastian, proffgodswill, sweeverdev, rhotimee, howtosteem, nightdragon, opulence, dexter24, dyancuex, ilyastarar, jfuenmayor96, instantania.cat, harshallele, jesdn16, xtramedium, bhim, luisrod, smafey, gotgame, silasvogt, afrin12, steaknsteem, kimaben, eleonardo, zohaib715, checkthisout, handfree42, ilovekrys, not-a-cat, varja, sebastiengllmt, carsonroscoe, zlatkamrs, xplore, layanmarissa, kodeblacc, jerybanfield, sijobe, kekegist, solomon507, patatesyiyen, deejee, rsteem, onin91, isabella394, emailbox19149, videosteemit, lemony-cricket, saifannur-mzy, yeswanth, exploreand, petvalbra, hmctrasher, photohunter1, photohunter3, photohunter4, photohunter5, kingsman2, livsky, tailslide, roj, andiepumpgun, aderemi01, soykatherine, killbill73, amirdesaingrafis, fai.zul, criptokingko, reazuliqbal, aliyu-s, muratti, flinter, mwfiae, nikema, carlitojoshua, donjyde, nonsqtr, crispycoinboys, bluestorm, wirdayulahya, jayo, sugandhaseth, pepememes, animesukidesu, lsanek, lykia, realness, musicbot, flugbot, gydronium, masterofdisaster, truthtrader, gnaimul, editorspicks, darkassassin, cryptocopy, artsyunicorn, minersean, flauwy, nanwaiwaimyint, naideth, mela65, mountainjewel, annyvery1, naturallife, organicgardener, sampath94, maribelanzola, pixelproperty, knot, ahmad097, sharminwadud, ernoldlvb, kryptogermany, clevershovel, nazmulrana, godsngh1, sazid36, syahrin, oezixxx, studytext, lemcriq, frieder, downtempo, santom, gluttony, ewuoso, esme-svh, biplob12, odesanya, camillius, estherekanem, kaell, hendragunawan, toninux, fabiocola, soydandan, umut1905, desteemy, salahudeen, chi-bike, wealth4good, odibezeking, tradergurl, michelios, karimelshami, jdc, devilonwheels, abbyrich, solpaman, ramadhanil, cubitknot, steemassistant, skorpsim, bargolis, phasma, carloniere, steemitcanarias, vladalexan, saksham, phogyan, hillaryaa, techmojo, idlebright, adhew, shenoy, thescholarlyowl, jrmiller87, kaking, kucukprens, gwapoaller, khairulfahmi92, isaganicabrales, chester3636, francoissagat, zeropointmax, j1984mg, kostybrat, gregan, spe3dy123, yazdani33, mister80, blessu, lukas-schulz, loool, ipo64, e-alex, overunitydotcom, galoisconnection, stephan-b, matools, akifane, santamorillo, abrahanibarra, hazem90, exhige, bitcoinsandgravy, benilda, bate, caribbeancrypto, cryptodelos, mahlilfisher, adypur, damotil, doughtaker, masuri, dare456, bluemoon, cryptowarrior88, darkknight-m, rjrubel23, sami10, cauac, jooley, gametrailerflash, kumillla, carterx7, tomixdante, john455, shirish5, nemenge, darkstar-42, waniara, coreychambers, cryptobite, firesteem, ipman62, bradfordtennyson, kenmwolfgang, chamath, thethreehugs, sshappydayz, john8284, khaled1234, airbud23, fayescott, treeplanter, freeyourmind, soumiit, cryptochallenge, antonsteemit, danielfinn, steemiens-guide, marzuki-r, fouadbenlarbi, freemon, professional954, ahsan11, someonewhoisme, bionade24, shelleyplum, k4v2n, fashionmodels, bitland, twilliams, farukcom, rensoul17, sixexgames, alam1234, ifunnymemes, sarez, afsheel, mrfantastis, paluchie, juanpablo1, stevecronin, sapferdi, wuwurrll, teachinthai, cryptogrant, omardel, khurmi, sageyuan, raju1818, rashadkhan, pmiller2176, rmp, maar0106, sakib007, johnquake, idalaili1974, mdmehedi94, lekspot, davejorsky, r-one, psicoparedes, zakerin, nomadics, drubo4145, reko, crystalhuman, thesiam, ascendedmonkey, haveaheart, deletefacebook, multiplicity, munkiioh, dabstars, dabstar, vlemon, fatkat, vijbzabyss, nurulafsar03, blockgators, ihsan19, penantang, buti95, ariffashraff, eddieboo, teevmoore, will12, anam01, erreute, techsfair, krvin, awesome-p, alj, kennybrown, amayahaley21, daeshawn, sukro, moscato, osobiggie, moissrams, aescpe1, virus95, samdman, petcompilations, herbsgalore, hkniazi, mateusz.antosiak, frost15, queenzoe, mrmastercryptow, lusmerb, zanityplus, putrabone, ahmed.rahat, grzesiek94, abrar323, realitytunnel, drekkelly, steemfart, cryptoexpert0, biswatube, usibrahim, richard5ds, jeromesenyonga, edgy, nathanjames, harrisonmack, master-minds, paandooora, malinex, berkkrgzz, dondimaric, alexter, justinadams, marek.bogacz, yone4life, cocainfromjesus, greenprogrammer, mytokenyandexru, imanolm, xarvixu, bashan, aervin11, morphewq, hakansahin,