Tutorial Modelado 3D Vehículo "El Batimóvil" (6ta Parte)
spanish·@josefmedinar·
0.000 HBDTutorial Modelado 3D Vehículo "El Batimóvil" (6ta Parte)
***  <center><a href="https://youtu.be/bjOnIdFFULc" target="_blank">Fuente</a></center> <center>[](https://gifyu.com/image/L8AP)</center> *** >Todo el material audiovisual presente fue extraído de mi canal de YouTube: </div><center><a href="http://www.youtube.com/subscription_center?add_user=josefmedinar" target="_blank"> <img src="http://i.imgur.com/dFxCgls.jpg" width="1" height="5" ></a></center> *** <div class="text-justify"><div class="pull-right"><img src="https://i.imgur.com/y2NoPn3.jpg" /><a href="https://galaxytoysandcomics.com/products/copy-of-jada-toys-metals-die-cast-1966-classic-tv-series-batmobile-with-batman-and-robin-figures-1-24-scale-diecast-model-car-black-98259">Fuente: THE DARK KNIGHT™ BATMOBILE™ WITH BATMAN™ FIGURE 1/24, DIECAST MODEL CAR, BLACK - 98261</a></div> Buen día amigos de steemit, sean bienvenidos a la continuación del tutorial modelado de vehículo 3D, en este caso El Batimóvil. </div> <div class="text-justify">En esta oportunidad diseñaremos el disco central del neumático delantero y una pieza de la carrocería con una forma muy particular e interesante. </div> <div class="text-justify">En cuanto al diseño del disco central es algo sencillo al principio pero luego utilizaremos una nueva herramienta muy útil llamada "Deformador Esferizar" y lo podremos ver actuando a continuación: </div> 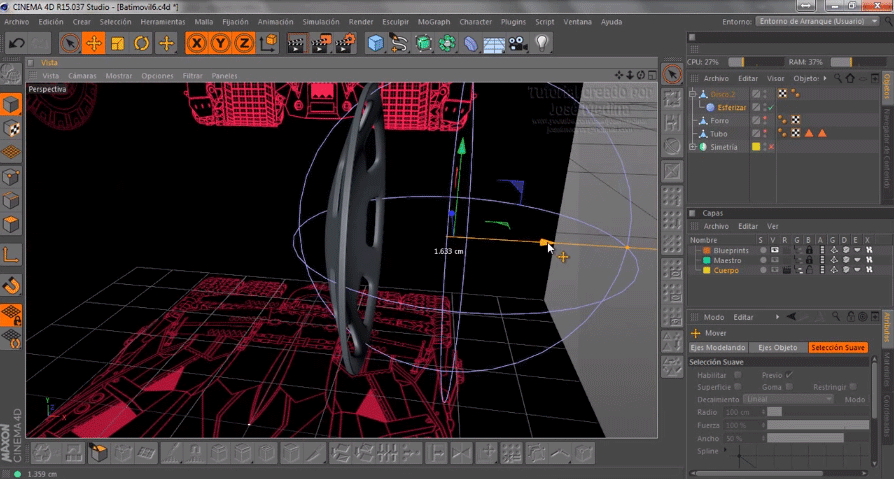 <center><a href="https://youtu.be/bjOnIdFFULc" target="_blank">Fuente</a></center>  <center><a href="https://youtu.be/bjOnIdFFULc" target="_blank">Fuente</a></center> *** <div class="text-justify">Posteriormente realizaremos la pieza de la carrocería a partir de la pieza máster ya configurada: </div>  <center><a href="https://youtu.be/bjOnIdFFULc" target="_blank">Fuente</a></center> <div class="text-justify">Realizamos una serie de movimientos y rotaciones al igual que varios cortes para poder obtener la forma deseada: </div>  <center><a href="https://youtu.be/bjOnIdFFULc" target="_blank">Fuente</a></center>  <center><a href="https://youtu.be/bjOnIdFFULc" target="_blank">Fuente</a></center> <div class="text-justify">Obtendremos el siguiente objeto, con un muy buen acabado: </div>  <center><a href="https://youtu.be/bjOnIdFFULc" target="_blank">Fuente</a></center> <div class="text-justify">Culminando de esta forma la sexta entrega de este increíble tutorial: </div>  <center><a href="https://youtu.be/bjOnIdFFULc" target="_blank">Fuente</a></center> <div class="text-justify">Espero que al observar este pequeño preámbulo te animes a realizarlo. Como siempre cuentan con el tutorial completo al final de cada post. </div> >Cualquiera de mis tutoriales pueden ser realizados en cualquier software de diseño 3D!!! *** A continuación el tutorial completo: <iframe width="560" height="315" src="https://www.youtube.com/embed/bjOnIdFFULc" frameborder="0" allow="autoplay; encrypted-media" allowfullscreen></iframe> Saludos y hasta la próxima parte... *** <center></center>
👍 penghuren, dineroconopcion, zonabitcoin, sevillaespino, alejandroortega, alexicp, marlozad, raiser, yohannagotopo, kal-el, ernick, elprutest, jacksonmil980, hanna900, littleroger, feltoxxx, ozorio, seikatsumkt, andriusangronis, lordantoni, yorbin17, jeander, emperatriza, arpost, laloretoyya, angelusnoctum, danieelab, sangronisgregori, shnayder, jospig, ncoz98, cryp2me, lamari, archildo, floresrg, tatty, djkrad, nothingmatters, ubikalo, nuevaeconomia, balfred, giobarco, alfargenis, josefmedinar, angiejuliethh, proelite, henlicps, alebricke, adrianvillalobos, moiscapsesii, christianvas, gladysb, chepexx, alcidsmujica, franciaguerrero, ignacioarau, makemoneynow, enriquerodriguez, naysayer, alexanderlara, chrismma1, dgcarlosleon, fjcalduch, musicayfarandula, elianabe, kastiuz, caturrox, ceciliao, yulicvh, ralber, alexmorenoec, jexpro, joseforo, vidafitnessfeliz, daneftaly, ppita, elsociooficial, jcrodriguez, hendersonp, cesarclaudio, pequef, ricardoquintero, bibiuz, fsegredo1, tatianaalbornoz, helengutier, samuel-film, analistbit, exe8422, mamacharo, zcevallos, laqsking, aballarde53, sarahjireth, jessalin, megaela, walad, blatross, ottto, yarimasilva1974, chefrose, hevictor, rosmarreyes, ramonoropeza, gabob25, minipon15, yoneidernovoa, nayaritvenuti, yerlika, rosetargaryen, wilmerh, robertojavier, yesialv, jetsurypadilla, nguoiviet, gogriffs, jacobyu, ubik, travelnepal, duartenunes, beauknows, meysam, noobsin, chaimyu, lila-wish-genie, xabi, makhzar, kwakumax, marksheppard, stuttgart, dorianabdullahu, stephen.king989, landonator, jun04035, tandemus, panql1979, azorahai77, travelmuse, madviking, mrshark, agussafrizal, steve1122, maksola, jois, lady-lovel, maxwel, liverehab, cygon, alishapti, jondahl, bembelmaniac, killvrill, donovan313, bcrafts, scottcbusiness, cryptovisitor, araujo, sohel7421, steemnova, tatyanamishenko, yuliana, philhyuntd, gamemusic, rahulsingh25843, lucashunter, carmalain7, akshaykumar12257, valchiz, arshi, kakaotalk, evilrabbi, terrenceh, ungest, thephotographers, glayre, fishdd, hilvarion, robertking, minnowsupport, pharesim,