[ESP | ENG]-COMO HACER UN GIF 3D ANIMADO CON KEYSHOT/HOW TO MAKE AN ANIMATED 3D GIF WITH KEYSHOT
hive-148441·@kryptonita·
0.000 HBD[ESP | ENG]-COMO HACER UN GIF 3D ANIMADO CON KEYSHOT/HOW TO MAKE AN ANIMATED 3D GIF WITH KEYSHOT
 Hola hivers; Espero! Qué, como siempre, se encuentren muy bien en todos los aspectos de sus vidas : ) Les comparto otro mini tutorial. En esta ocasión y aprovechando el material previamente realizado, para mis post anteriores, decidí: Hacer un GIF animado del logotipo de HIVE, en 3D con el software KEYSHOT. >Hello Hivers, Wait! May, as always, be very well in all aspects of your lives:) >I share another mini tutorial. On this occasion and taking advantage of the material previously made, for my previous posts, I decided to: Make an animated GIF of the HIVE logo, in 3D with the KEYSHOT software. 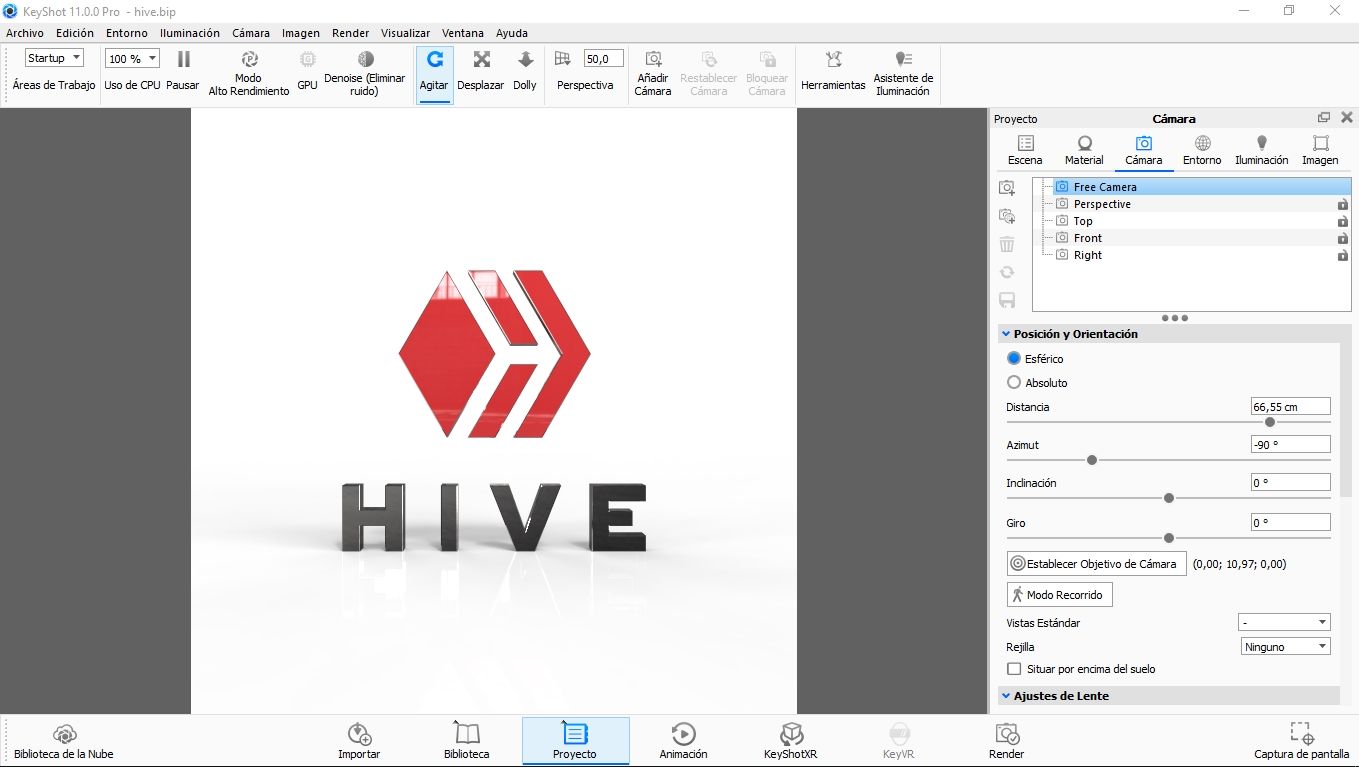 1- Importamos ó abrimos el modelo a utilizar, en KEYSHOT para hacer la animación 3D, con la exportación a formato GIF animado. >1- We import or open the model to use, in KEYSHOT to make the 3D animation, with the export to animated GIF format. 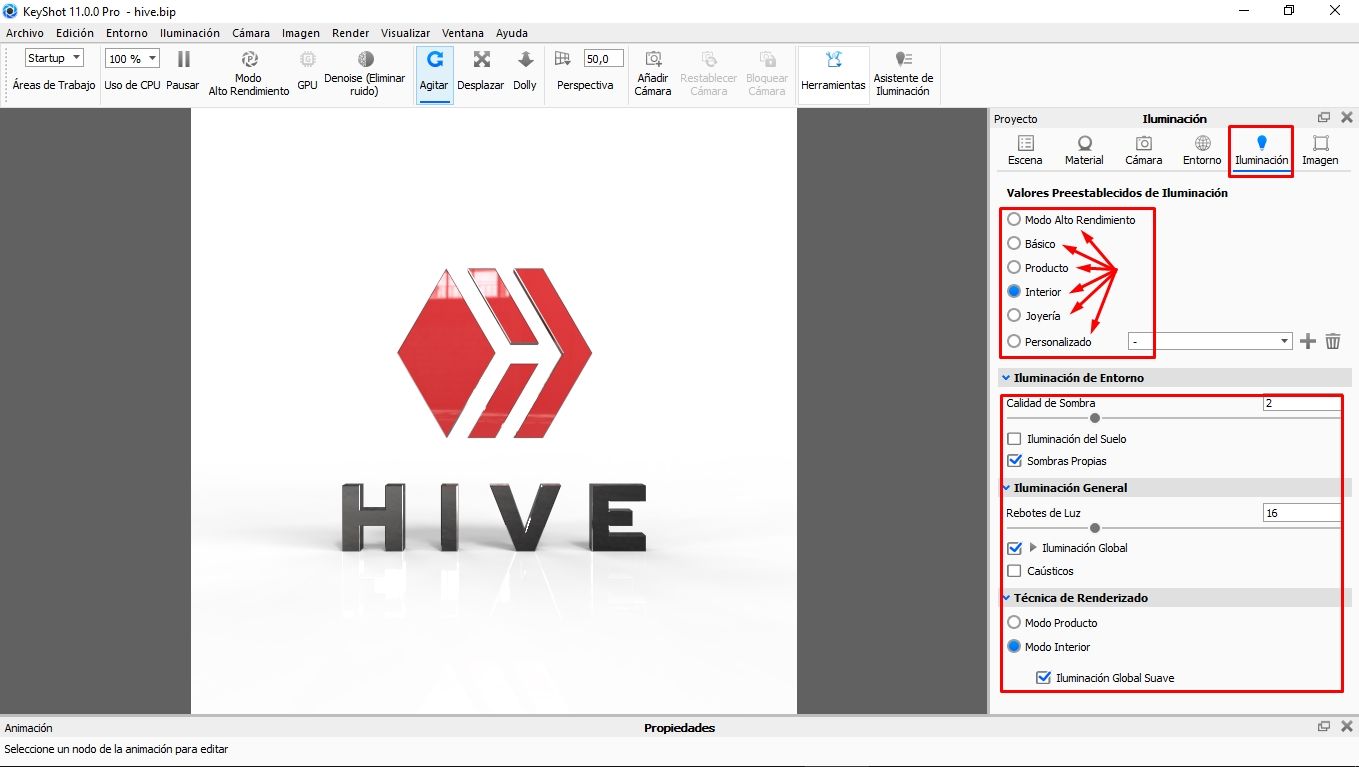 2- Cliqueamos en la pestaña de Iluminación; Para ajustar la calidad de nuestra animación. Yo utilicé para este tutorial el modo **Interior** - Si queremos hacer un renderizado rápido y de baja calidad seleccionaremos **Modo Alto Rendimiento** - En los controles inferiores también se pueden hacer ajustes para aumentar o disminuir la calidad. - Al modificar alguno de los valores inferiores; Cambia automáticamente al modo **Personalizado**. 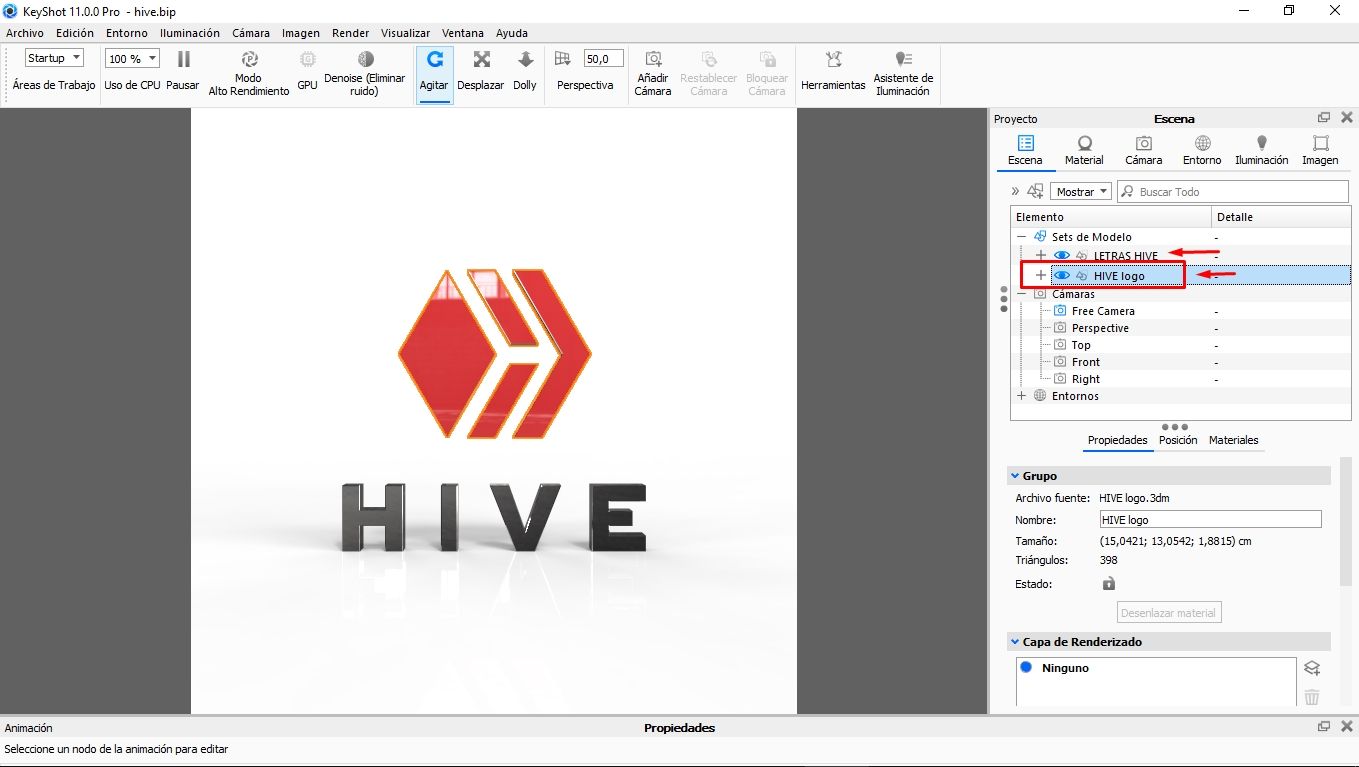 3- Si queremos animar solo una parte del modelo; Tenemos que tenerla separada en una capa o grupo distinto. - En este caso utilicé solo la parte superior para hacer la animación. 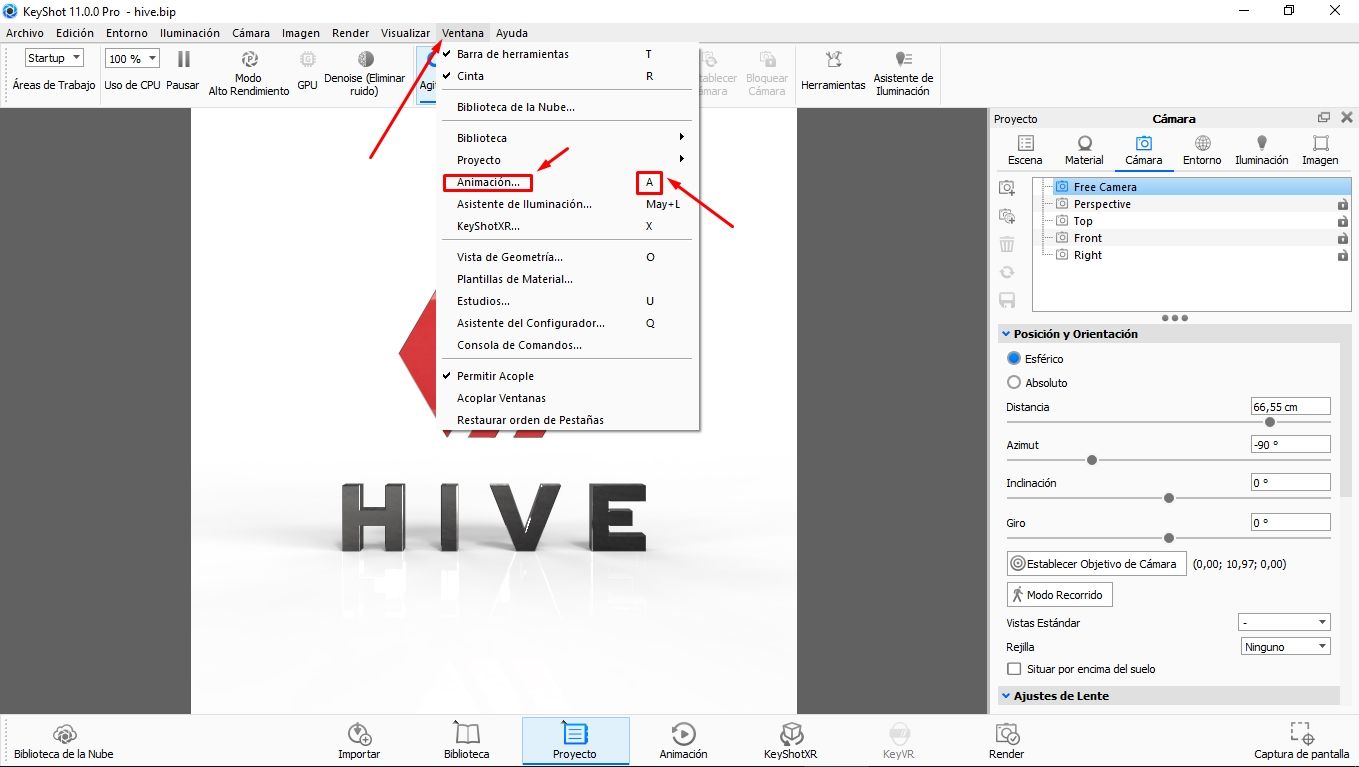 4- Una vez definida la distancia y vista de cámara; Cliqueamos en la pestaña **Ventana** para abrir la línea de tiempo de **Animación**. - También podemos hacerlo con el comando de teclado. Presionando la tecla: **A** 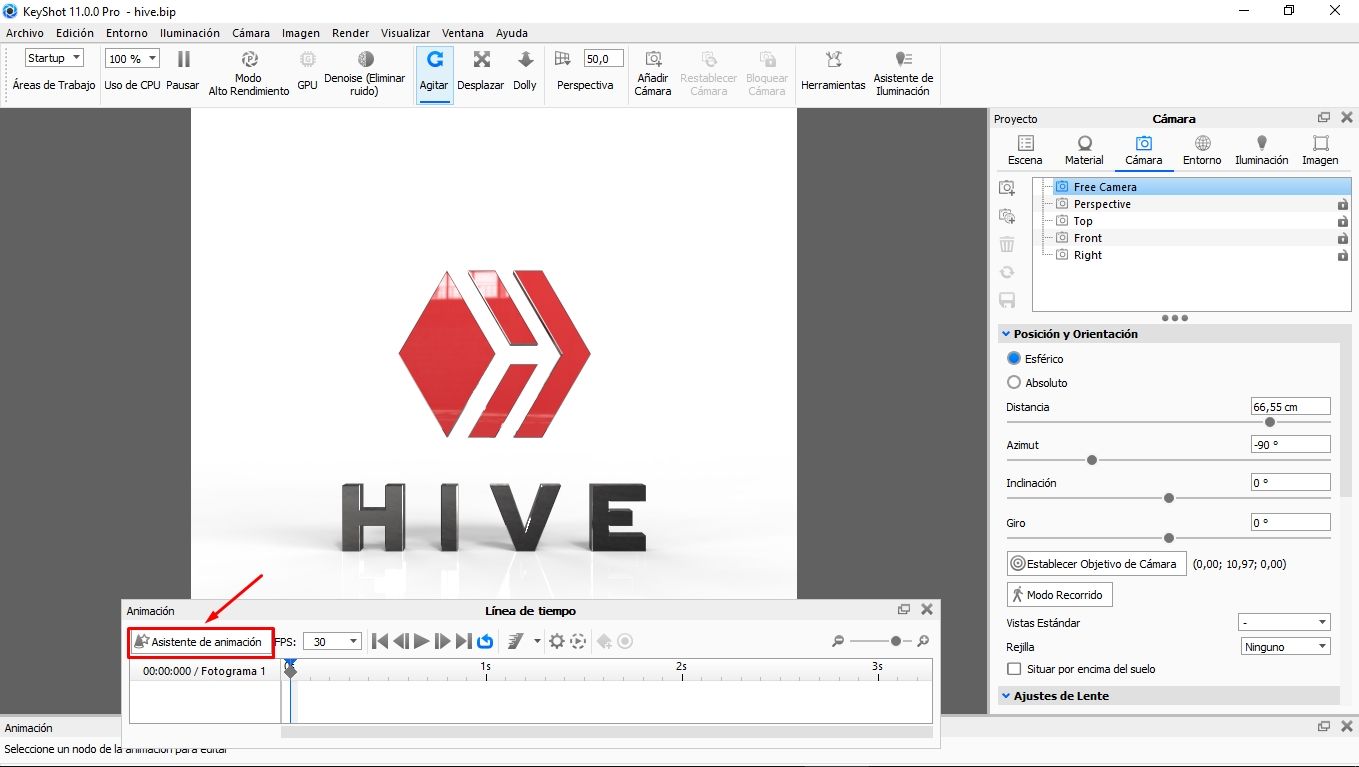 5- Una vez abierta la ventana de **Animación**; Cliqueamos en la pestaña **Asistente de animación**. Para proceder a configurar: El movimiento, tiempo y dirección de rotación. >5- Once the **Animation** window is open; Click on the **Animation Wizard** tab. To proceed to configure: The movement, time and direction of rotation. 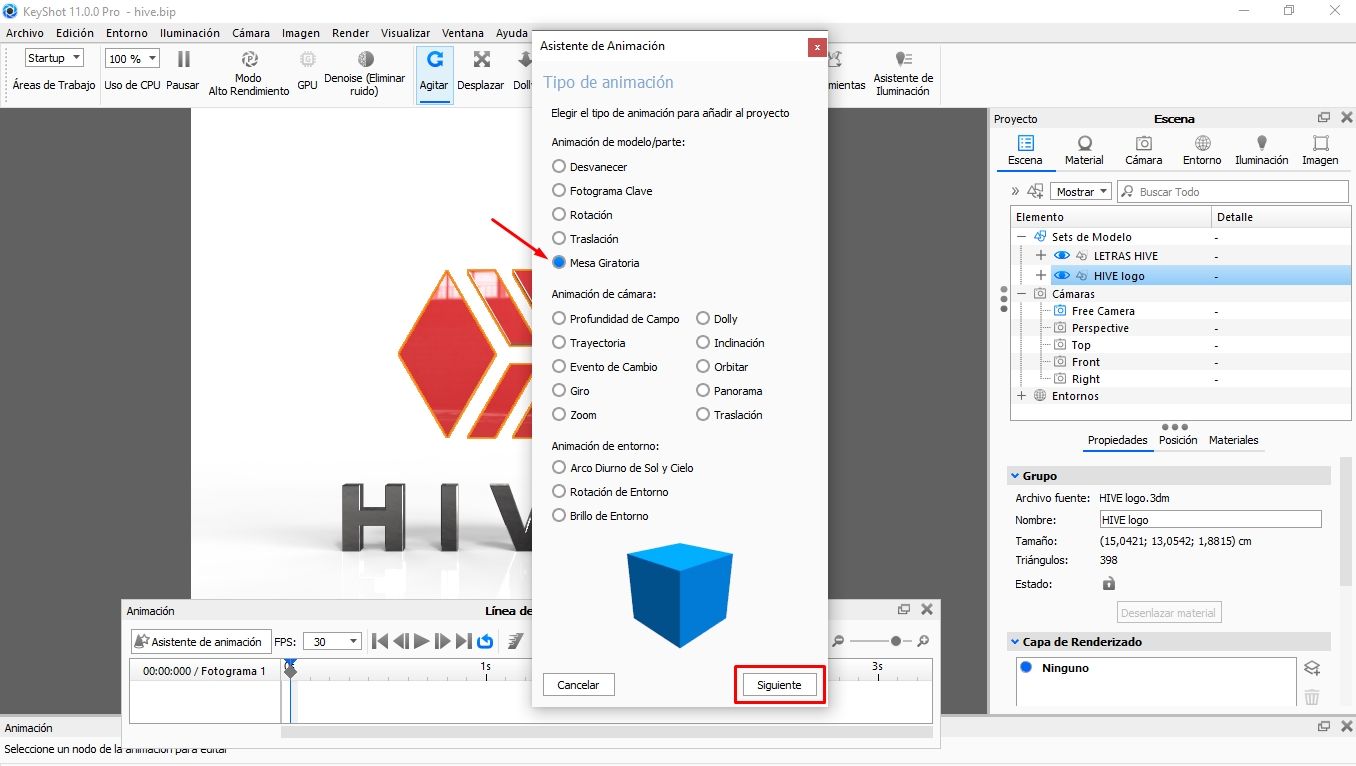 6- En la pestaña Asistente de animación y para este tutorial elegí **Mesa Giratoria**. - El cubo azul muestra una previsualización del modo seleccionado; Si se desea tener una idea del comportamiento se puede ir seleccionar uno por uno para tener una idea antes de cliquear en **Siguiente.** >6- In the Animation Wizard tab and for this tutorial I chose **Turntable**. - The blue cube shows a preview of the selected mode; If you want to have an idea of the behavior you can select one by one to get an idea before clicking on **Next.** 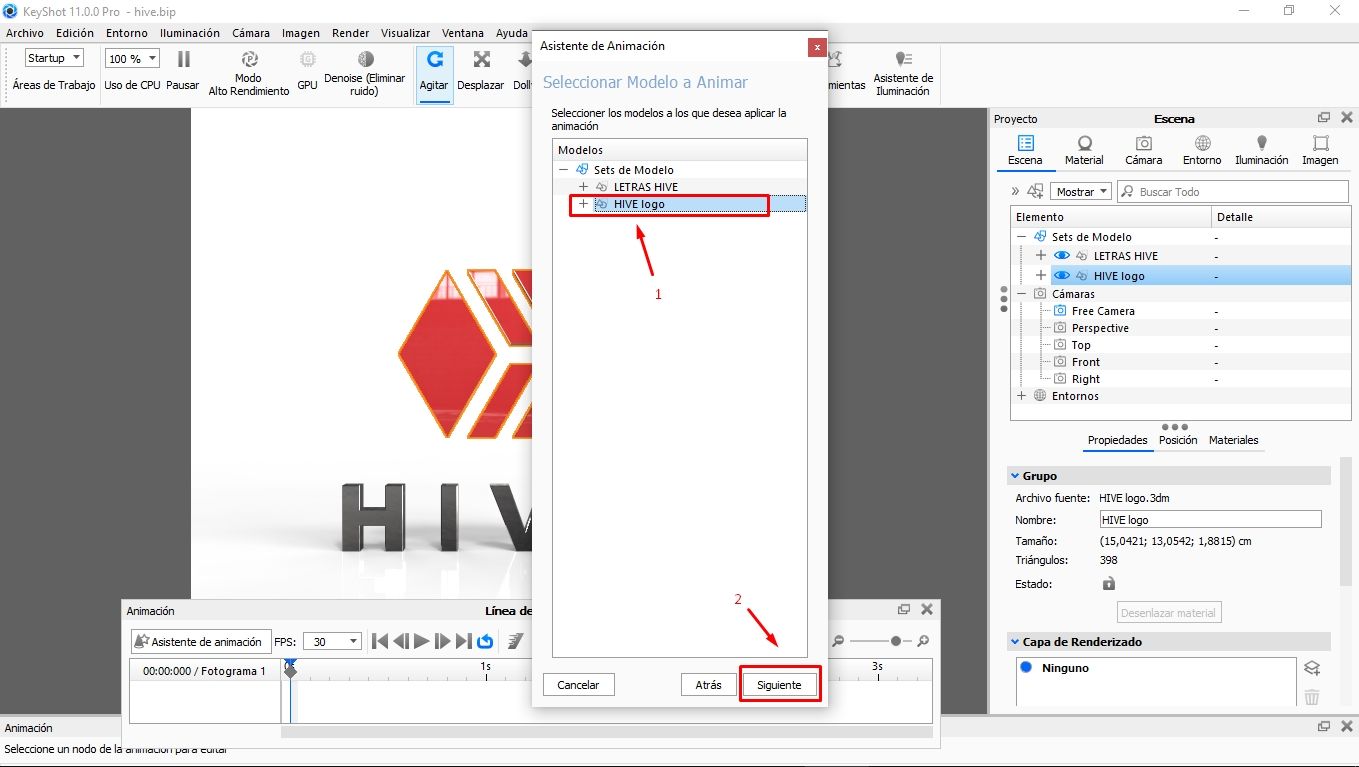 7- Procedemos a elegir la parte del logo que vamos a utilizar para nuestra animación. Cliqueamos en **siguiente.** >7- We proceed to choose the part of the logo that we are going to use for our animation. We click on **next.** 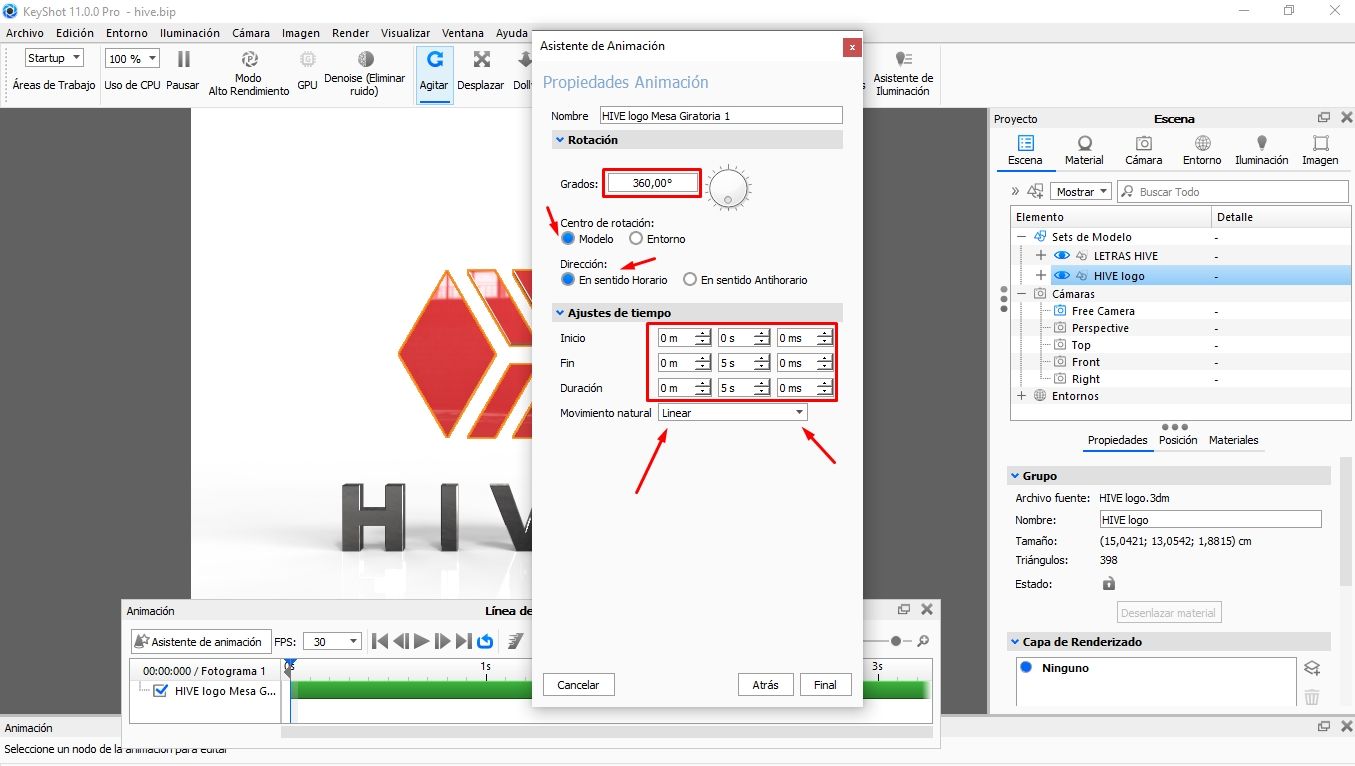 8- Para finalizar los ajustes de animación asignamos los valores de; **Grados, modelo, sentido horario y el tiempo de inicio, fin y duración.** - Cliqueamos en **Final** para poder ver una vista previa antes de proceder al renderizado y exportación. >8- To finish the animation settings we assign the values of; **Degrees, pattern, clockwise, and the start, end, and duration times.** - Click on **Final** to see a preview before proceeding to render and export. 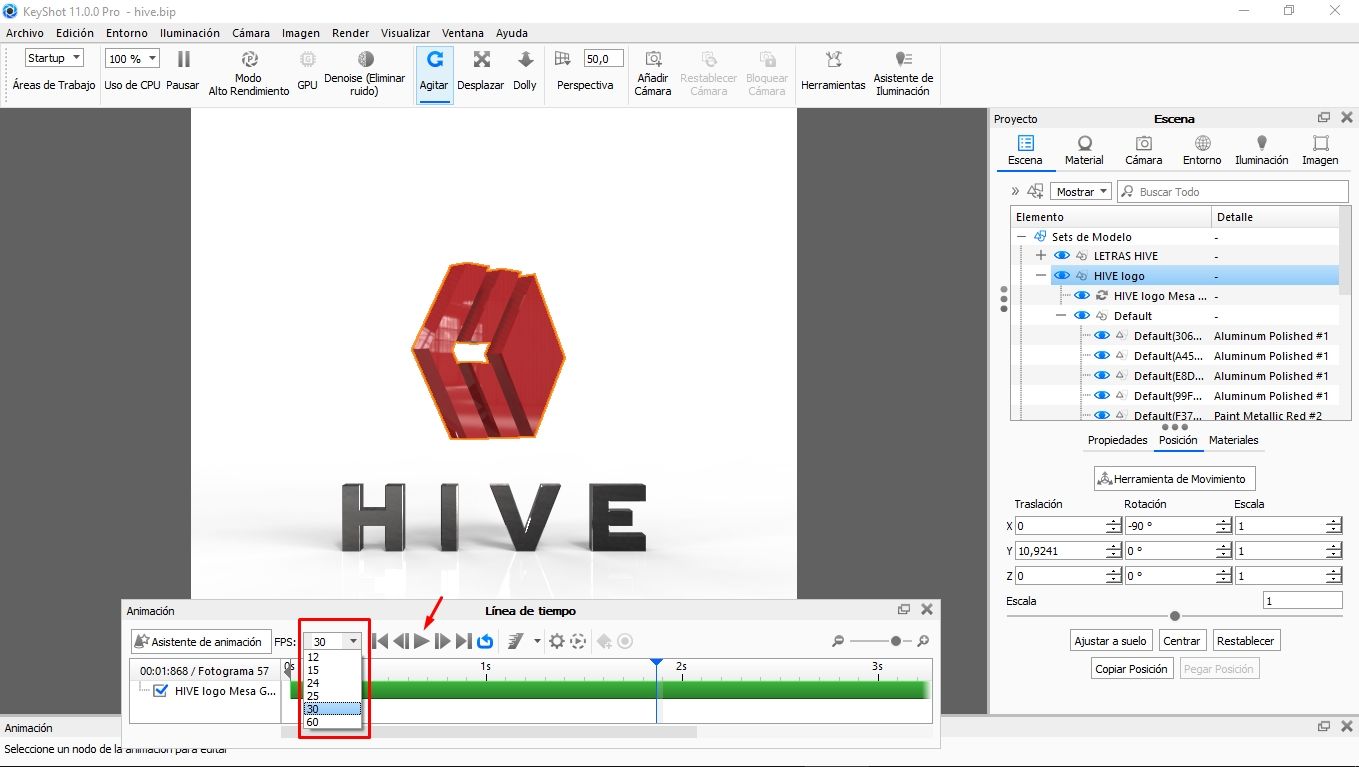 9- En la ventana de **Animación**; Cliqueamos en **FPS:**(fotogramas por segundo) y seleccionamos el valor para obtener mayor o menor calidad de la animación. - A mayor cantidad, Mejor calidad: También hay que considerar que; Aumenta el peso del archivo final GIF. Ya que son mas FPS a renderizar. >9- In the **Animation** window; We click on **FPS:**(frames per second) and select the value to obtain greater or lesser quality of the animation. - The greater the quantity, the better the quality: We must also consider that; Increase the weight of the final GIF file. Since they are more FPS to render.  10- Procedemos a hacer la exportación de la animación; Y para ello tenemos que renderizar todos los FPS. Cliqueamos en la pestaña **Render**. >10- We proceed to export the animation; And for this we have to render all the FPS. Click on the **Render** tab. 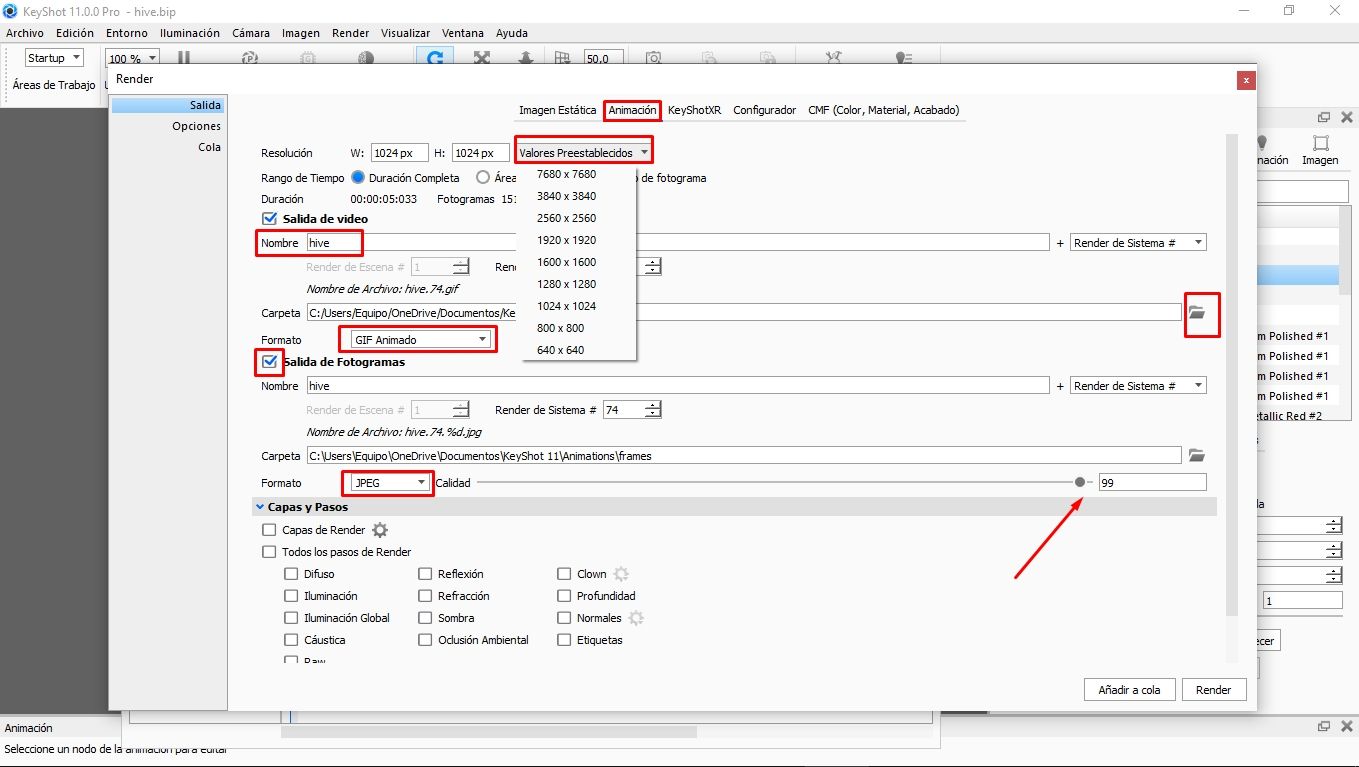 11- Abierta la pestaña **Render**, cliqueamos en la pestaña **Animación** y hacemos los ajustes de expertacion finales tales como: - **Resolución** - **Nombre** - **Ubicación del archivo** - **Formato (GIF)** - **Salida de Fotogramas** "solo si quieres obtener todos los fotogramas separados individualmente". >11- Open the **Render** tab, click on the **Animation** tab and make the final expert adjustments such as: - **Resolution** - **Name** - **File Location** - **Format (GIF)** - **Output Frames** "only if you want to get all the frames individually separated". 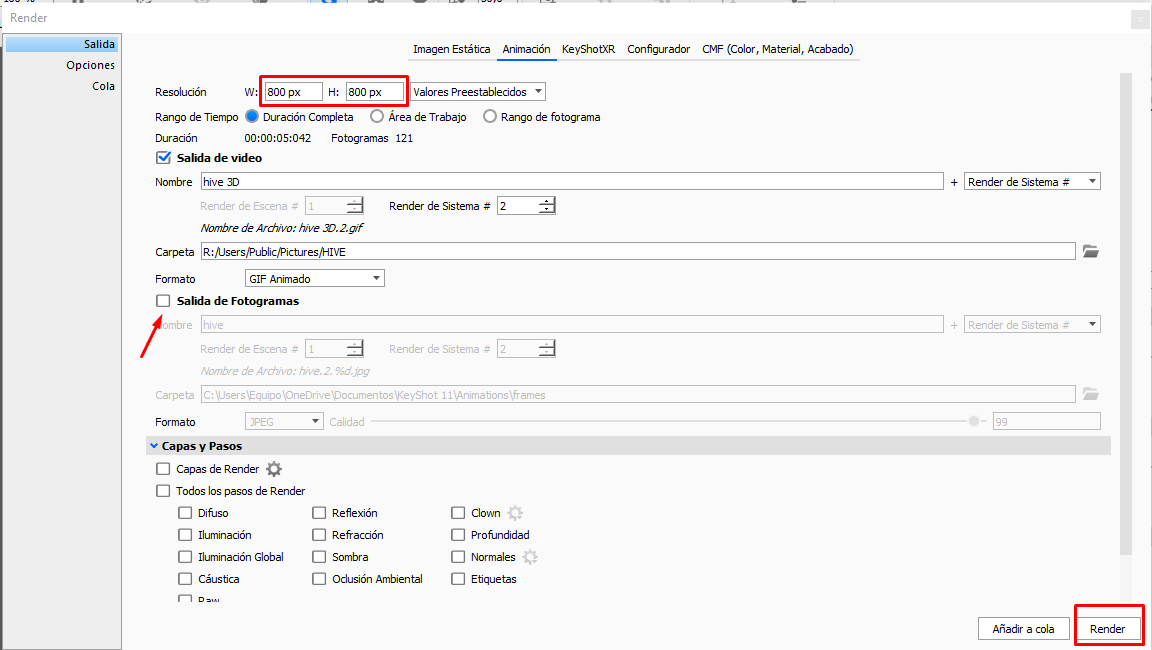 12- Una vez hecho todos los ajustes; Cliqueamos en **Render para finalizar nuestra animación**. 12- Once all the adjustments have been made; We click on **Render** to finish our animation.  Y este fue el resultado! Espero que les sea util y gracias por ver mi contenido; Cuídense mucho...
👍 roelandp, spaminator, josevillanueva, evelynchavez, fullcolorpy, delirius, jonatansanders, xelenium, wgonz, egonz, pepitagold, gracerolon, pastorencina, comandoyeya, sponge-bob, son-of-satire, cyclope, exchangethis, goldbuyer, least, agustinaka, gladiannys, jennyburgos, marnaza, angeli.mau, informatica, bsas, btu, bcc, hijosdelhombre, terminado, jhelbich, kurkumita, abrahan414, pdq, nazomimatute1998, meritocracy,