Making a beautiful lamp from scrap materials / (ENG/ESP)
hive-130560·@lauracraft·
0.000 HBDMaking a beautiful lamp from scrap materials / (ENG/ESP)
<center> 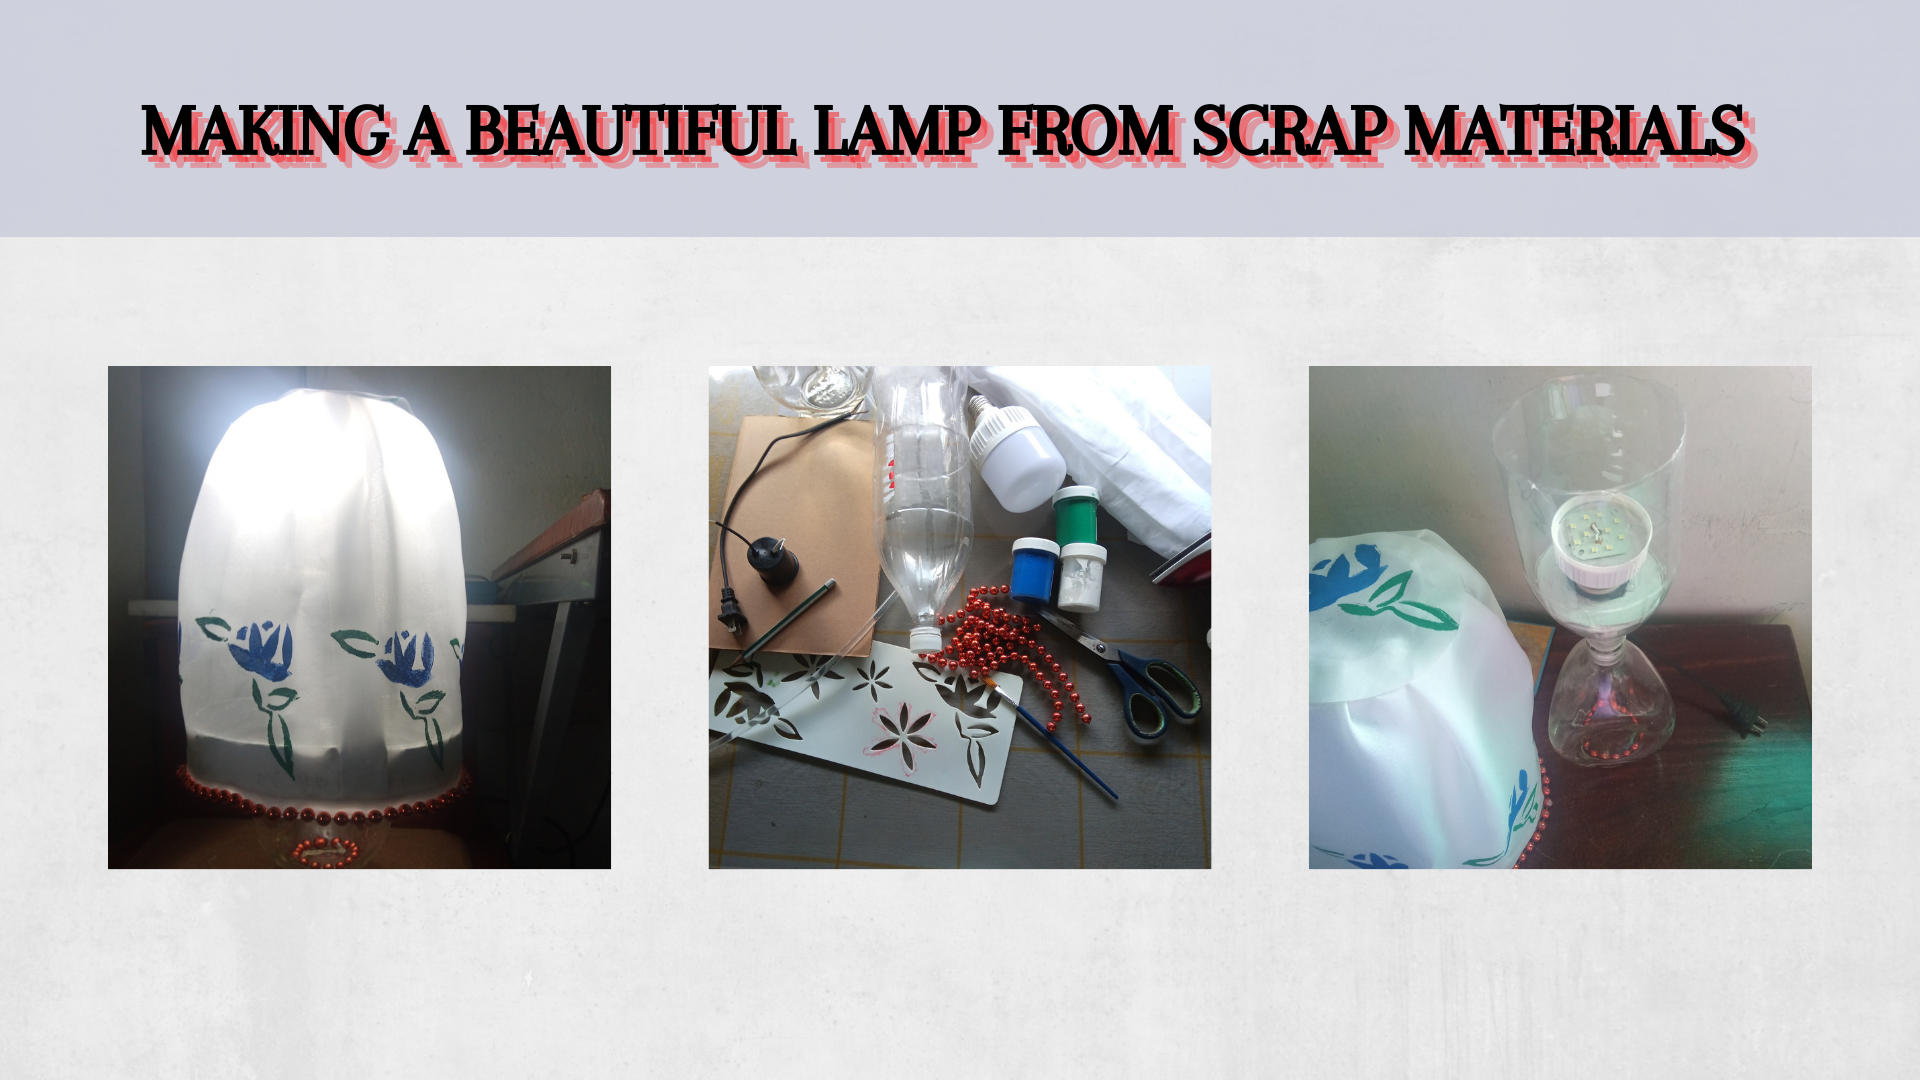 </center> <div class="text-justify"> https://steemitimages.com/200x100/https://i.ibb.co/SmpvHzh/Spanish-removebg-preview.png Saludos mis queridos amigos, sean todos bienvenidos a una más de mis publicaciones. Hoy quiero compartir con ustedes, una técnica para elaborar nuestras lámparas con materiales que tengamos en casa, es muy fácil de hacer y no tienes que invertir mucho. Te voy a dar esta técnica para que pongas a volar tu imaginación, usando diferentes formas de lámparas con diferentes bases. Las fotografías que verán a continuación, fueron tomadas con mi teléfono modelo Alcatel_5044R. </div> <div class="text-justify"> https://steemitimages.com/200x100/https://i.ibb.co/JFW9cZ0/English-removebg-preview.png Greetings my dear friends, welcome to one more of my publications. Today I want to share with you, a technique to elaborate our lamps with materials that we have at home, it is very easy to do and you don't have to invest much. I am going to give you this technique so you can let your imagination fly, using different shapes of lamps with different bases. The pictures you will see below were taken with my phone model Alcatel_5044R. </div> <center> https://i.ibb.co/w0Ft7mp/separador-esposa-removebg-preview-1.png </center> <center>  </center> <div class="text-justify"> https://steemitimages.com/200x100/https://i.ibb.co/SmpvHzh/Spanish-removebg-preview.png ***Paso 1*** Para hacer esta lámpara utilice una tela rígida, después la planche porque se encontraba un poco arrugada. Este tipo de tela tienen a agarrar mucha forma, después de tener la tela planchada, utilice una plantilla para decorarla con flores utilizando pintura al frío azul y verde. Después de haber pintado la tela, la reservé para que pudiera secarse, mientras transcurría ese tiempo, hice algunos recortes en una botella plástica de refresco, la cual es la base donde colocaré el bombillo y es la que va a sostener la base de la campana de la lámpara. </div> <div class="text-justify"> https://steemitimages.com/200x100/https://i.ibb.co/JFW9cZ0/English-removebg-preview.png ***Step 1*** To make this lamp I used a rigid fabric, then I ironed it because it was a little wrinkled. This type of fabric tends to take a lot of shape, after having the fabric ironed, I used a stencil to decorate it with flowers using blue and green cold paint. After having painted the fabric, I set it aside to dry, while that time passed, I made some cutouts in a plastic soda bottle, which is the base where I will place the bulb and is the one that will hold the base of the bell of the lamp. </div> <center> 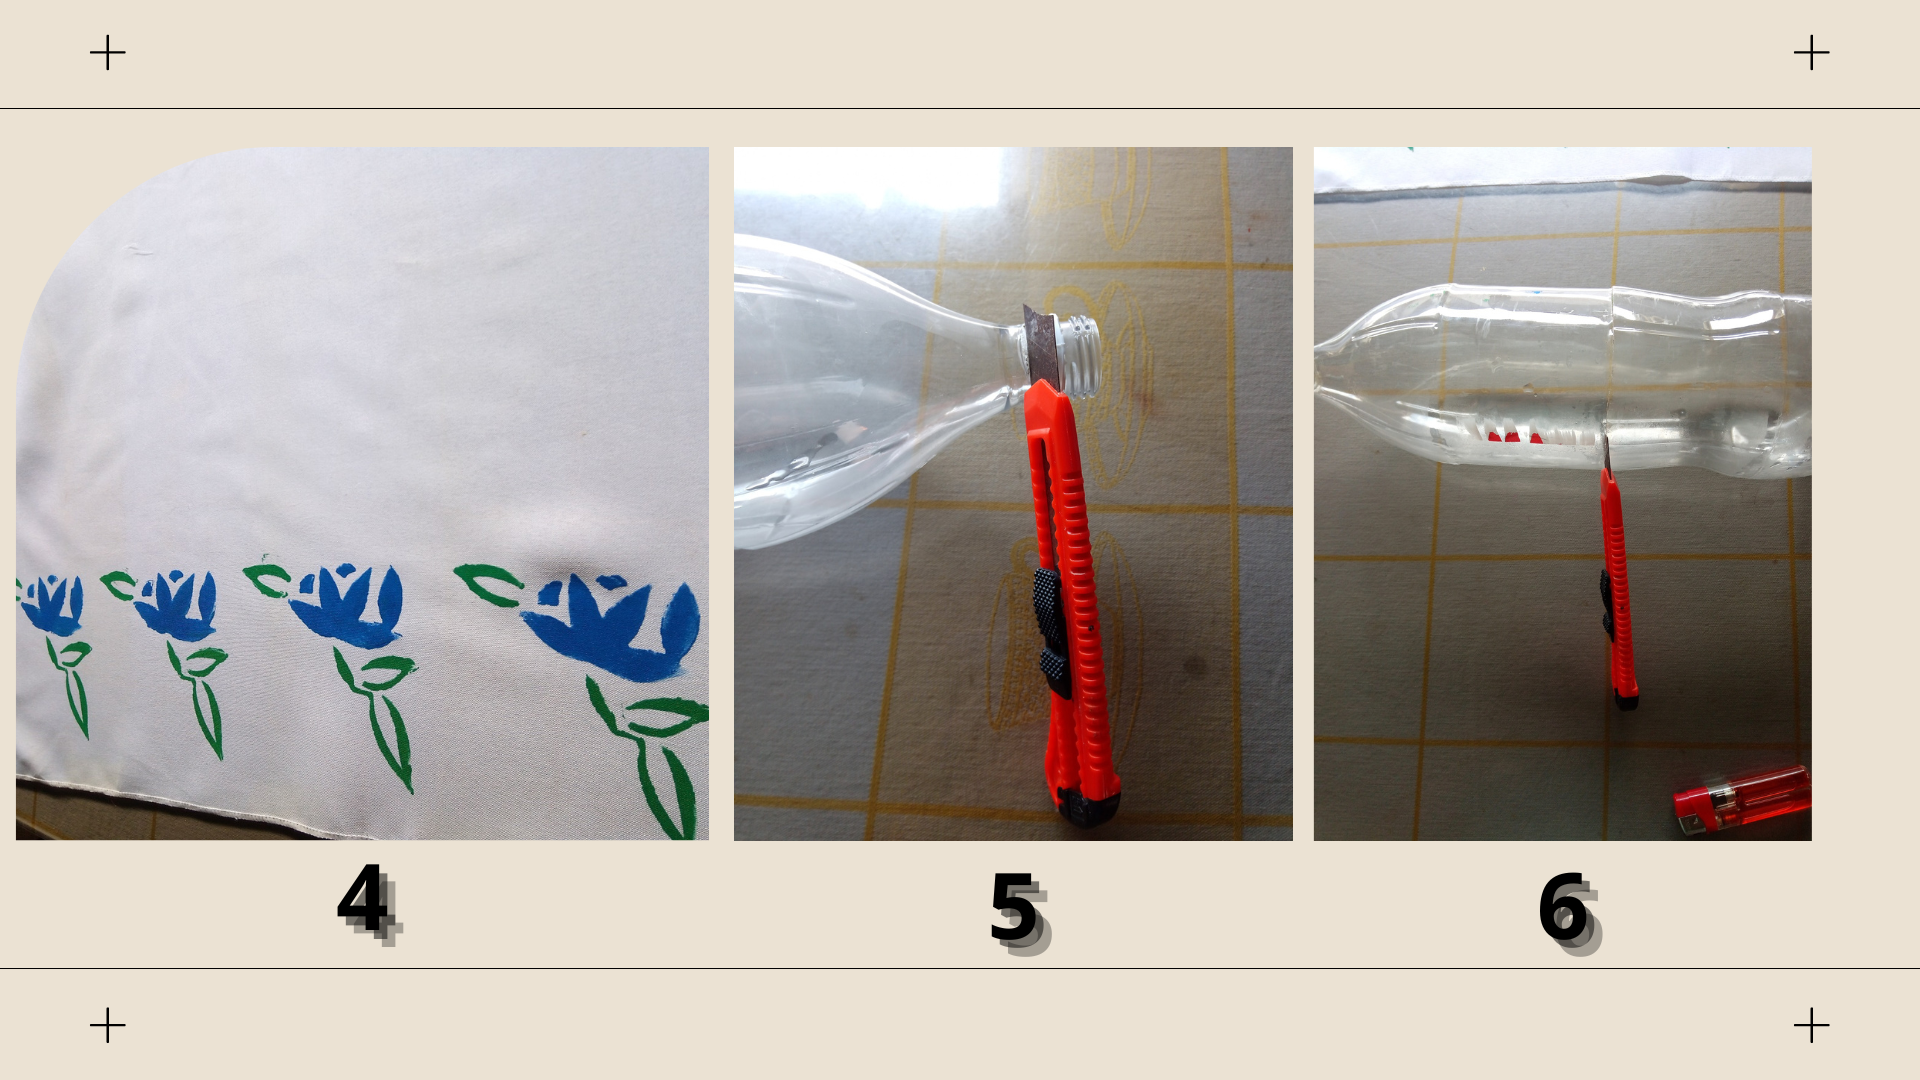 https://i.ibb.co/w0Ft7mp/separador-esposa-removebg-preview-1.png 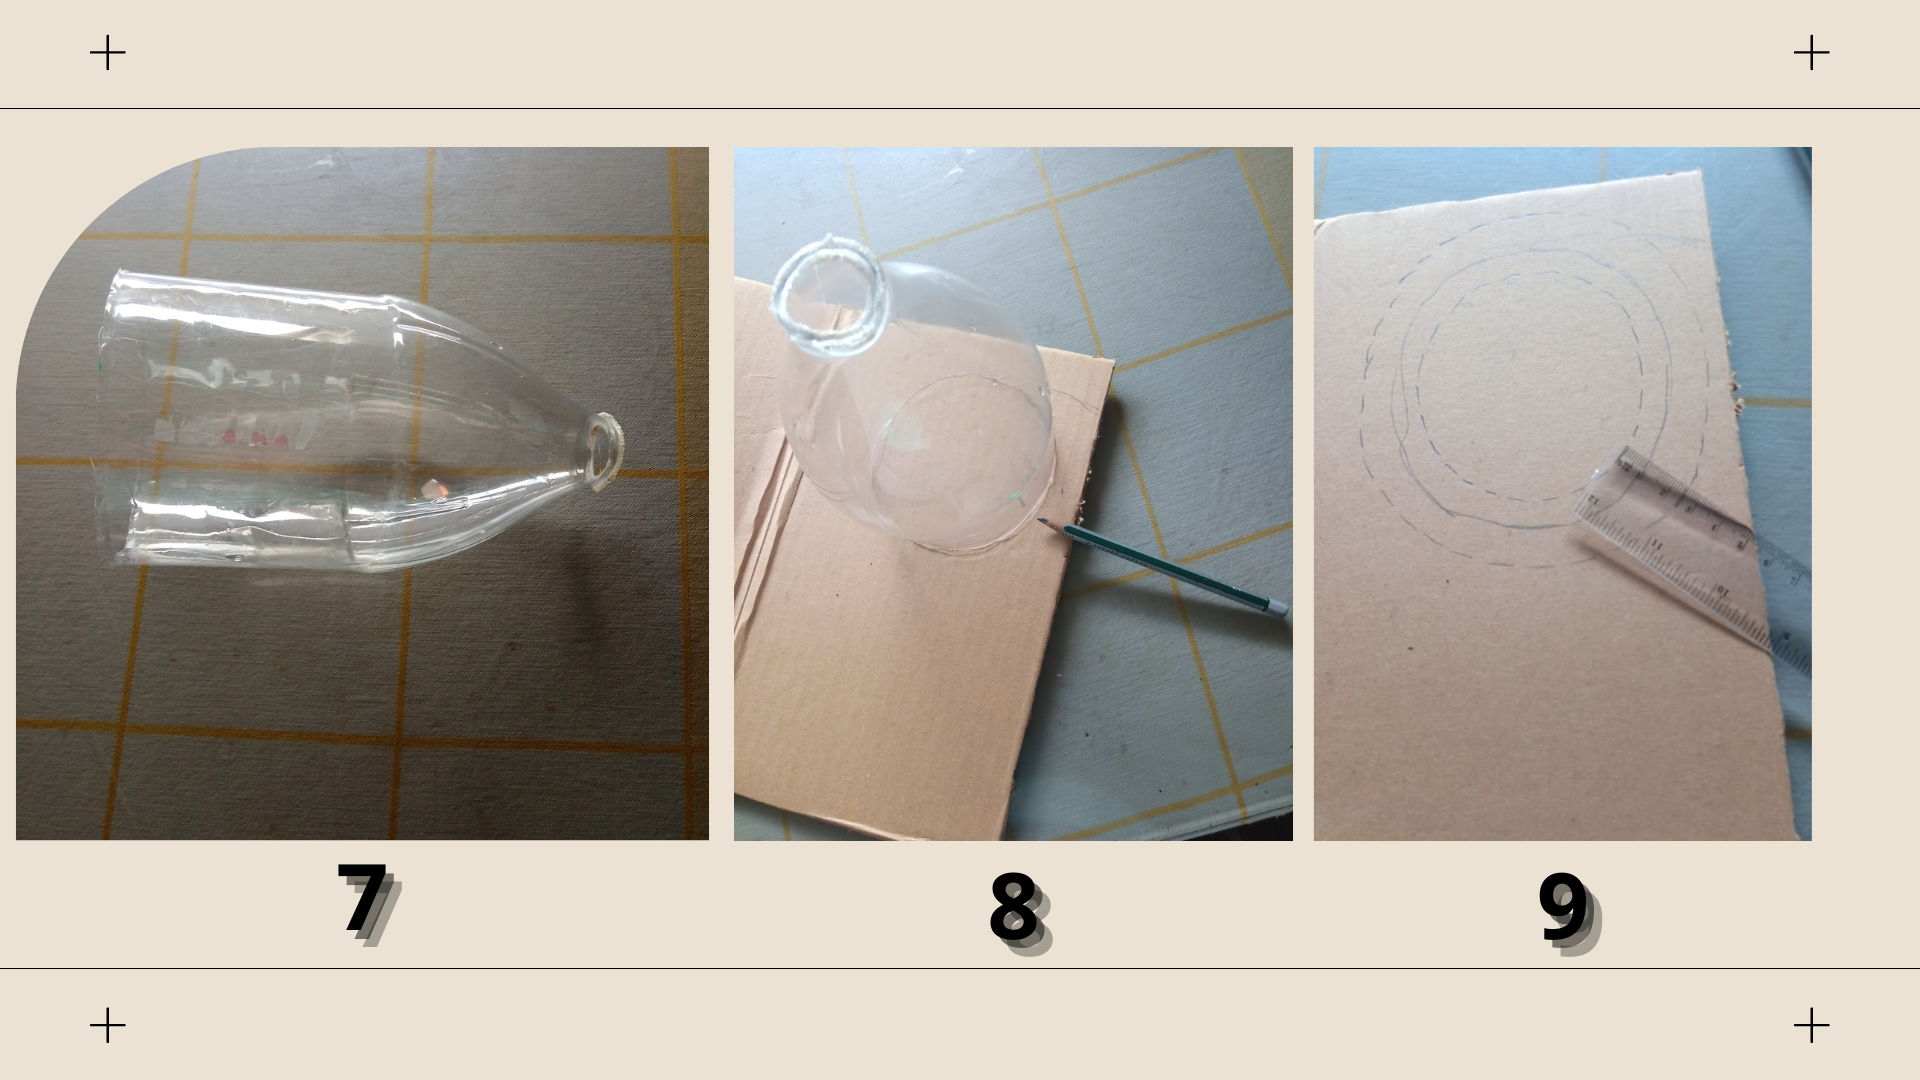 </center> <div class="text-justify"> https://steemitimages.com/200x100/https://i.ibb.co/SmpvHzh/Spanish-removebg-preview.png ***PASO 2*** Pueden notar como recorte la rosca de la botella, también la altura de la base donde colocaré el bombillo. Seguido a esto use la parte de la botella como molde sobre un cartón para realizar un círculo que será la parte superior de la campana de esta lámpara, pueden notar que este círculo tiene un círculo más ancho a su alrededor. De la parte externa es de 2 centímetros y la parte interna es de 1 centímetro de separación de cada línea. Con la ayuda de un exacto realicé el corte de los círculos. <div class="text-justify"> https://steemitimages.com/200x100/https://i.ibb.co/JFW9cZ0/English-removebg-preview.png ***STEP 2*** You can notice how I cut the thread of the bottle, also the height of the base where I will place the bulb. After this I used the part of the bottle as a mold on a cardboard to make a circle that will be the top of the bell of this lamp, you can notice that this circle has a wider circle around it. From the external part is 2 centimeters and the internal part is 1 centimeter of separation of each line. With the help of an exact, make the cut of the circles. </div> <center> 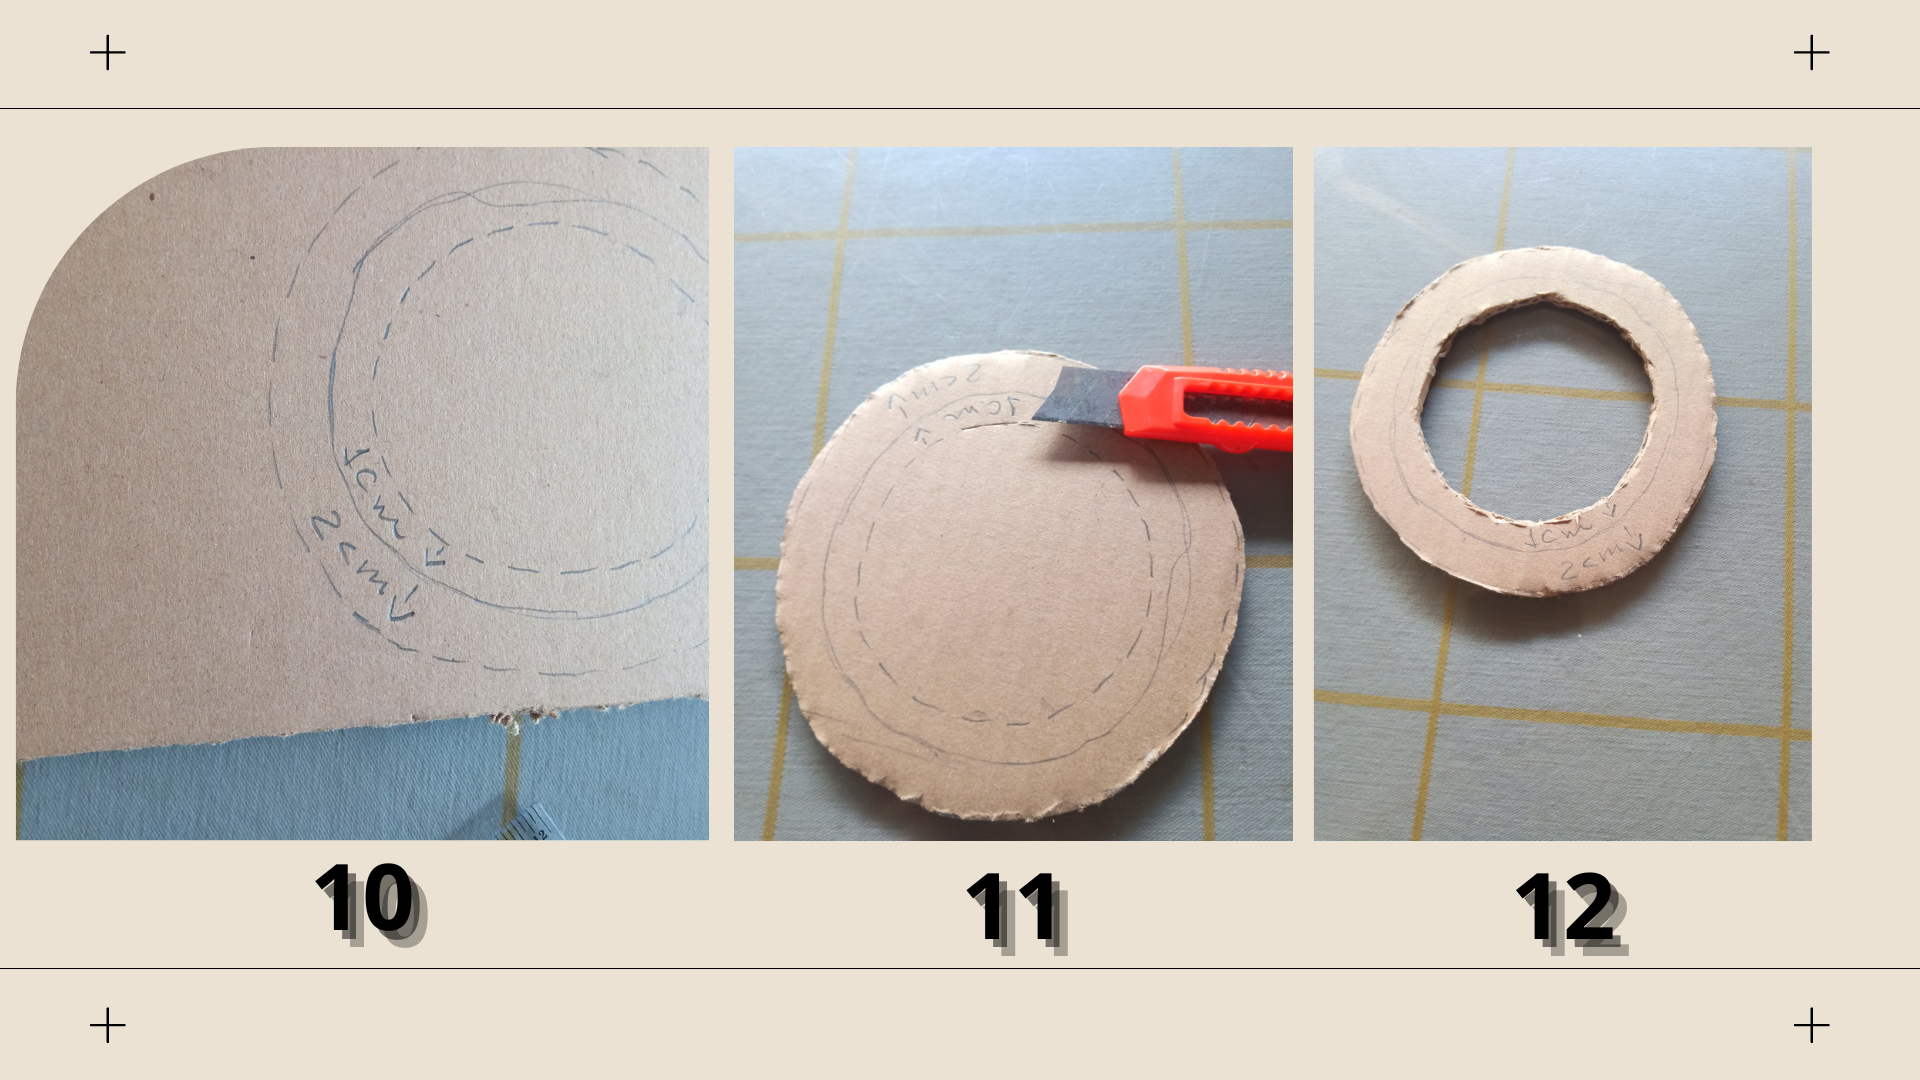 https://i.ibb.co/w0Ft7mp/separador-esposa-removebg-preview-1.png 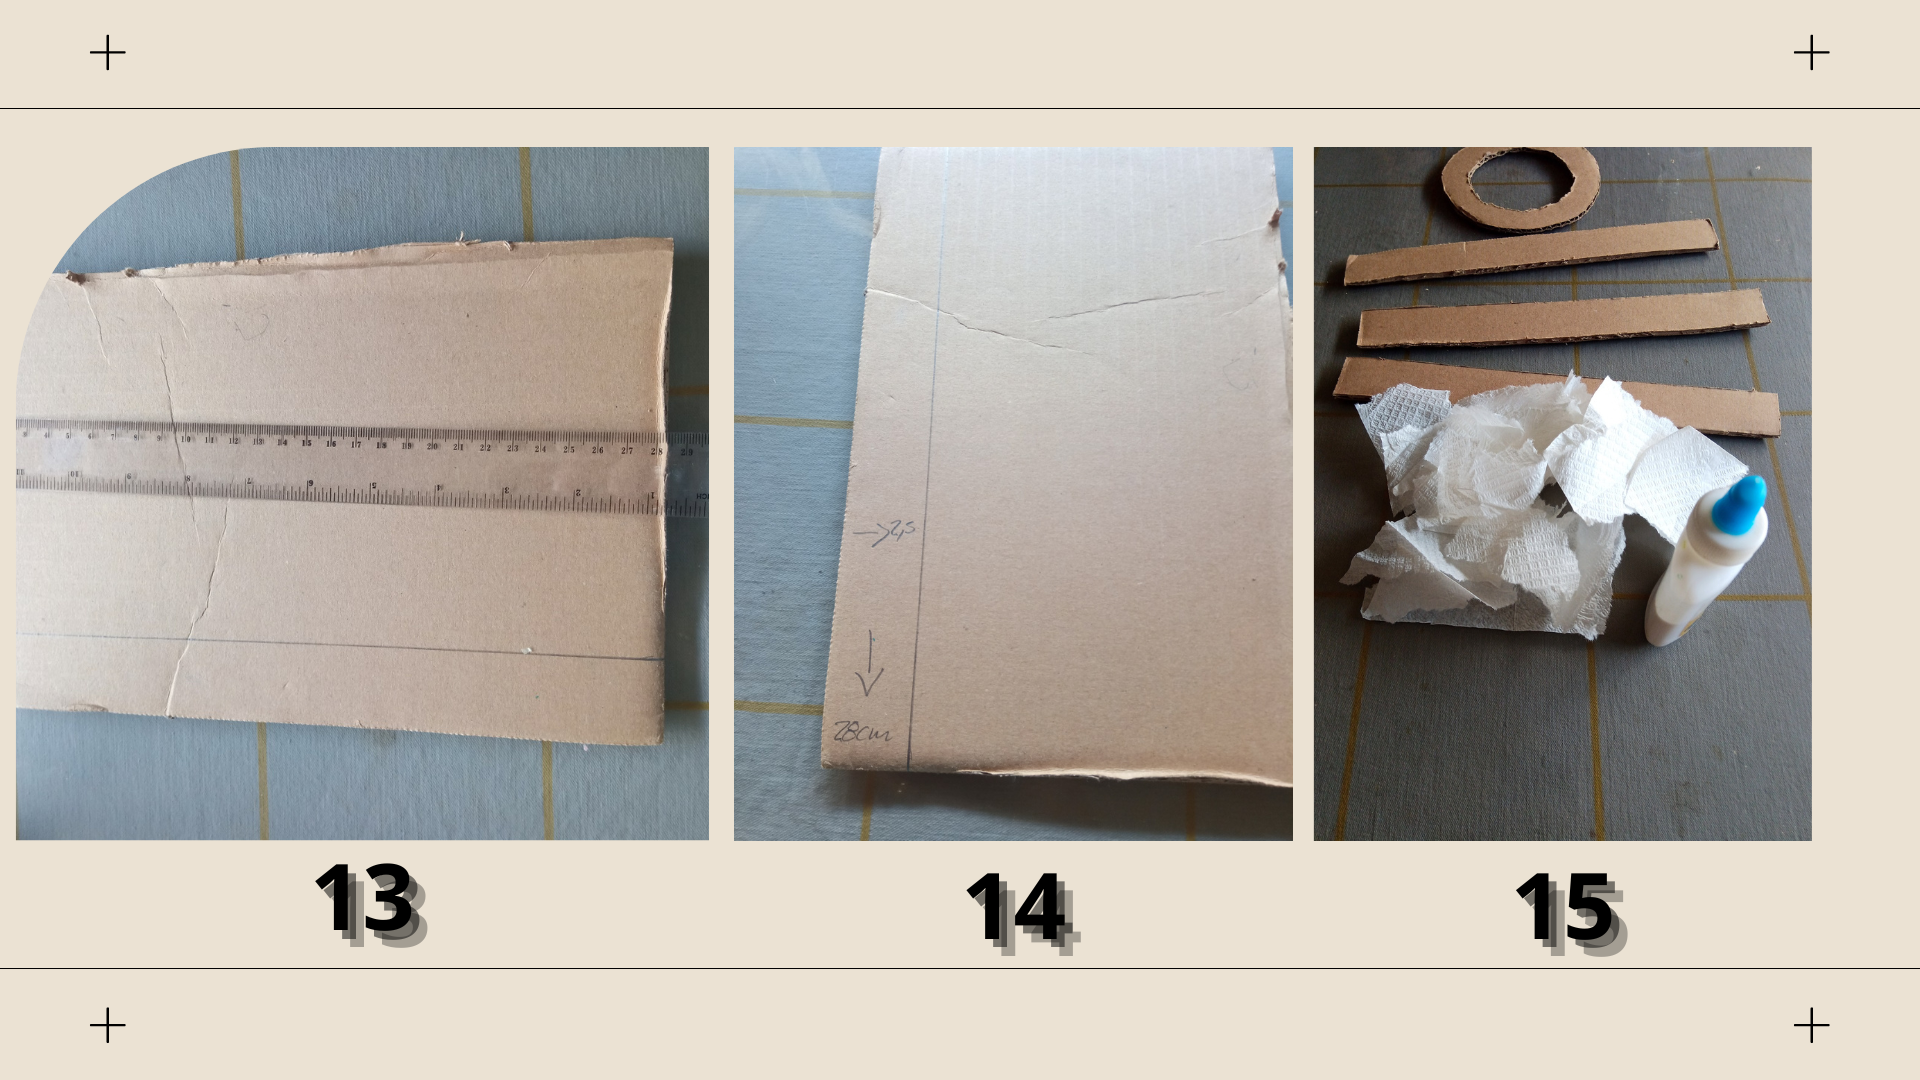 </center> <div class="text-justify"> https://steemitimages.com/200x100/https://i.ibb.co/SmpvHzh/Spanish-removebg-preview.png ***PASO 3*** Luego, con la ayuda de una regla sobre un cartón, comencé a realizar tres cintas de 28 centímetros de largo por 2,5 centímetros de ancho. Después de tener algunas de las piezas de la base de la campana, comencé a reunir todas las herramientas necesarias para hacer la base de la lámpara, en este caso usaré engrudo elaborado con servilleta y pegamento diluido en agua. Pueden notar el proceso de como fui dándole mayor resistencia a esta base, también con cintas de cartón de las que había recortado, realice la parte inferior de la campana, las doblándolas cada una de ellas para realizar un círculo. </div> <div class="text-justify"> https://steemitimages.com/200x100/https://i.ibb.co/JFW9cZ0/English-removebg-preview.png ***STEP 3*** Then, with the help of a ruler on a piece of cardboard, I began to make three ribbons of 28 centimeters long by 2.5 centimeters wide. After I had some of the pieces for the base of the bell, I began to gather all the necessary tools to make the base of the lamp, in this case I will use paste made with napkin and glue diluted in water. You can see the process of how I was giving more resistance to this base, also with cardboard ribbons that I had cut, I made the bottom of the bell, folding each one of them to make a circle. </div> <center> 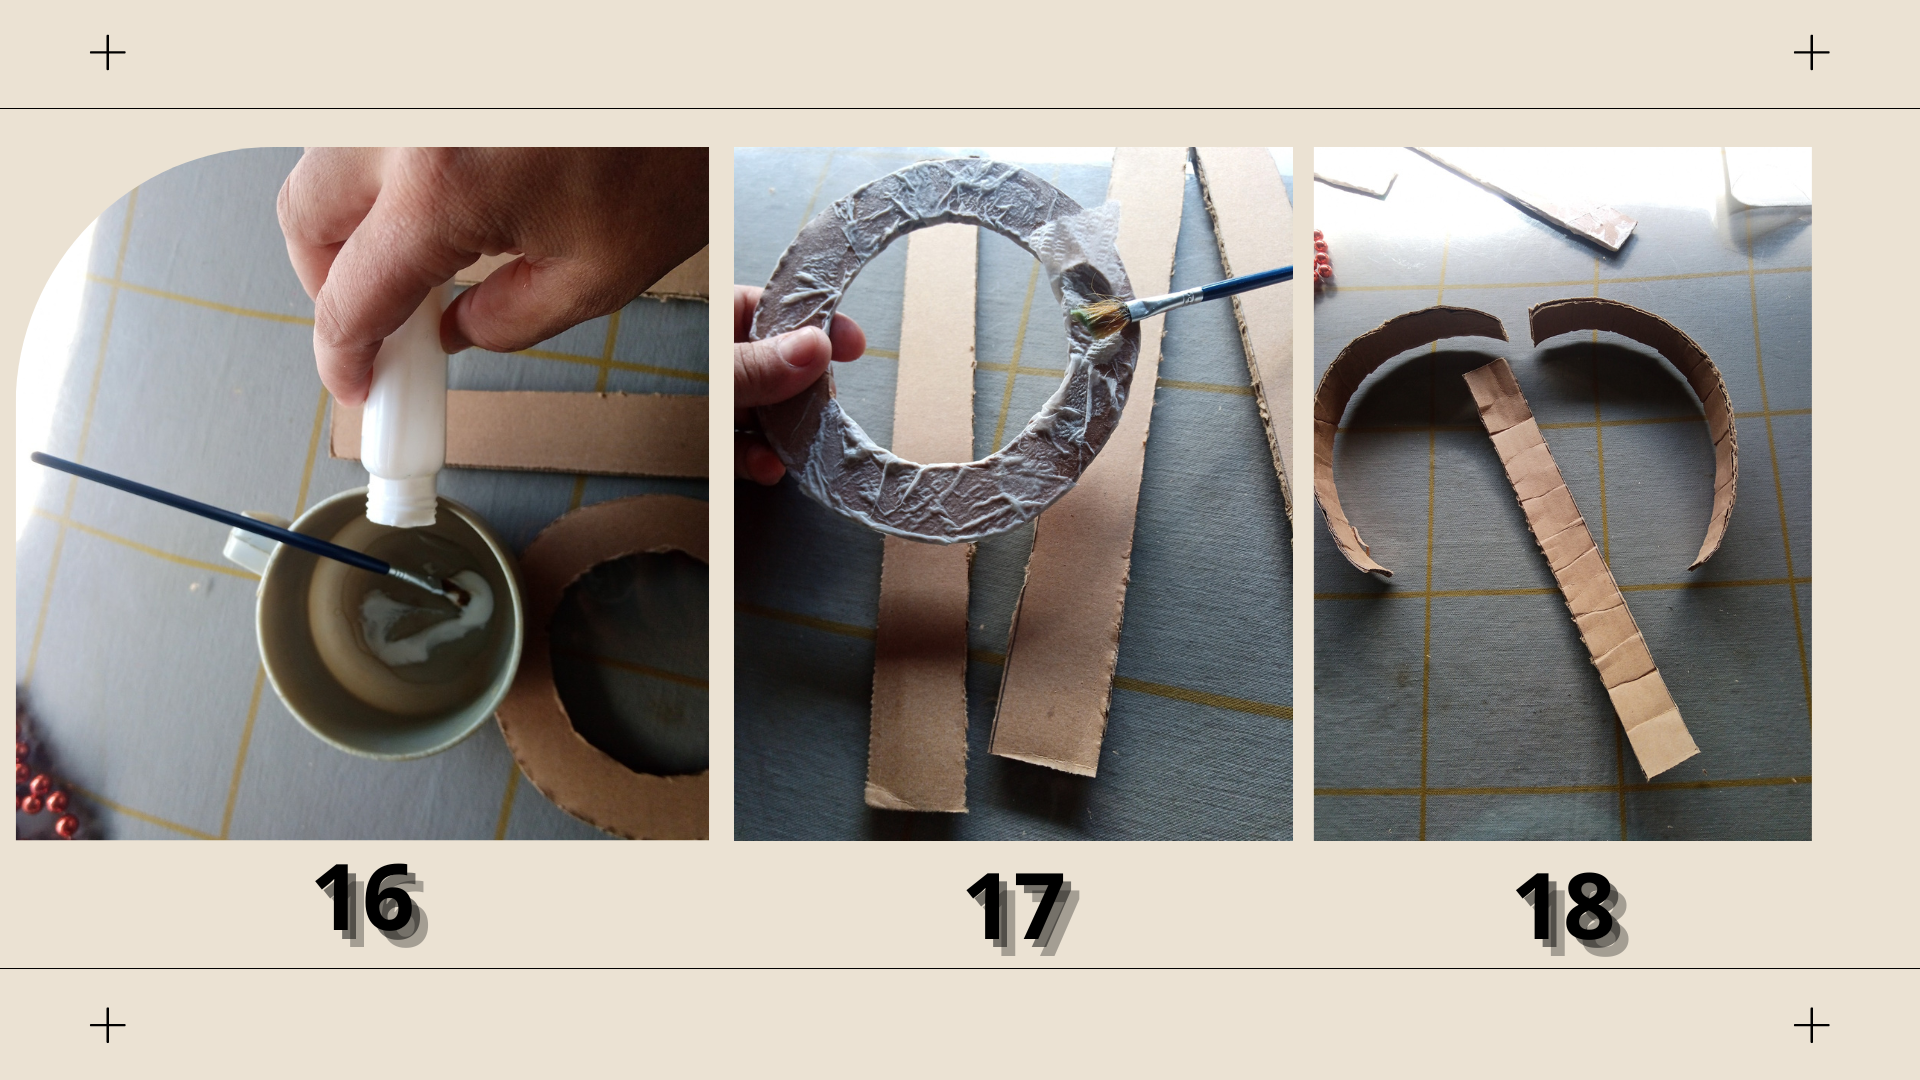 https://i.ibb.co/w0Ft7mp/separador-esposa-removebg-preview-1.png 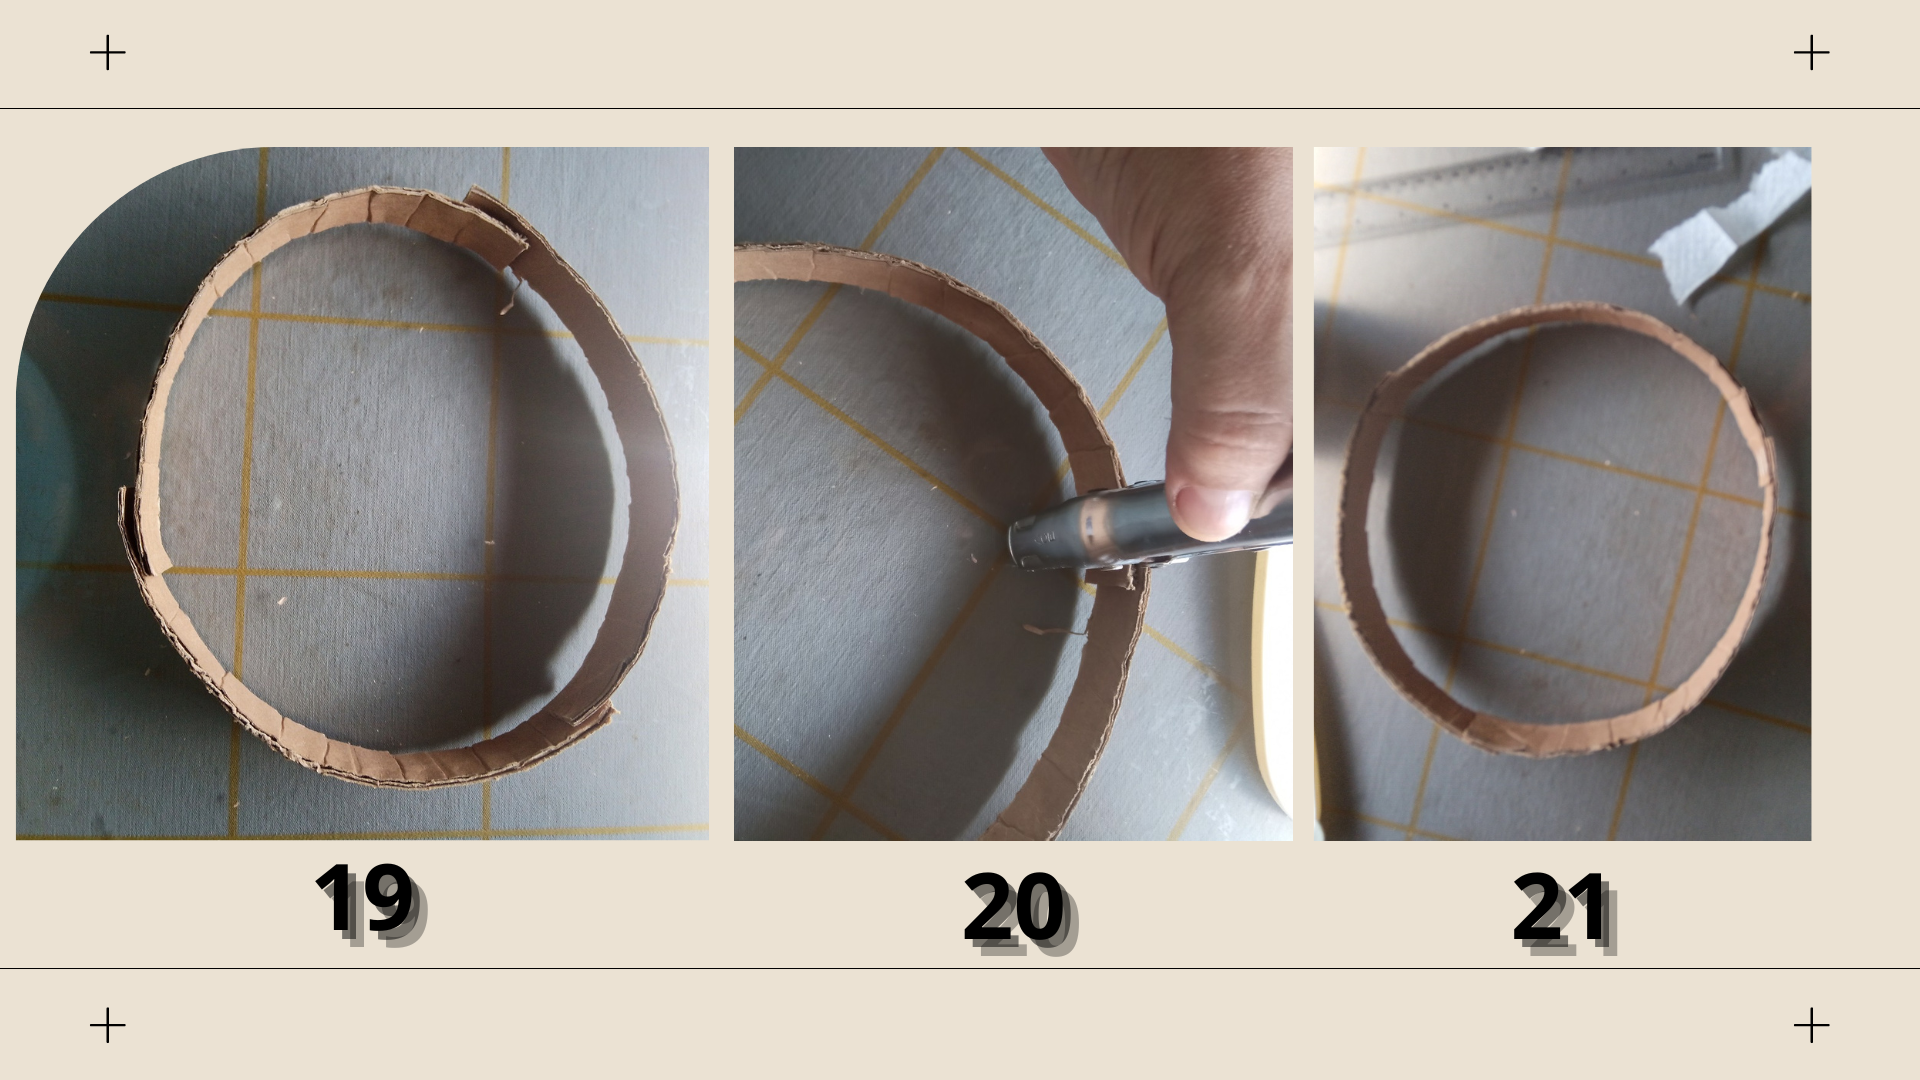 </center> <div class="text-justify"> https://steemitimages.com/200x100/https://i.ibb.co/SmpvHzh/Spanish-removebg-preview.png ***PASO 4*** Con la ayuda de una grapadora, uní cada una de las partes de la base inferior de la campana. Después de haberle colocado el pegamento con las servilletas a las diferentes partes, las deje secar unos 30 minutos. Mientras esperaba, realice la base para sostener el sócate que va a ir dentro de la botella de plástico que recorte anteriormente. </div> <div class="text-justify"> https://steemitimages.com/200x100/https://i.ibb.co/JFW9cZ0/English-removebg-preview.png ***STEP 4*** With the help of a stapler, I joined each of the parts of the lower base of the bell. After applying the glue with the napkins to the different parts, let them dry for about 30 minutes. While waiting, make the base to hold the socket that will go inside the plastic bottle that I cut out earlier. </div> <center> 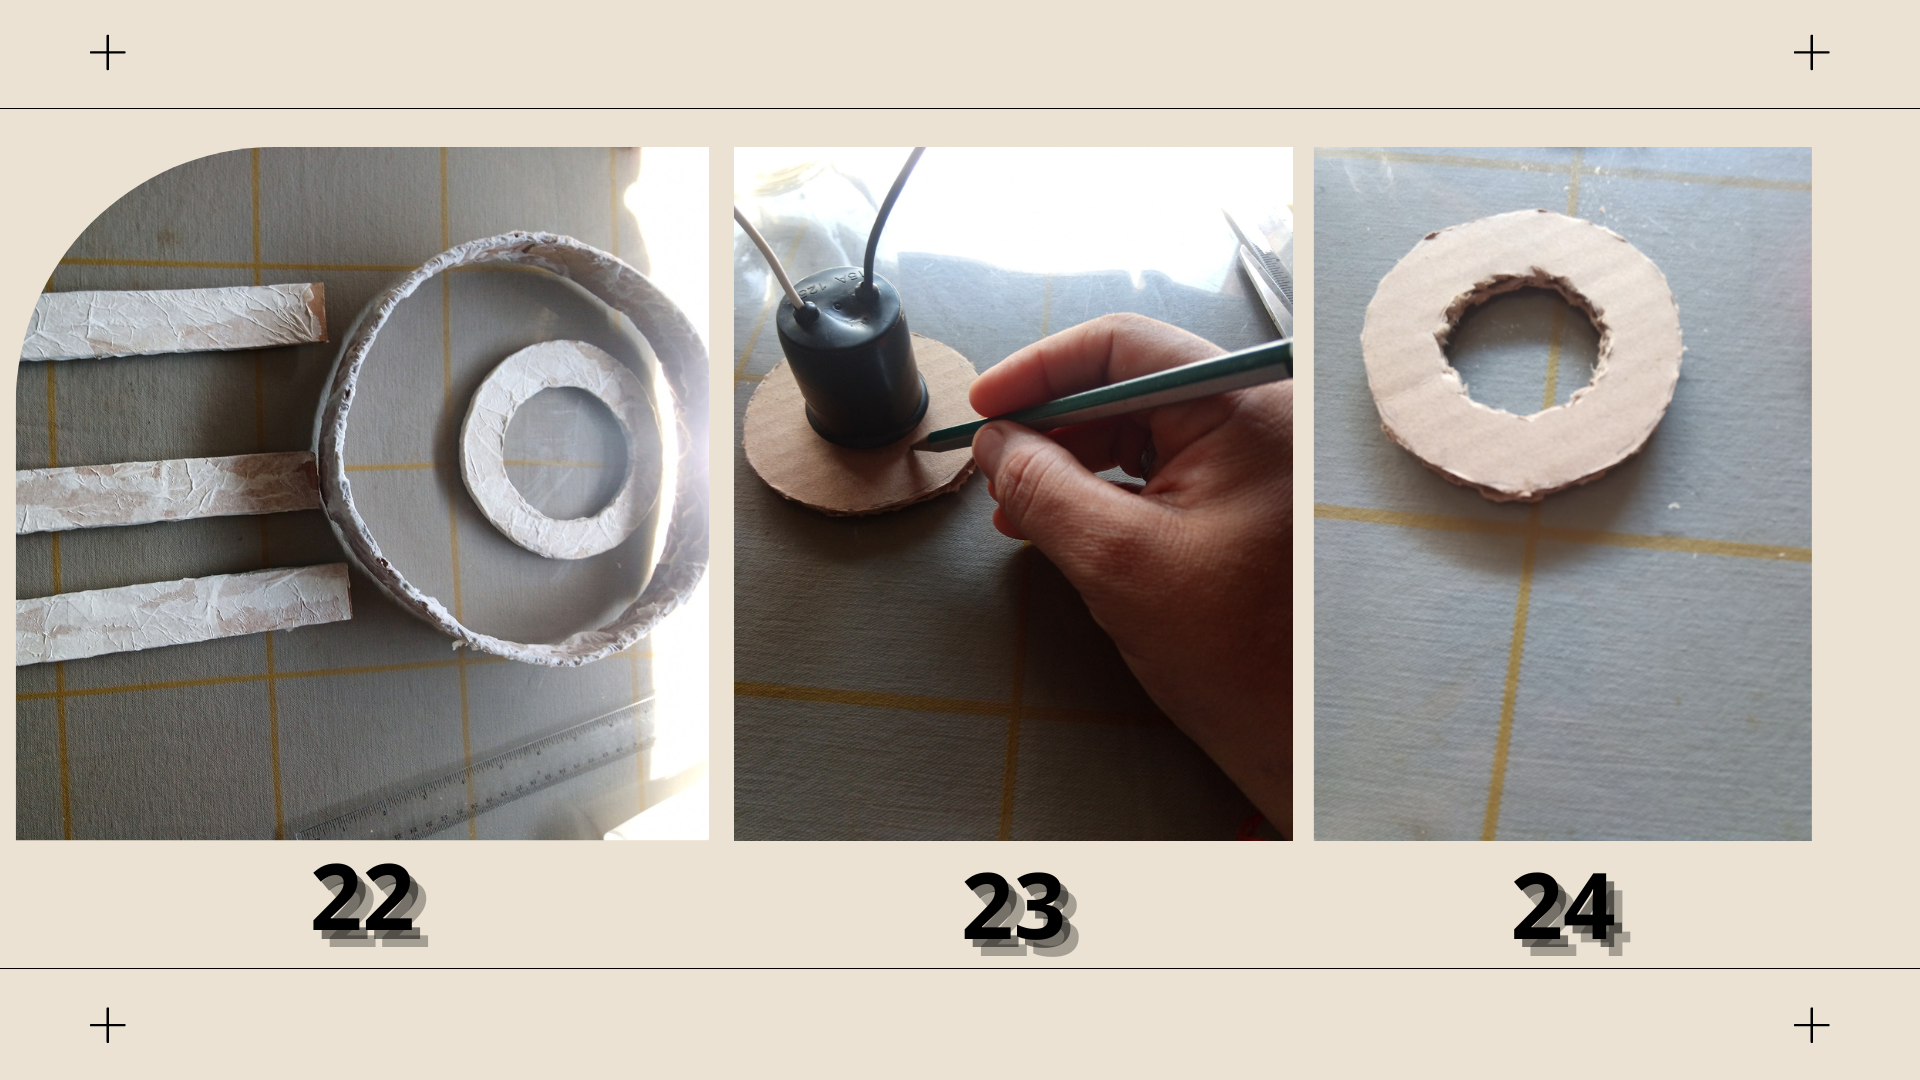 https://i.ibb.co/w0Ft7mp/separador-esposa-removebg-preview-1.png 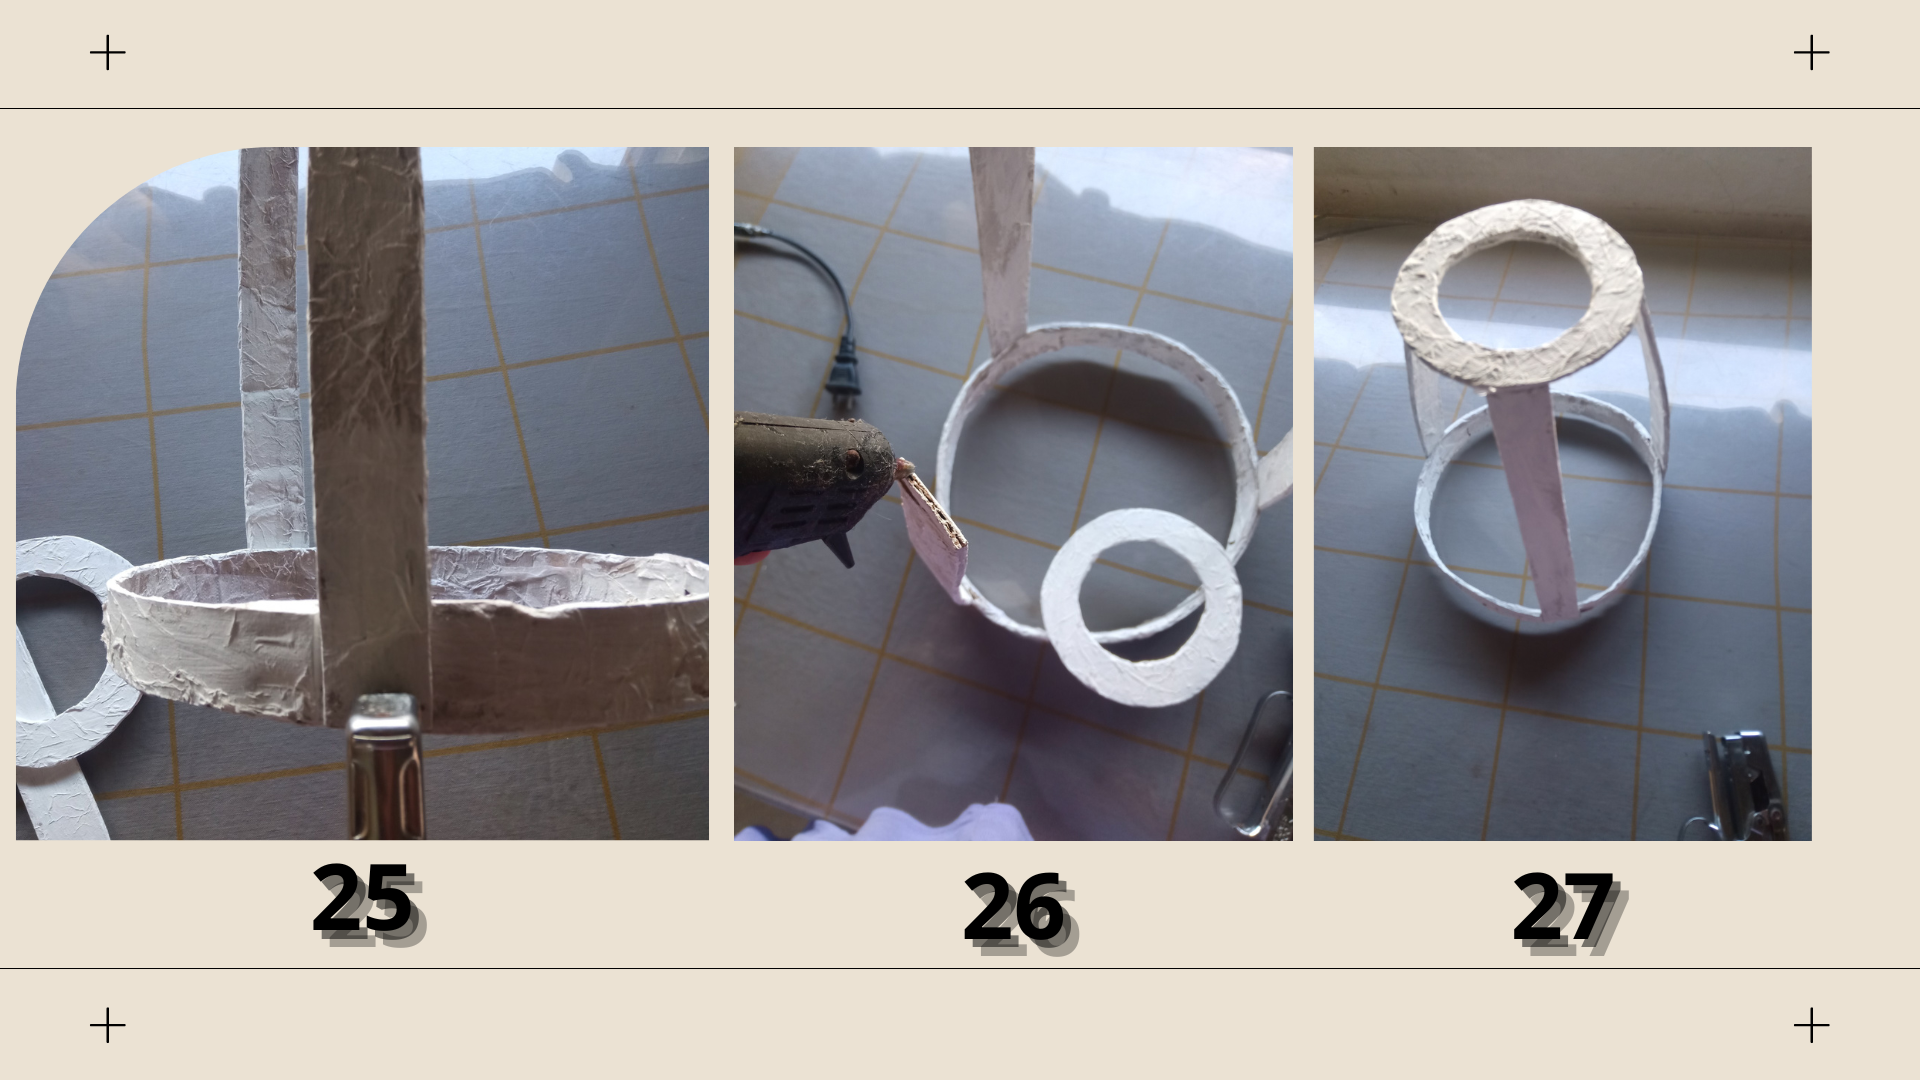 </center> <div class="text-justify"> https://steemitimages.com/200x100/https://i.ibb.co/SmpvHzh/Spanish-removebg-preview.png ***PASO 5*** Después de tener todas las piezas ya secas, empecé a armar la campana de esta lámpara, utilizando en la parte inferior grapas y en la parte superior silicona caliente. Luego de tener ya armada la base de la campana, comencé a pegarle la tela y a darle forma. </div> <div class="text-justify"> https://steemitimages.com/200x100/https://i.ibb.co/JFW9cZ0/English-removebg-preview.png ***STEP 5*** After all the pieces were dry, I started to assemble the bell of this lamp, using staples at the bottom and hot silicone at the top. After I had the base of the bell assembled, I started to glue the fabric and shape it. </div> <center> 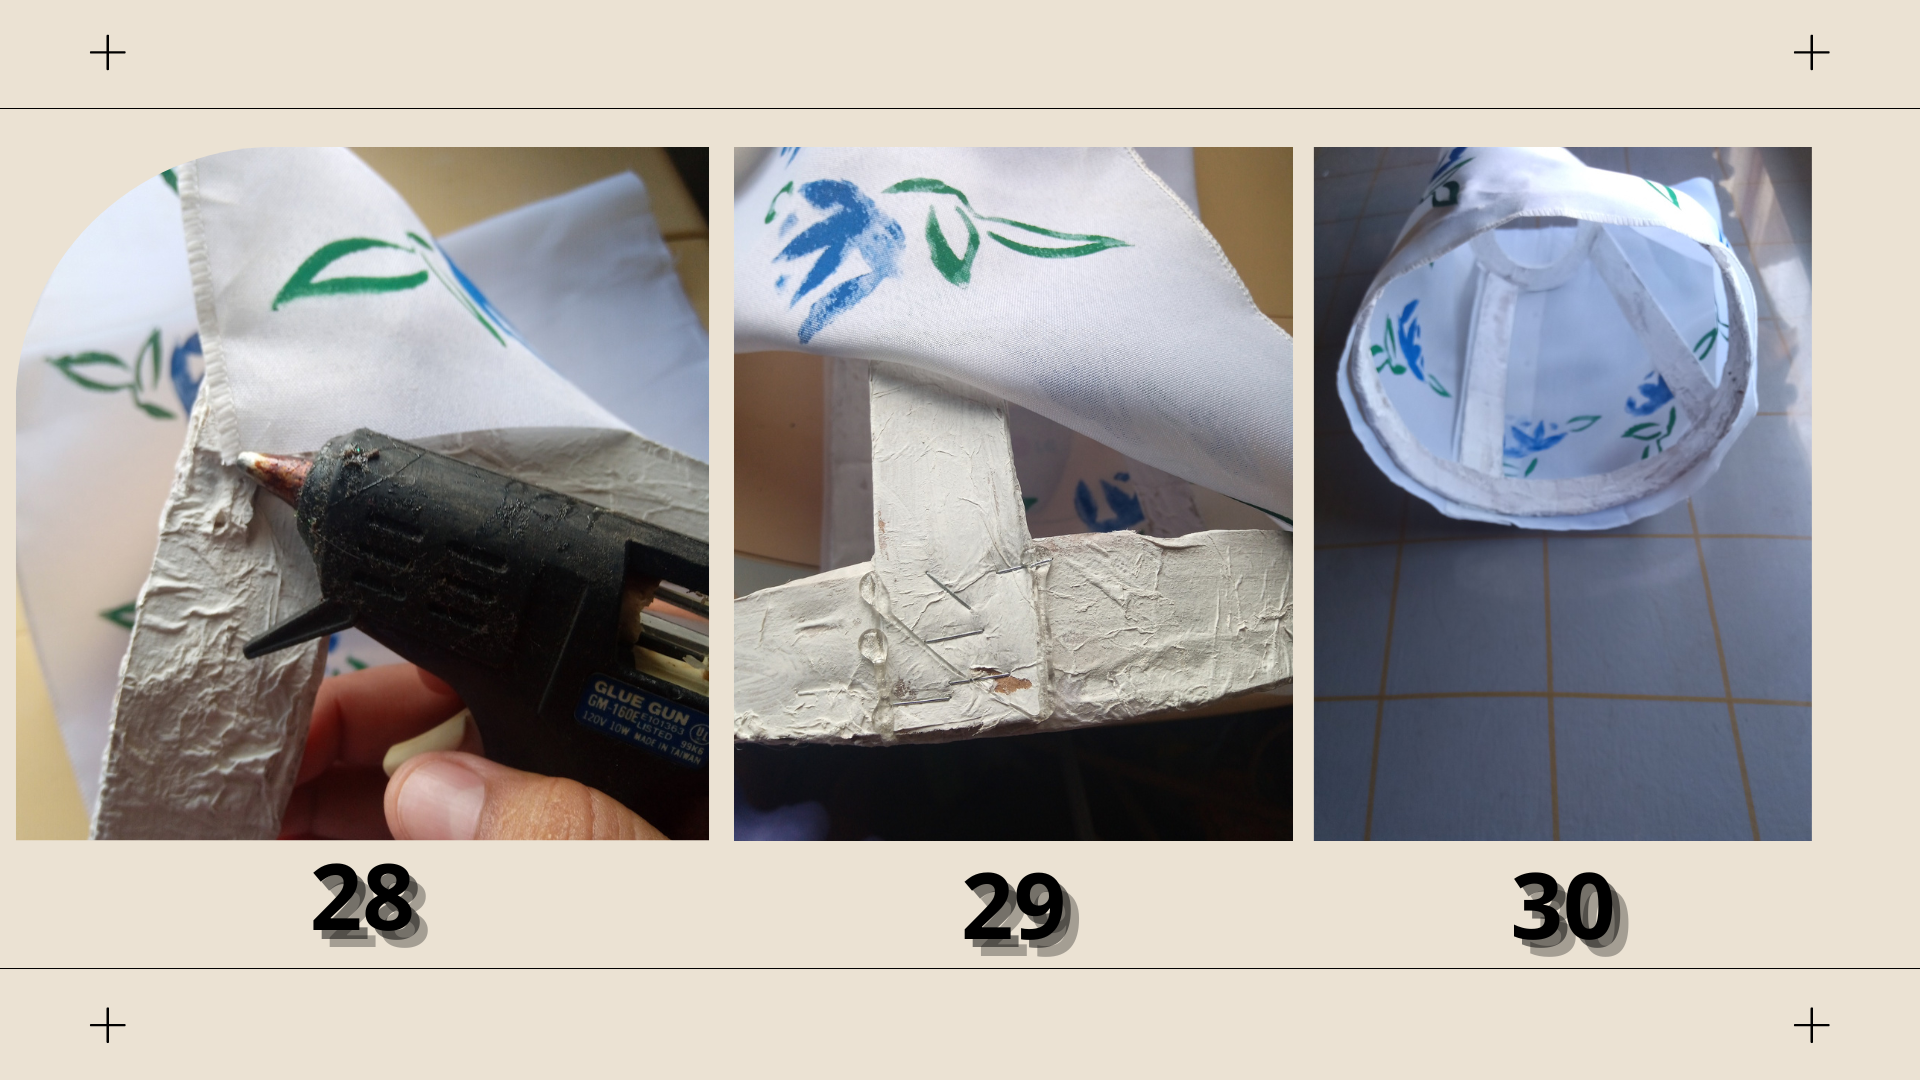 https://i.ibb.co/w0Ft7mp/separador-esposa-removebg-preview-1.png 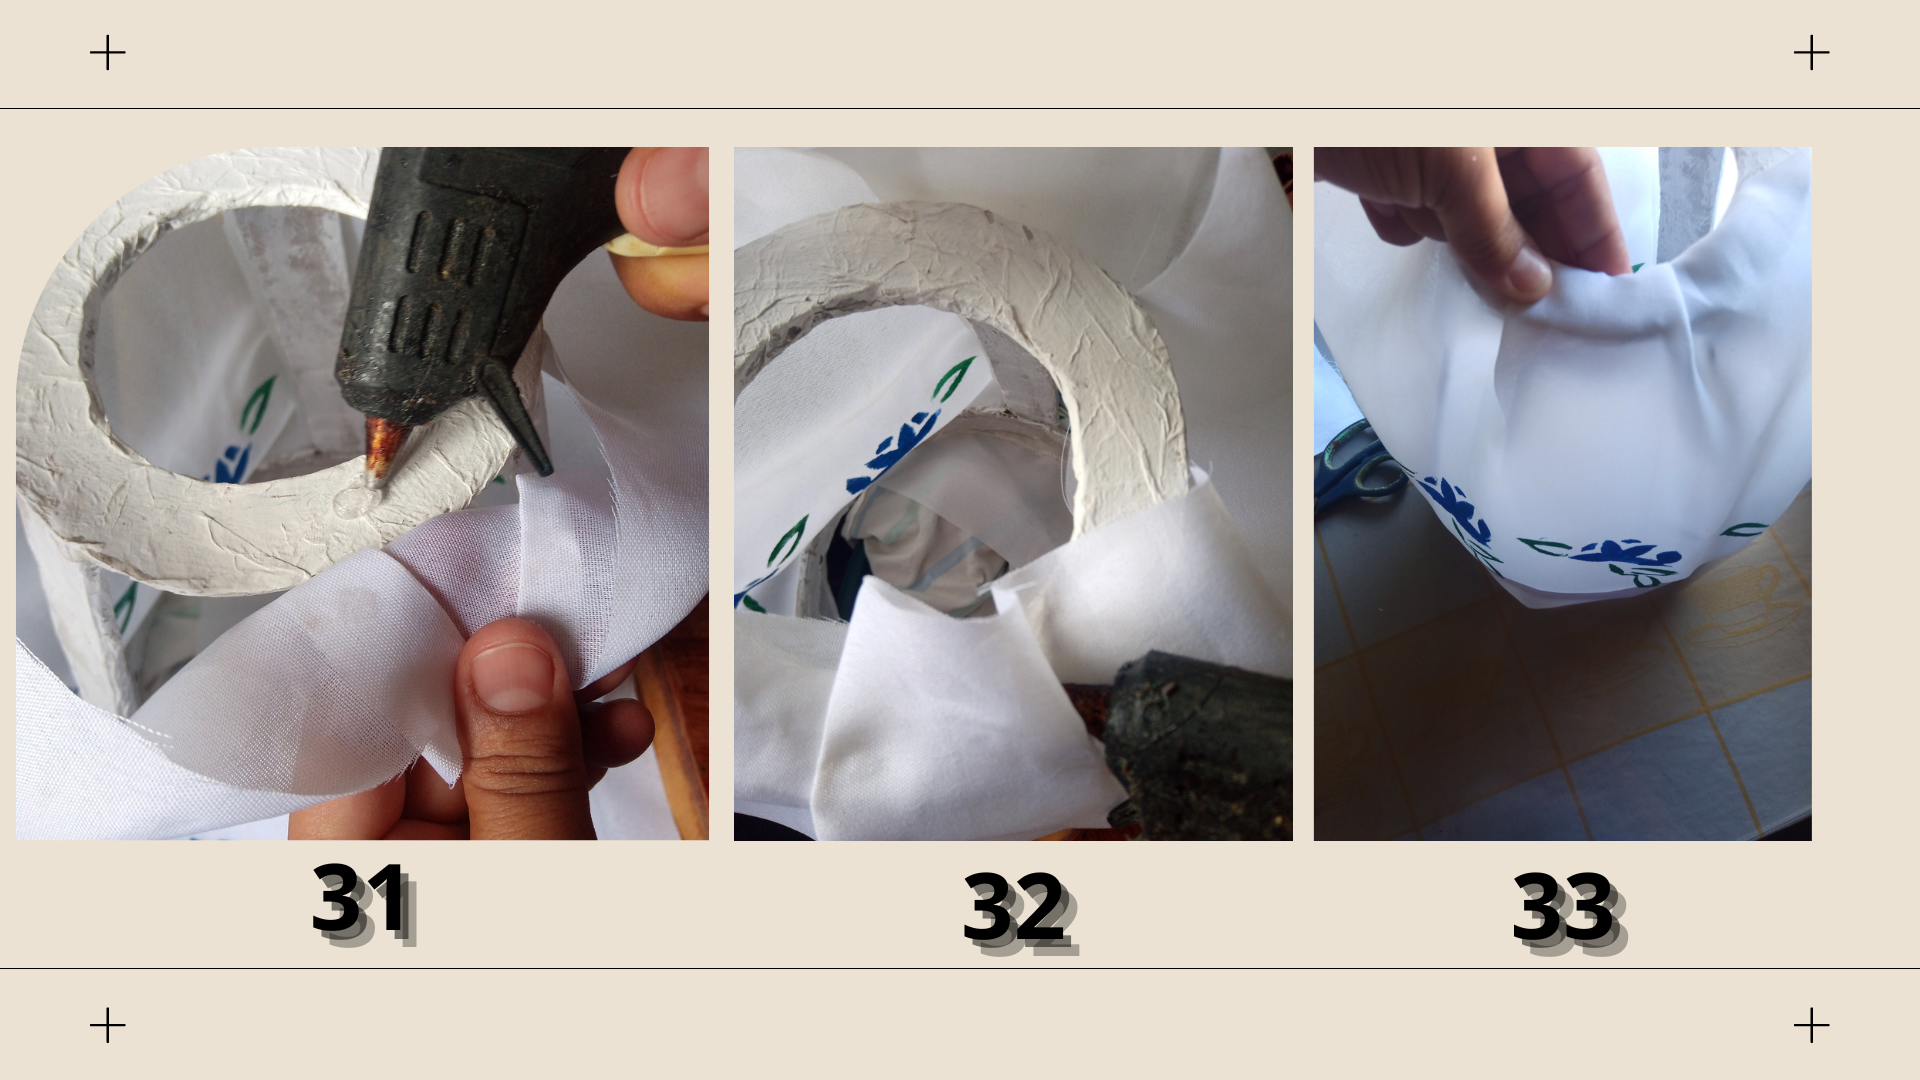 </center> <div class="text-justify"> https://steemitimages.com/200x100/https://i.ibb.co/SmpvHzh/Spanish-removebg-preview.png ***PASO 6*** Para la parte superior hice a unos tachones a la tela para darle forma, los mismos pegué con silicona. Sobre una tela, coloque la lámpara volteada, dibuje una circunferencia, la recorte a la medida superior de la campana para que no sobresaliera excedente de tela. </div> <div class="text-justify"> https://steemitimages.com/200x100/https://i.ibb.co/JFW9cZ0/English-removebg-preview.png ***STEP 6*** For the upper part I made some studs on the fabric to give it shape, I glued them with silicone. On a fabric, place the upside down lamp, draw a circumference, cut it to the top of the bell so that no excess fabric protrudes. </div> <center>  https://i.ibb.co/w0Ft7mp/separador-esposa-removebg-preview-1.png  </center> <div class="text-justify"> https://steemitimages.com/200x100/https://i.ibb.co/SmpvHzh/Spanish-removebg-preview.png ***PASO 7*** En la parte del ruedo de la lámpara, lo decoré con unas cadenas de perlas cobrizas para embellecerlas. Luego empece a colocar la parte eléctrica para poder darle luz a esta lámpara, sobre la parte inferior del embudo de la botella, abrí un orificio por donde va a salir el cable que conectara la luz de la lámpara. Teniendo el sócate sujeto en la base del cartón, lo coloqué dentro de la base de la botella, asegurándolo con unos puntos de silicona por dentro y sacando el cable por el orificio que ya tenía listo. Uni los cables del enchufe del sócate y estaría lista mi conexión, teniendo todos estos pasos listos, solo colocaremos la lámpara sobre la base y tendríamos una bonita lámpara de noche para nuestra habitación. Pueden notar como se ve la lámpara Iluminada. Esta lámpara es muy práctica porque podemos realizar otros modelos de campanas y otras bases como botellas de otros colores, decoraciones y adaptarlas a la base principal que es el embudo de la botella plástica donde está la parte de iluminación. Materiales. Botella de plástico. Silicona. Exacto. Perlas de color cobre. Grapas. Lápiz. Sócate. Tijeras. Tela. Molde de formas. Cartón. Pinturas al frío, verde, azul y blanco. Bombillo. Botella. Plancha. </div> <div class="text-justify"> https://steemitimages.com/200x100/https://i.ibb.co/JFW9cZ0/English-removebg-preview.png ***STEP 7*** In the part of the lamp's ring, I decorated it with some strings of copper pearls to embellish it. Then I started to place the electrical part to give light to this lamp, on the bottom of the funnel of the bottle, I opened a hole where the cable that will connect the light of the lamp will come out. Having the socket attached to the base of the cardboard, I placed it inside the base of the bottle, securing it with some silicone dots on the inside and pulling the cable through the hole that I already had ready. Uni the wires of the plug of the socket and my connection would be ready, having all these steps ready, we will only place the lamp on the base and we would have a nice night lamp for our room. You can see how the lamp looks illuminated. This lamp is very practical because we can make other models of bells and other bases such as bottles of other colors, decorations and adapt them to the main base which is the funnel of the plastic bottle where the lighting part is. Materials. Plastic bottle. Silicone. Exactly. Copper colored beads. Staples. Pencil. Socket. Scissors. Cloth. Shape mold. Cardboard. Cold paints, green, blue and white. Light bulb. Bottle. Planch. </div> <center> 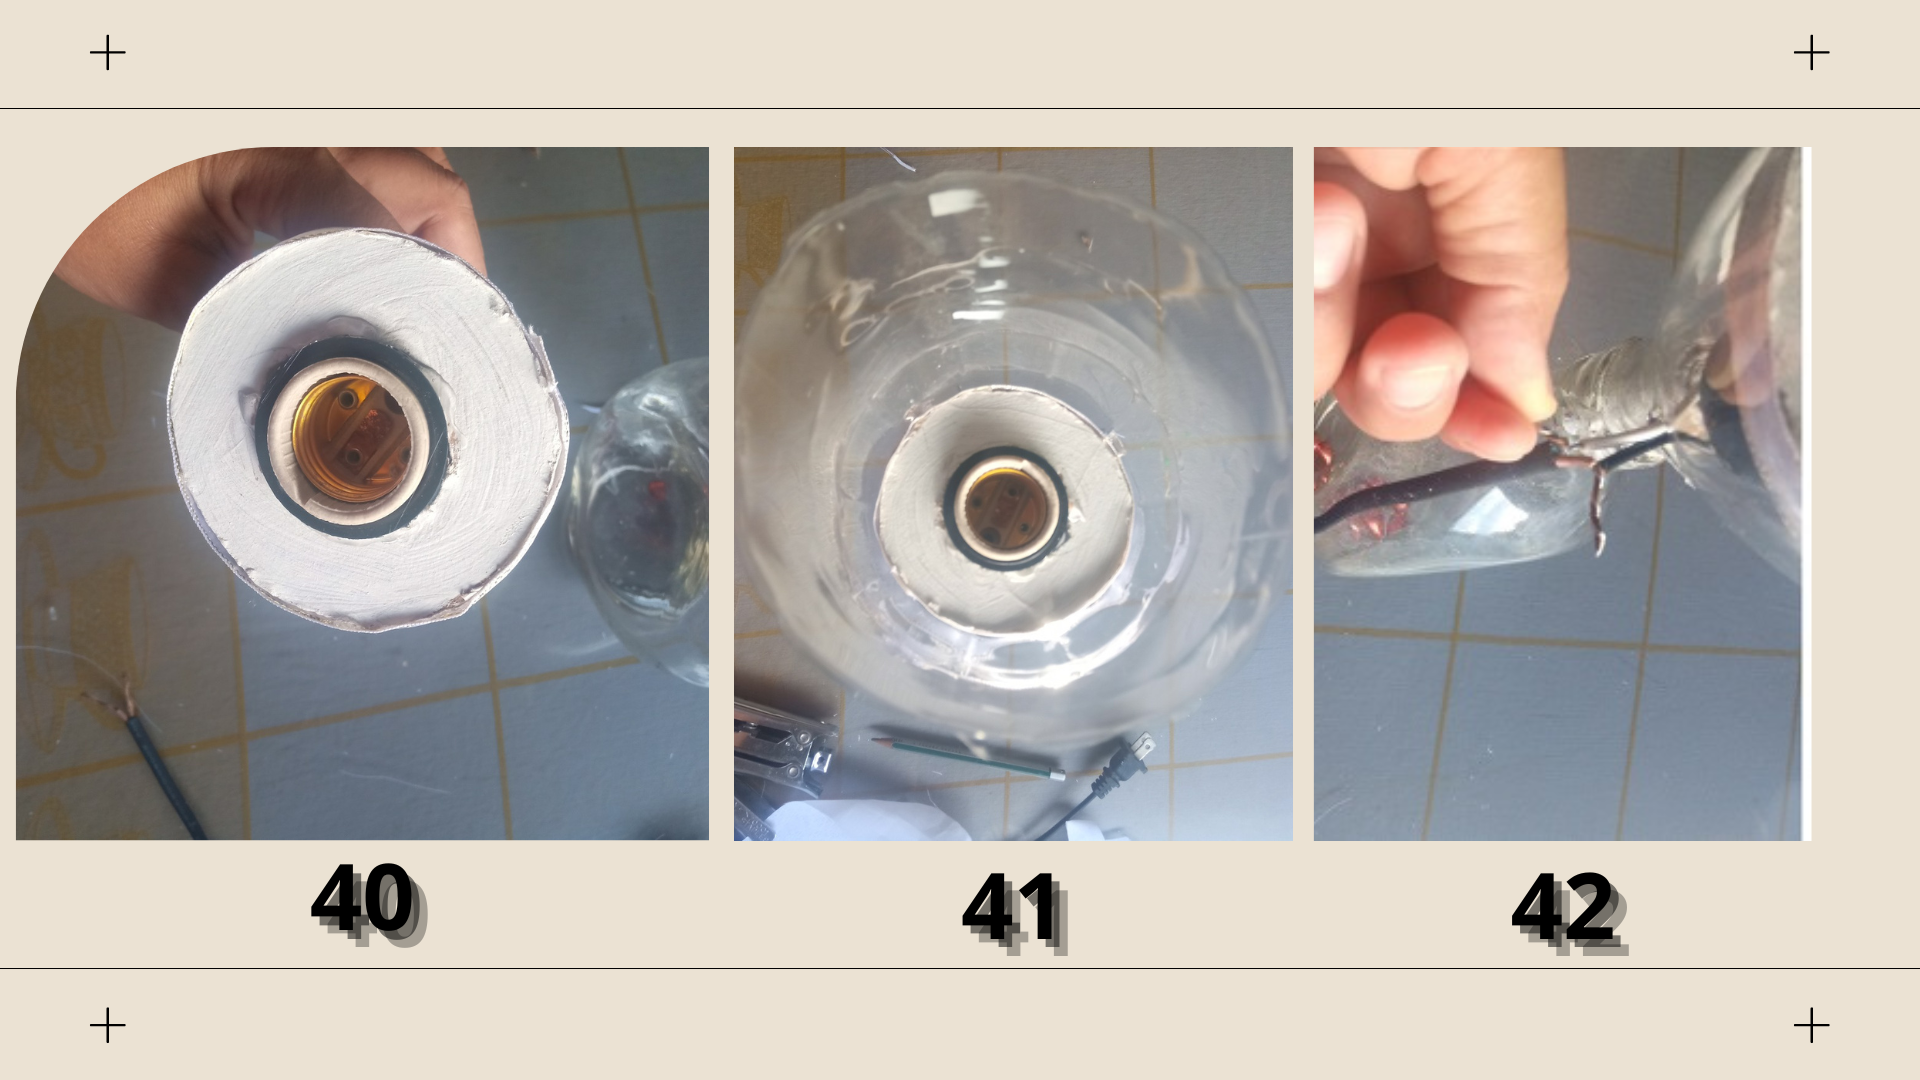  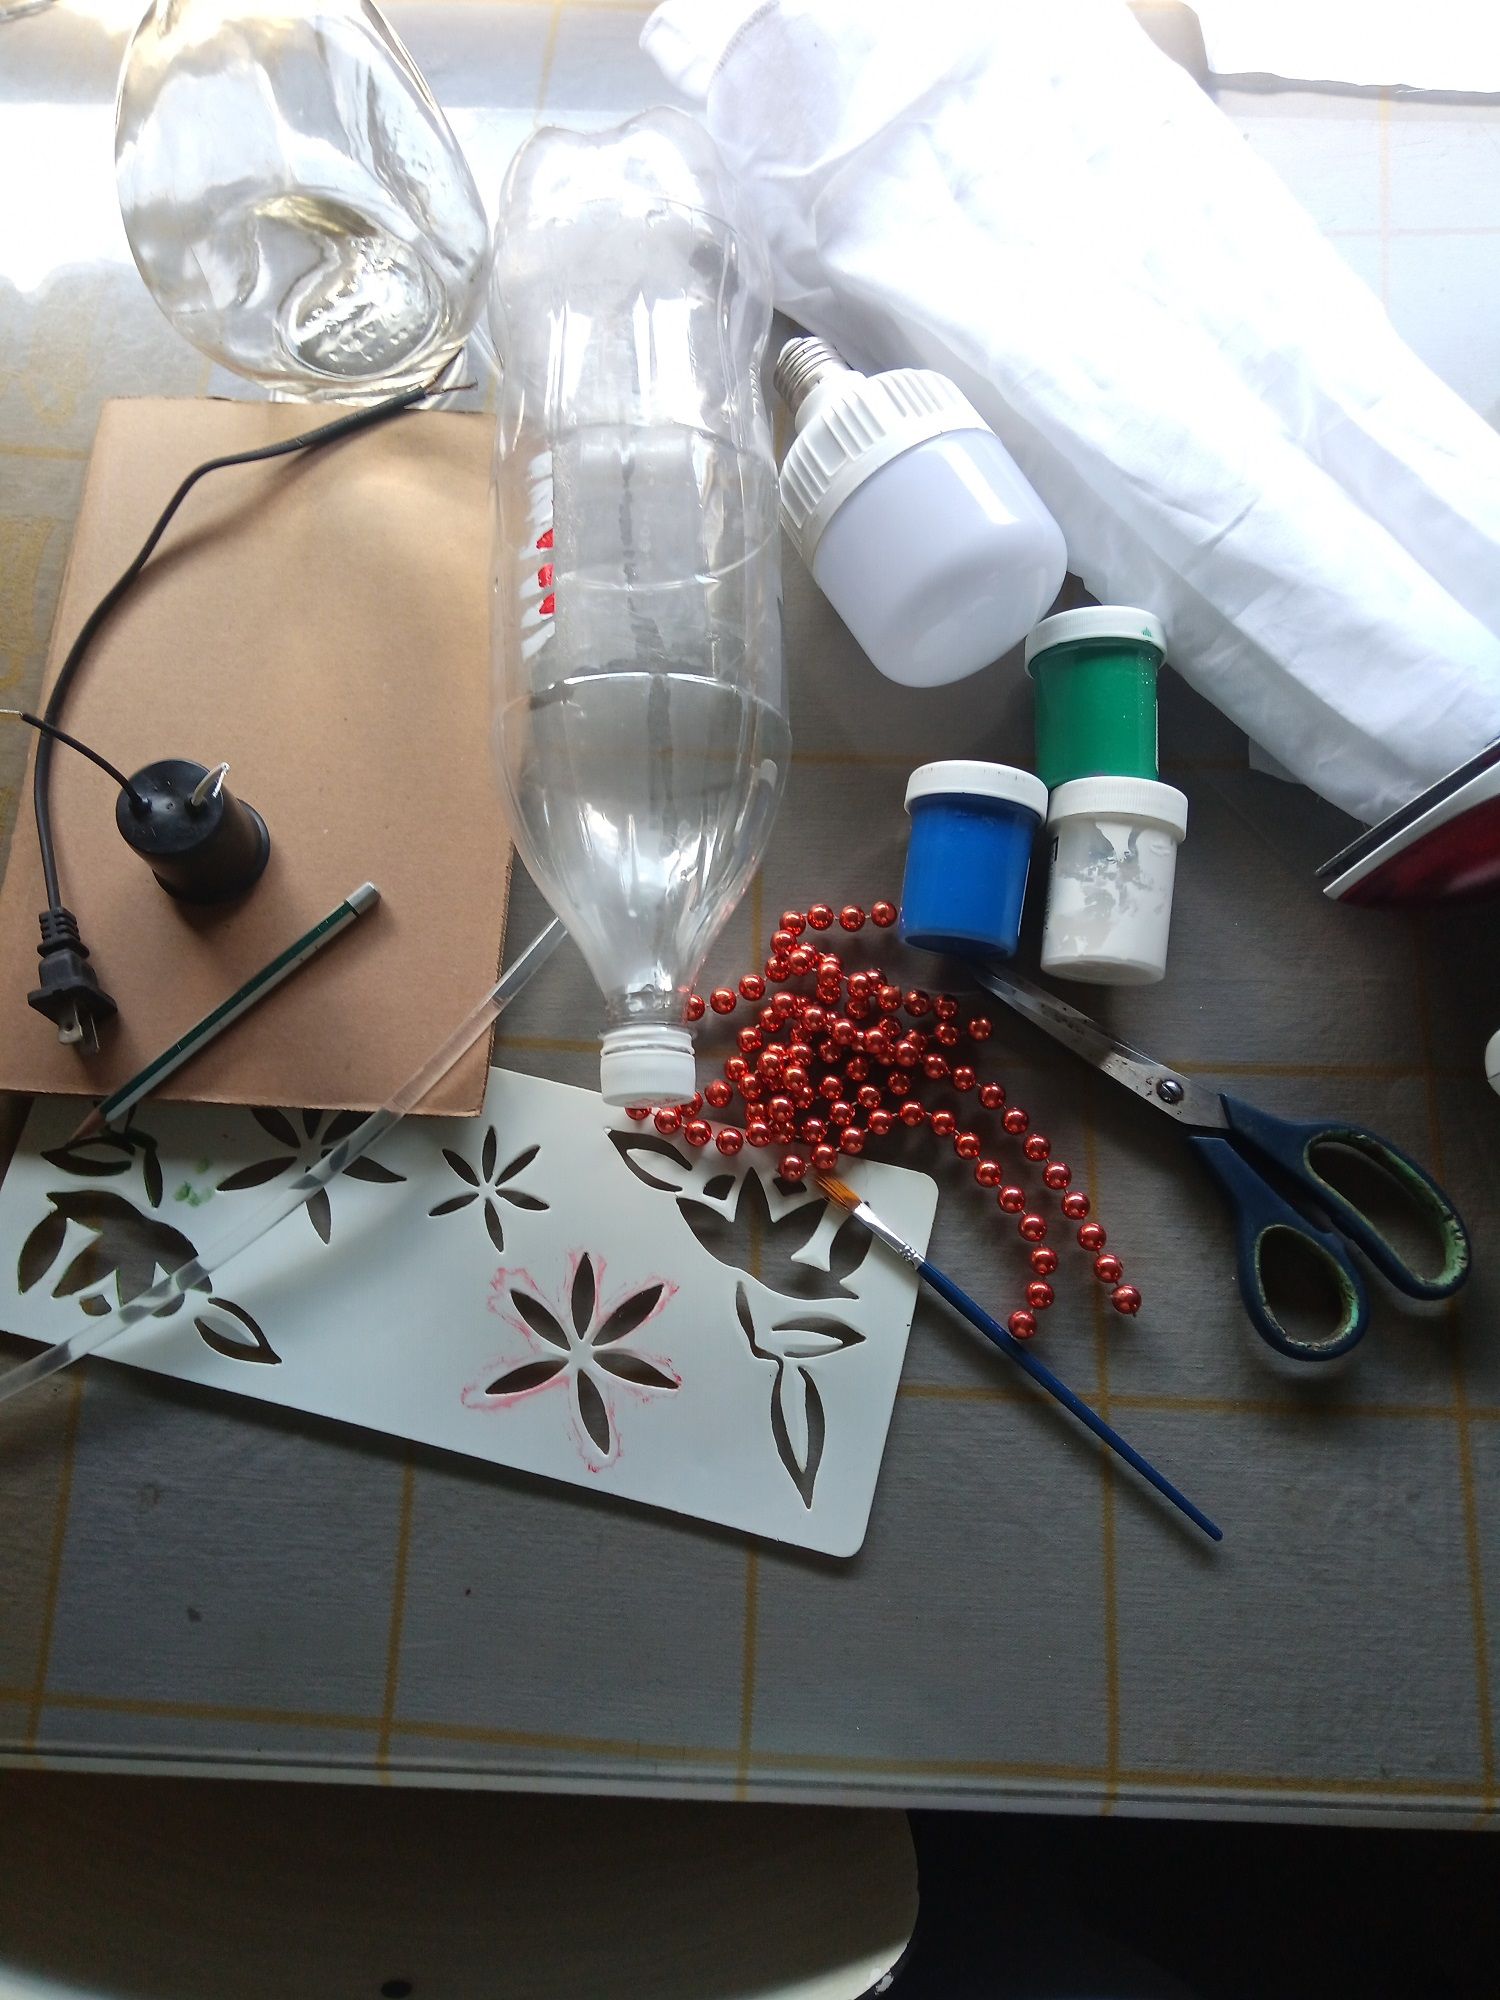 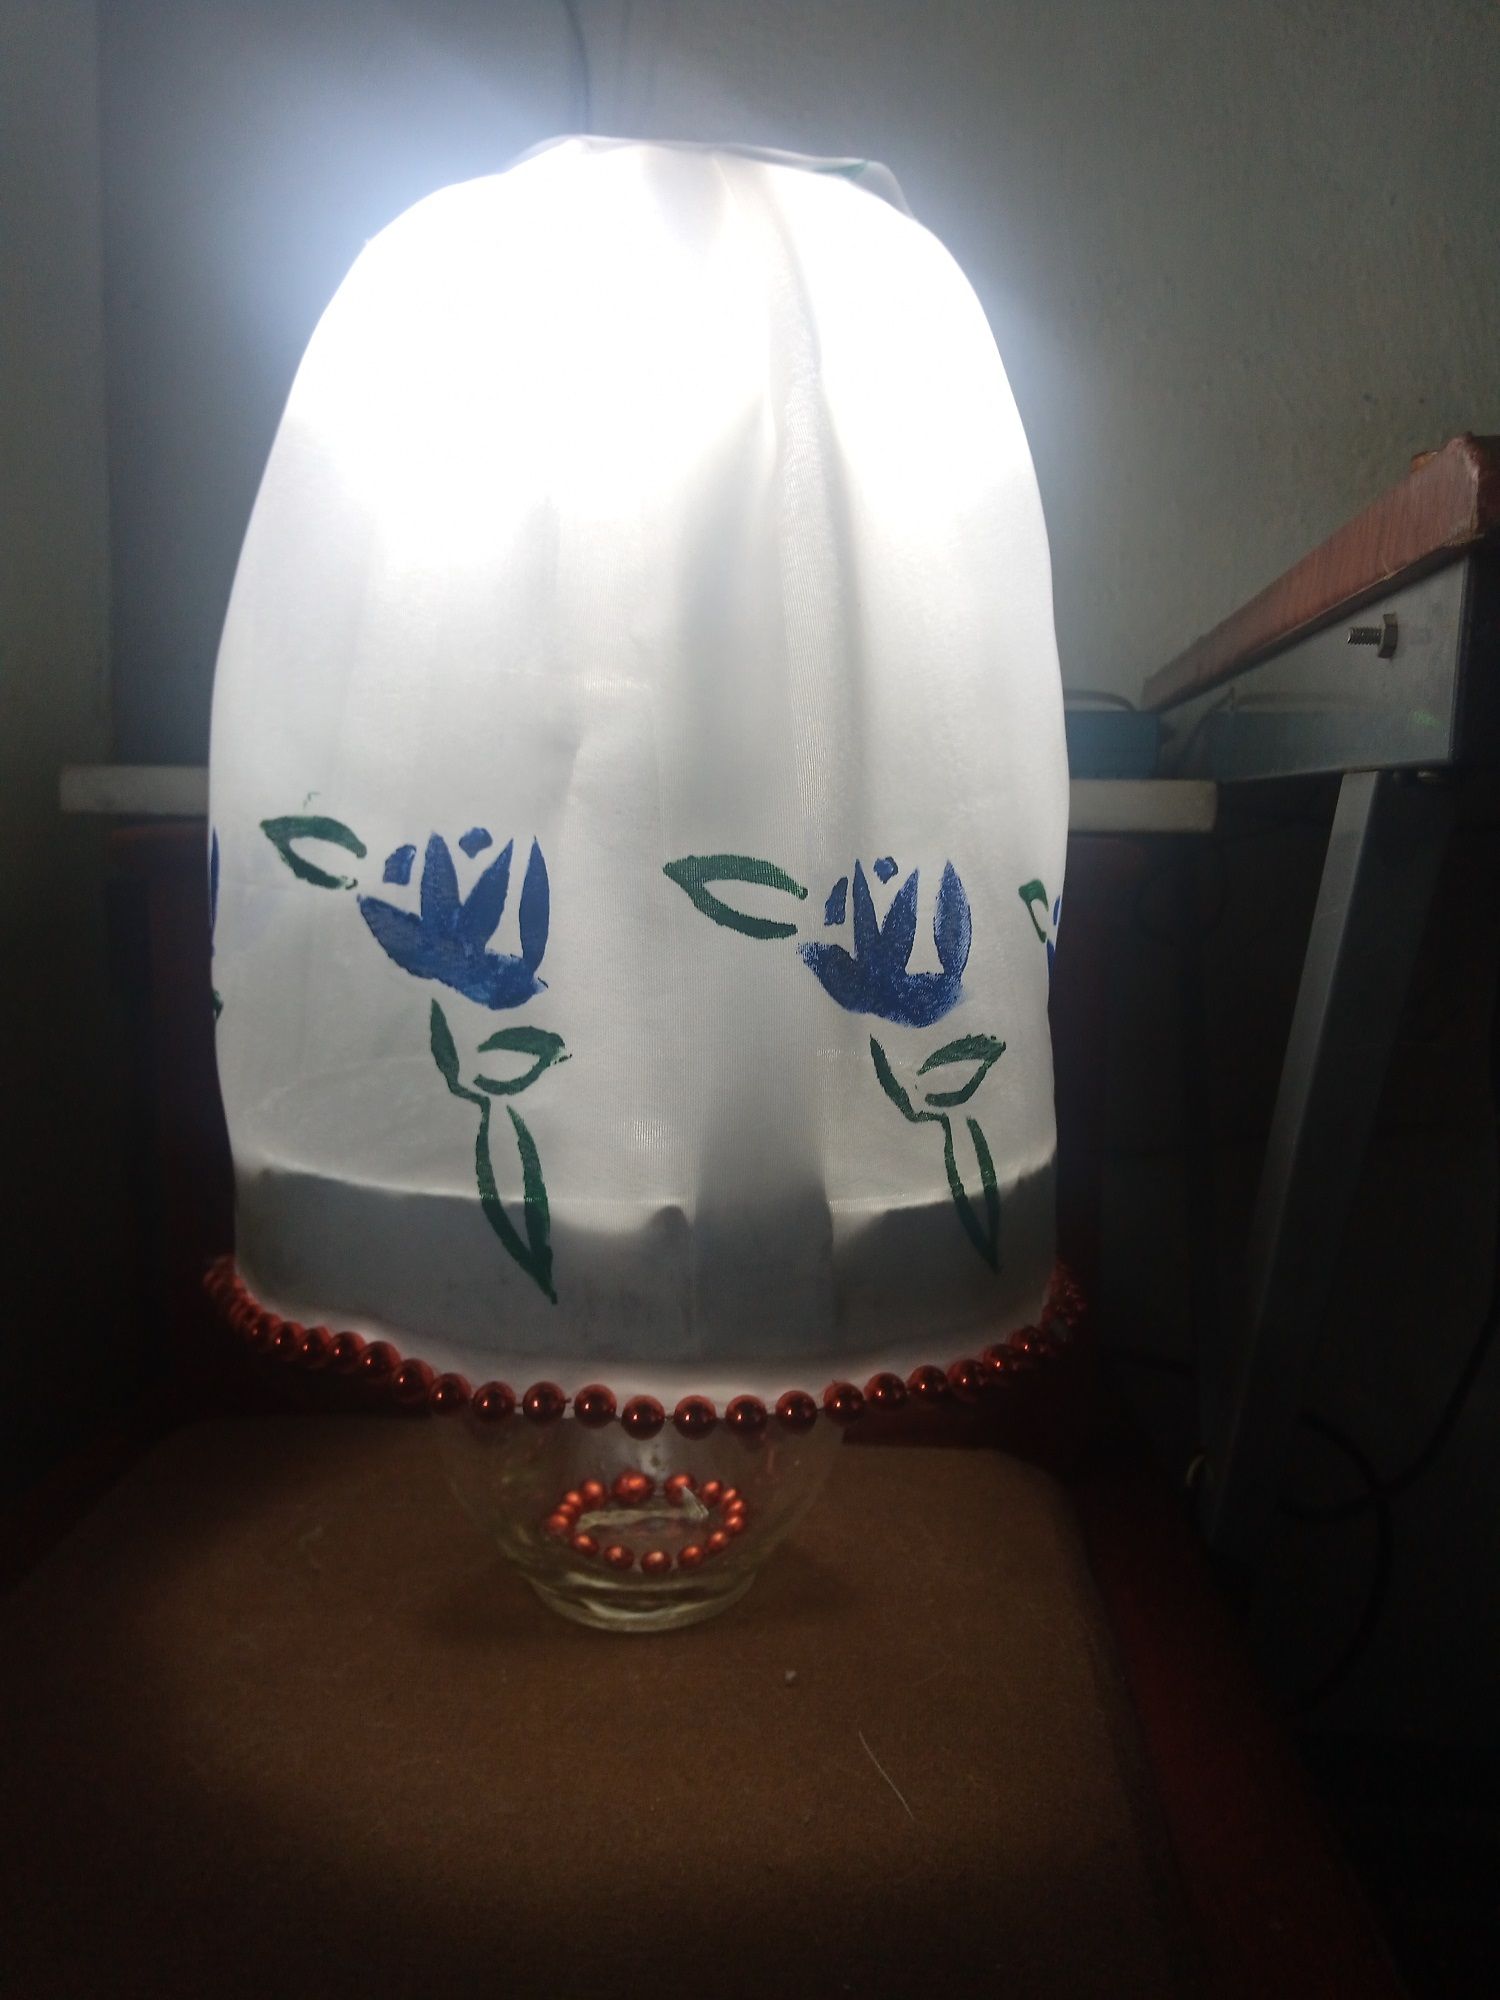 https://i.ibb.co/w0Ft7mp/separador-esposa-removebg-preview-1.png </CENTER> <center> social networks / redes sociales [](https://www.facebook.com/w.66laura/) [](https://twitter.com/lauramarbelis) Traductor [Deepl](https://www.deepl.com/home) >Translated [Deepl](https://www.deepl.com/home) Ediciones [Canva](https://www.canva.com/) >Editions [Canva](https://www.canva.com/) https://i.ibb.co/gVpTCyH/Clase-de-Ciencias.gif https://i.ibb.co/vPQjNP8/precentacion-final.png </center>
👍 joeyarnoldvn, thelooter, gerber, dcityrewards, chess-fitness, reazuliqbal, mice-k, chessbrotherspro, exyle, iansart, shitsignals, jeanlucsr, bobby.madagascar, steem.leo, hivechat, dcrops, daan, ezzy, felander, unconditionalove, bestboom, steem.services, dlike, determine, dpend.active, sketching, jelly13, vjap55, sawko, eniolw, misterlangdon, followjohngalt, cakemonster, poliwalt10, triplea.bot, tiffin, therealyme, ribary, eumorrell, jrjaime, mcsherriff, tony1294, rosmarly, adrianalara, oabreuf24, nazom, raca75, philipp87, ebargains, drricksanchez, sunshineee, holoferncro, playchess, meanbees, forykw, forkyishere, blq.alfa, equipodelta, frankches, eleazarvo, ang.spc, valthy, janettbrito76, brume7, wito7, yusma21, victor8, darguin3, lauracraft, badtman, eduard20, alba21, yoe1974, lk666, build-it, amberyooper, cruisin, letalis-laetitia, iworld, diy.blog, tokenyzzy, viking-ventures, hivemx, vickaboleyn, zenkly, acont, kiutvariedades, ritch, elsan.artes, hivemexico, pcojines, sweetval, sweetest, sancho.panza, cervantes, gargon, pgarcgo, jgcastrillo19, dulcinea, genesisojeda, buff-news, roinv, joseq1570, wartrapa, titin, justyy, fdataline77, augusto-cordova, ratspencer, hashzone91, danokoroafor, teo, simonmaz, technologix, steemegg, jmsansan.leo, kooza, sephiwolf, sovebrito, albagargon, oliviagm, mdcomes, val.halla, salvao, arnaldoropeza, rosana6, noticias, reimerlin, cervantes.one, davidcentenor, steemian258, arnilarn, cleydimar2000, doriangel, cuvi, jkj, tsoldovieri, camaund, pabloptimista, apokruphos, evagavilan2, neymarjr, spanishchef, cataluz, miguelbaez, edithbdraw, aneblueberry, juanmiguelsalas, teacher, magoia, artemisjane26, vampire-steem, heiditravels, christianytony, gabox, akertxu, astrochologist, zackygamer, kilianmiguel, maastro, kgakakillerg, martinstomisin, cpl-17, suteru, aliriera, germanandradeg, weissdorn, joshglen, fidel-castro, maruskina, noalys, lolysacc, mpandrew, kgswallet, mariacherries, soymanu, hijosdelhombre, elocuenciadsnuda, helengutier2, marievar, josdad01, kranga, meno, morey-lezama, c1udadan0x, phendx, corinadiaz, bit4bit, patris, nazer, peterpanpan, federacion45, gunthertopp, garvi, yohanys, battebilly, dumitriu, suzn.poudel, chopiliart, pialejoana, melor9, iamsaray, julesquirin, ilpaso, nbs.gmbh, simsahas, lizanomadsoul, manncpt, jnmarteau, thehealthylife, payger, globalschool, dknkyz.leo, dknkyz, cgamardo, violetmed, xeldal, shainemata, victartex, ykroys, nodoninja, menzo, xxeldal, adol, enki, carilinger, ilovegames, dondido, daniel.dalo, yehey, juanfb, coquiunlimited, julian.alejandro, mike961, piotr42, mammasitta, massivevibration, onartbali, sardrt, setroot, nascimentoab, diyhub, deepu7, diytube, arita992, orlandogonzalez, fulani, yiobri, jlinaresp, endersong, eylis, valenpba, fmbs25, curangel, roelandp, xcurangel, azircon, lepr8, abh12345, sustainablyyours, diegoameerali, felt.buzz, rocky1, auleo, cherryng, bertrayo, remotehorst23, cmplxty, thevil, dawnoner, issymarie2, olusiu, dibblers.dabs, pharesim, gikitiki, jayna, gentleshaid, stevenson7, lemony-cricket, louis88, tijntje, coloneljethro, nsfw-power, babytarazkp, robvector, minas-glory, the-burn, cooltivar, epicdice, meritocracy, waivio.curator, keuudeip, drax, ronpurteetv, thelittlebank, instagram-models, ssiena, x9ed1732b, altleft, traderhive, bryan-imhoff, diabolika, sco, outlinez, josdelmi, daboba, justbekindtoday, the-grandmaster, stemng, milky-concrete, doctor-cog-diss, samest, kingabesh, the.chiomz, cyprianj, joelagbo, djoi, temitayo-pelumi, jlsplatts, filler, saboin, koenau, warpedpoetic, obsesija, sampraise, robmojo, mister.reatard, macoolette, lxsxl, bluefinstudios, loadreaper,