How to make a cosmetic holder with recycled materials. // Cómo hacer un portacosméticos con materiales reciclados.
hive-130560·@lexim·
0.000 HBDHow to make a cosmetic holder with recycled materials. // Cómo hacer un portacosméticos con materiales reciclados.
## <center> ✨Bienvenidos. // Welcome. ✨</center> <center> 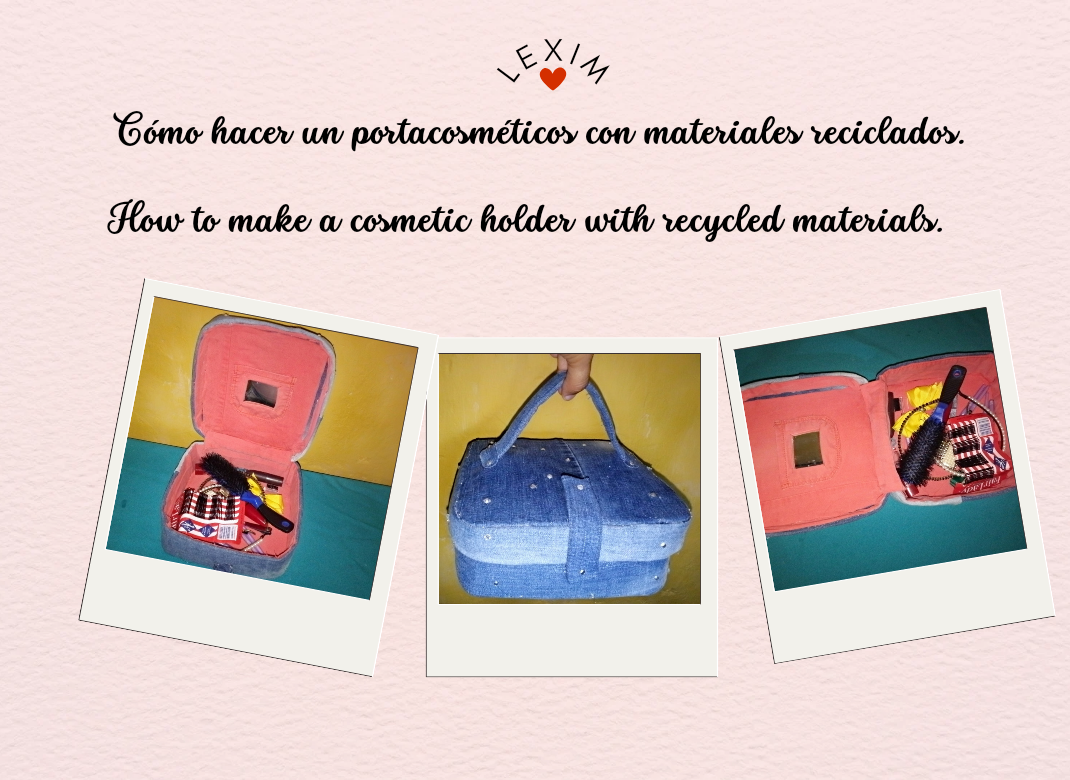 </center> <div class = pull-right> Hello everyone dear colleagues a pleasure to greet you. Today I want to share with you one of my creative activities that I like to do with much affection for you a step by step cosmetic holder with recycled materials looking in my clothes I found an old jeans that does not serve me and another softer fabric that was going to vote so I wanted to give another chance making a cosmetic holder and so it was that I was left I hope you like it and be useful for you too here I leave its elaboration. </div> <div class = pull-left> Hola a todos queridos compañeros un gusto en saludarlos. Hoy les quiero compartir una de mis actividades creativas que me gusta hacer con mucho cariño para ustedes un paso a paso de portacosméticos con materiales reciclados buscando en mis ropas encontré un jeans viejo que no me sirve y otra tela más suave que iba a votar así que quise darle otra oportunidad haciendo un portacosméticos y así fue que me quedo espero que les guste y sea útil para ustedes también acá les dejo su elaboración. </div> https://images.hive.blog/DQmQn6ZSnKcBTnsC3JN3Yv8EsVrPZdndhPszpXcBjudpArd/20230309_134052_0000.png #### <div class = pull-right>Materials. </div> #### <div class = pull-left>Materiales. </div> https://images.hive.blog/DQmQn6ZSnKcBTnsC3JN3Yv8EsVrPZdndhPszpXcBjudpArd/20230309_134052_0000.png <div class = pull-right> - Cardboard - Old cloth and denim - Scissors - Pencil - Ruler - Magic clasp - Decorative stones - Silicone gun - Small mirror. </div> <div class = pull-left> - Cartón - Tela vieja y de jeans - Tijera - Lapiz - Regla - Cierre mágico - Piedras decorativas - Pistola de silicón - Espejo pequeño. </div> https://images.hive.blog/DQmQn6ZSnKcBTnsC3JN3Yv8EsVrPZdndhPszpXcBjudpArd/20230309_134052_0000.png <center> 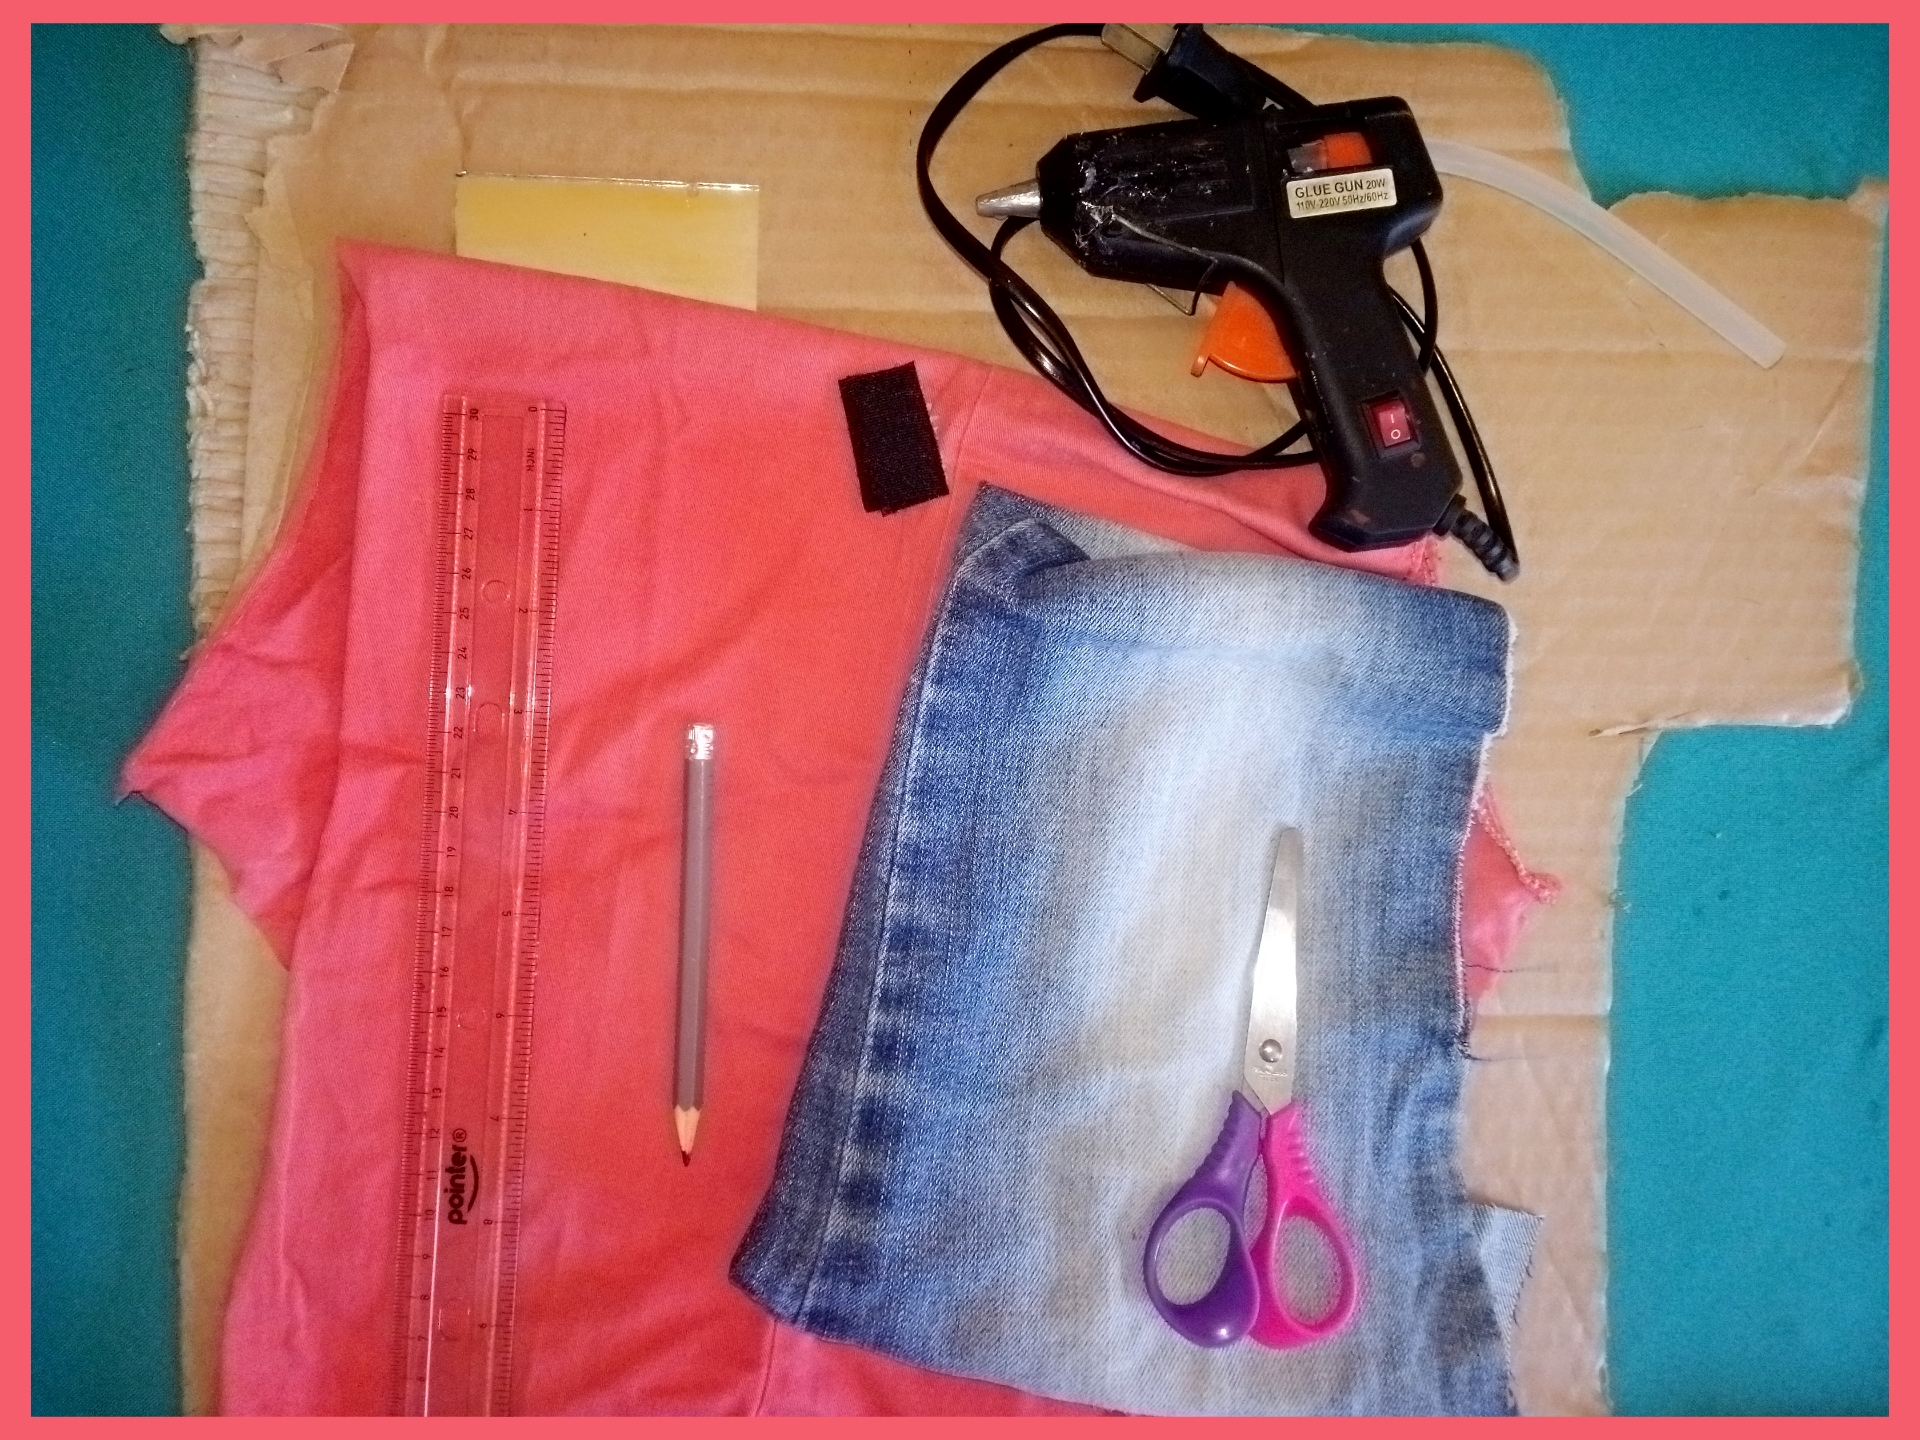 </center> #### <div class = pull-right>Step by step. </div> #### <div class = pull-left>Paso a paso. </div> https://images.hive.blog/DQmQn6ZSnKcBTnsC3JN3Yv8EsVrPZdndhPszpXcBjudpArd/20230309_134052_0000.png ### <center> Paso 1. // Step 1.</center> --- <div class = pull-right> To make the cosmetic holder take the cardboard and cut about 20 x 20 centimeters and ovalize the corners with something circular again draw another piece but 19 x 19 centimeters for the base. Then cut strips of 3 x 80 centimeters and another of 7 x 78 centimeters. </div> <div class = pull-left> Para hacer el portacosméticos coge el cartón y corta unos 20 x 20 centímetros y ovalamos las esquinas con algo circular nuevamente traza otra pieza pero de 19 x 19 centímetros para la base. Después corta unas tiras de 3 x 80 centímetros y otra de 7 x 78 centímetros. </div> 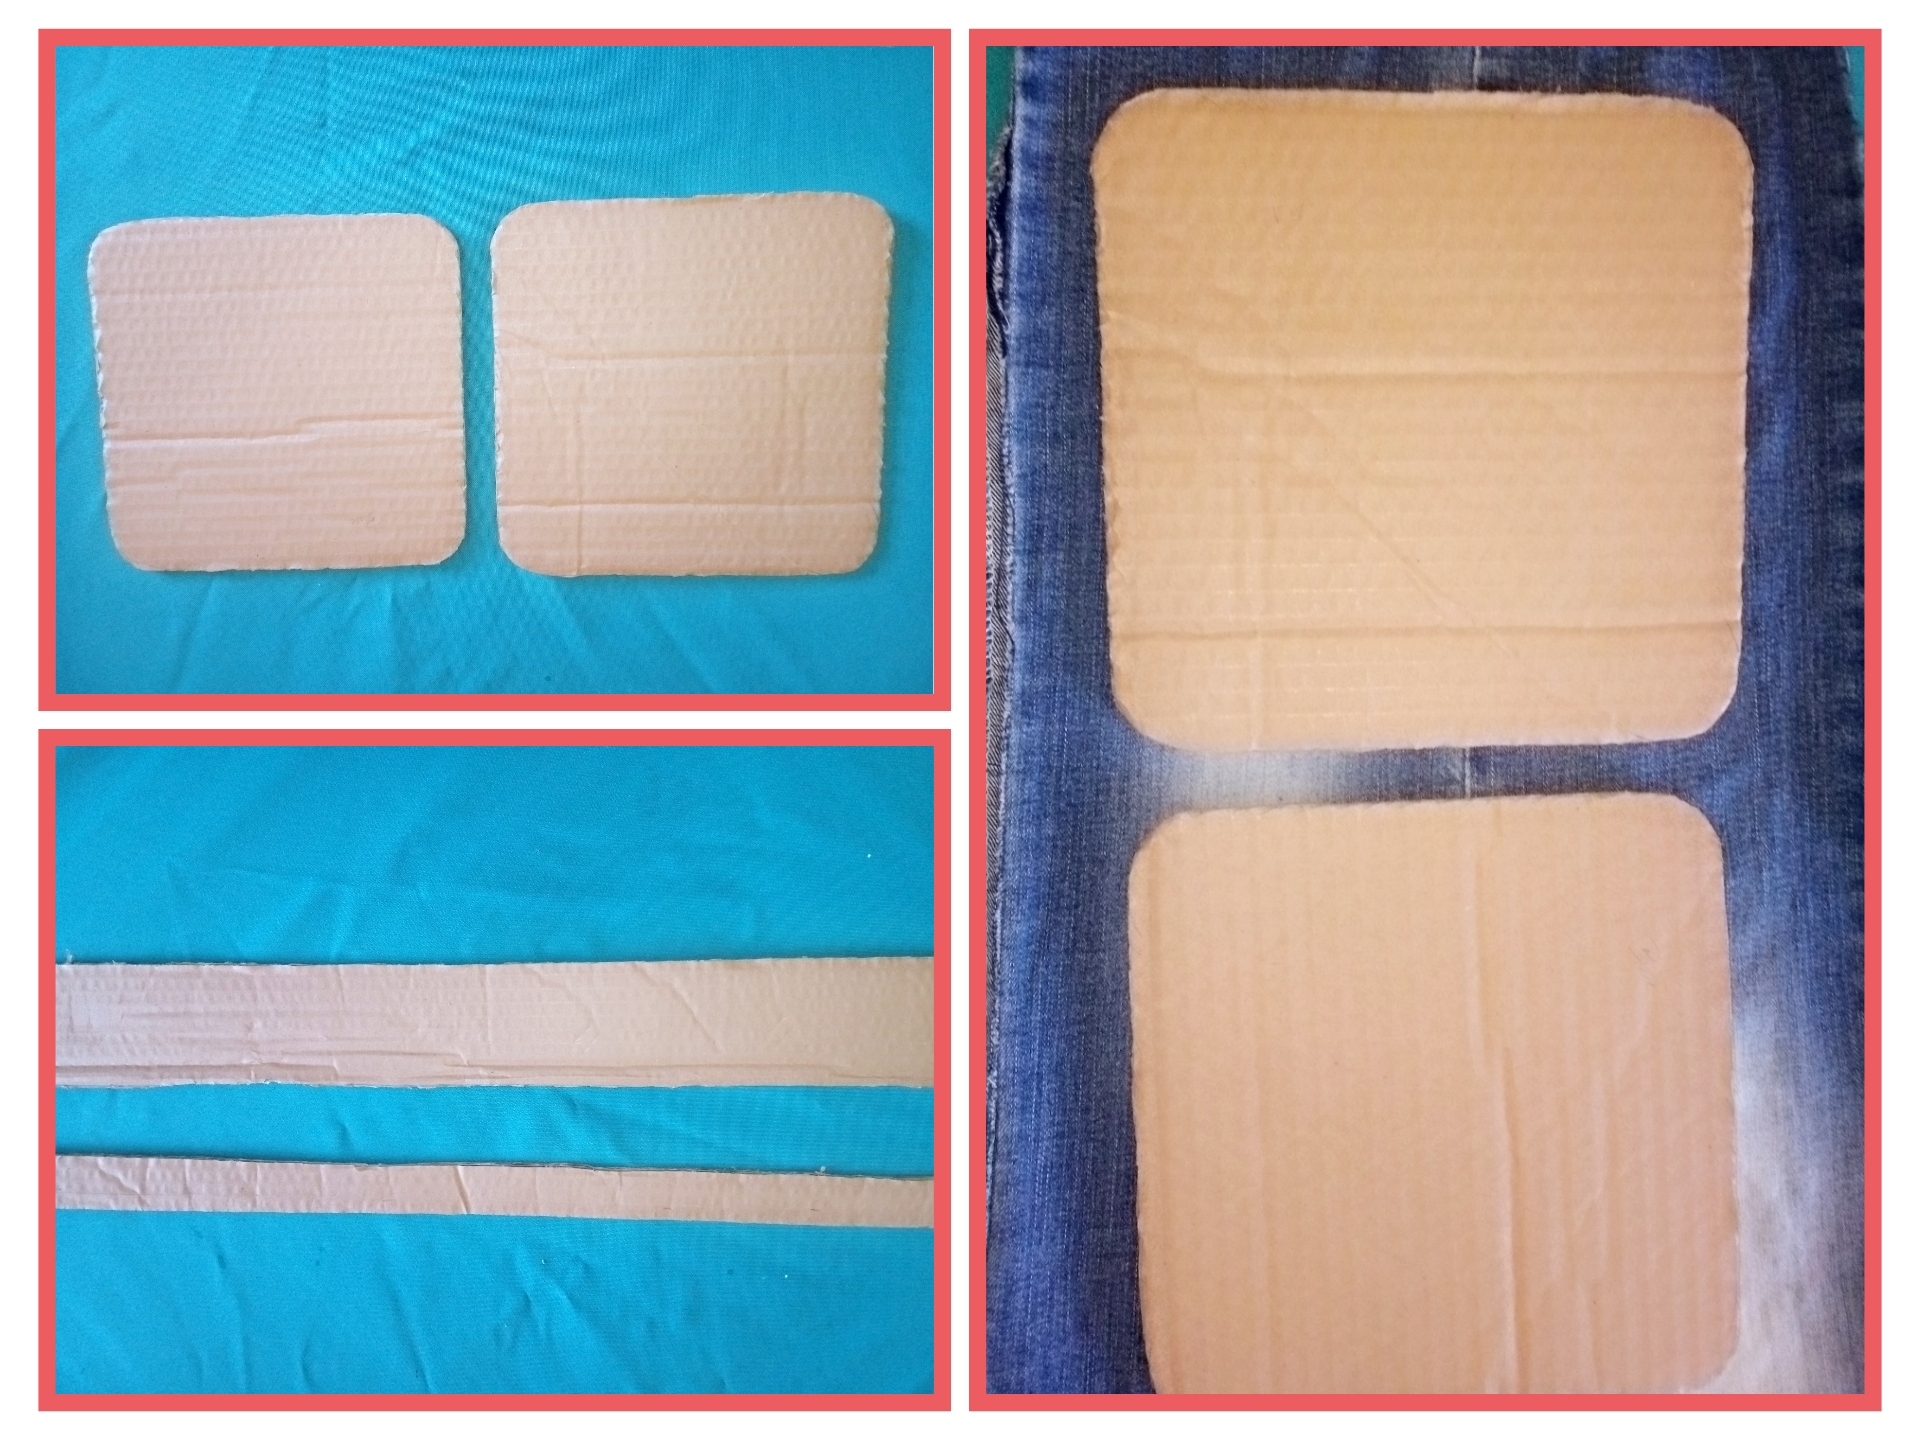 ### <center> Paso 2. // Step 2</center> --- <div class = pull-right> We line with the old fabric the pieces and strips on one side with the jean fabric and on the other side with another softer fabric we glue with hot silicone. </div> <div class = pull-left> Forramos con la tela vieja las piezas y tiras de un lado con la tela de jean y por el otro lado con otra tela más suave pegamos con silicón caliente. </div> 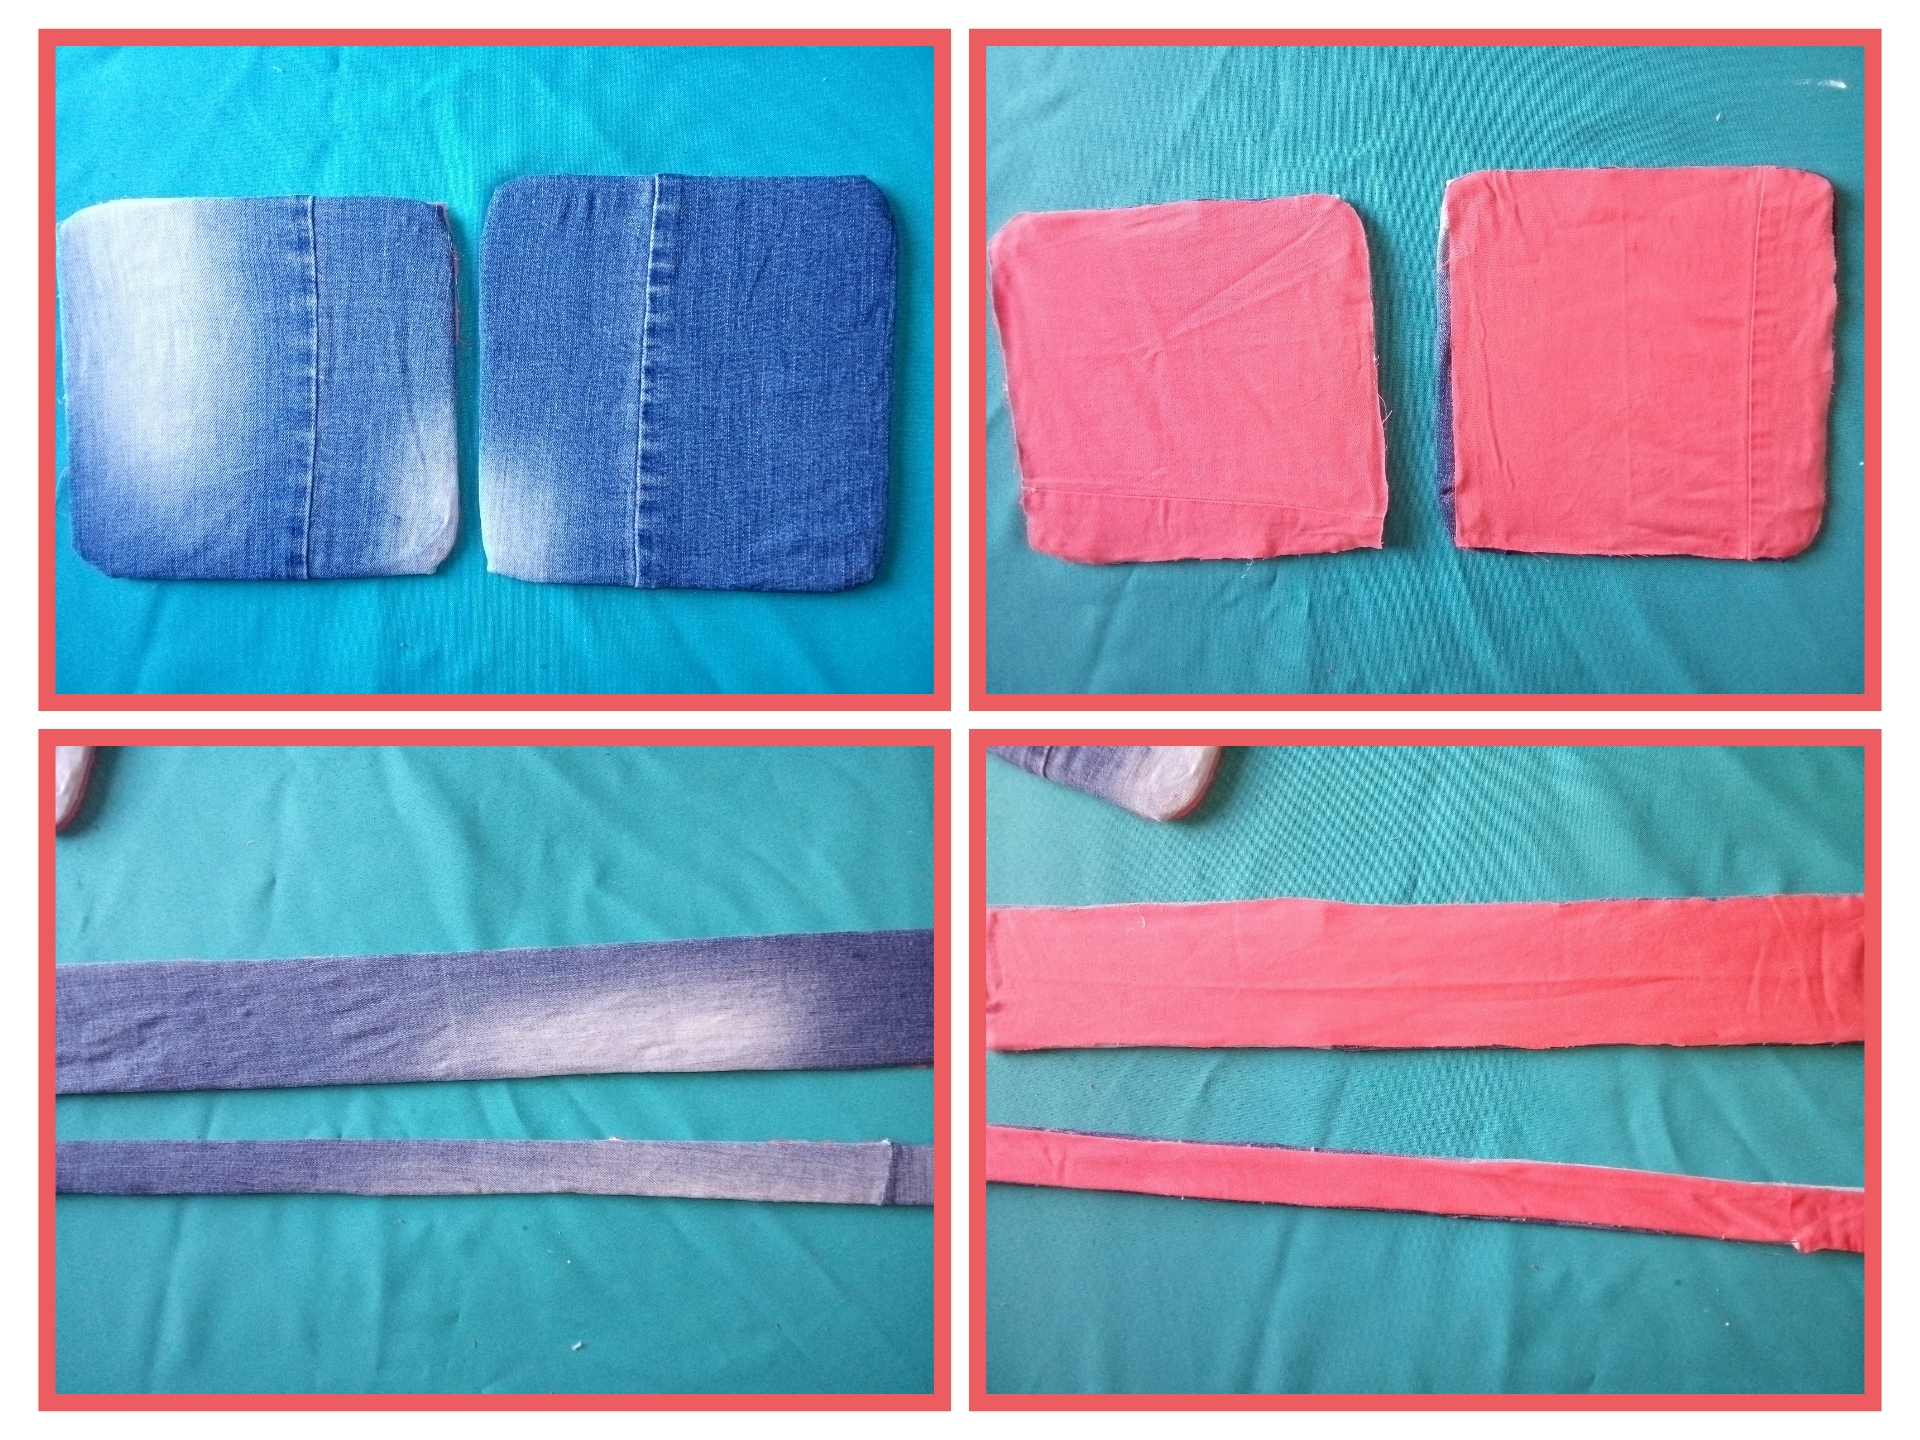 ### <center> Paso 3. // Step 3.</center> --- <div class = pull-right> We continue assembling the cosmetic box, once the pieces are covered, glue the 20 x 20 piece with the 3 x 80 strip and the two remaining pieces as well. We leave the jean fabric on the outside and the other one on the inside in this way we will obtain a box and a lid. </div> <div class = pull-left> Seguimos armando el portacosméticos ya cubierta las piezas pega la pieza de 20 x 20 con la tira de 3 x 80 y las dos piezas que quedan también. Dejamos la tela de jean por fuera y la otra por dentro de esta manera obtendremos una caja y una tapa. </div> 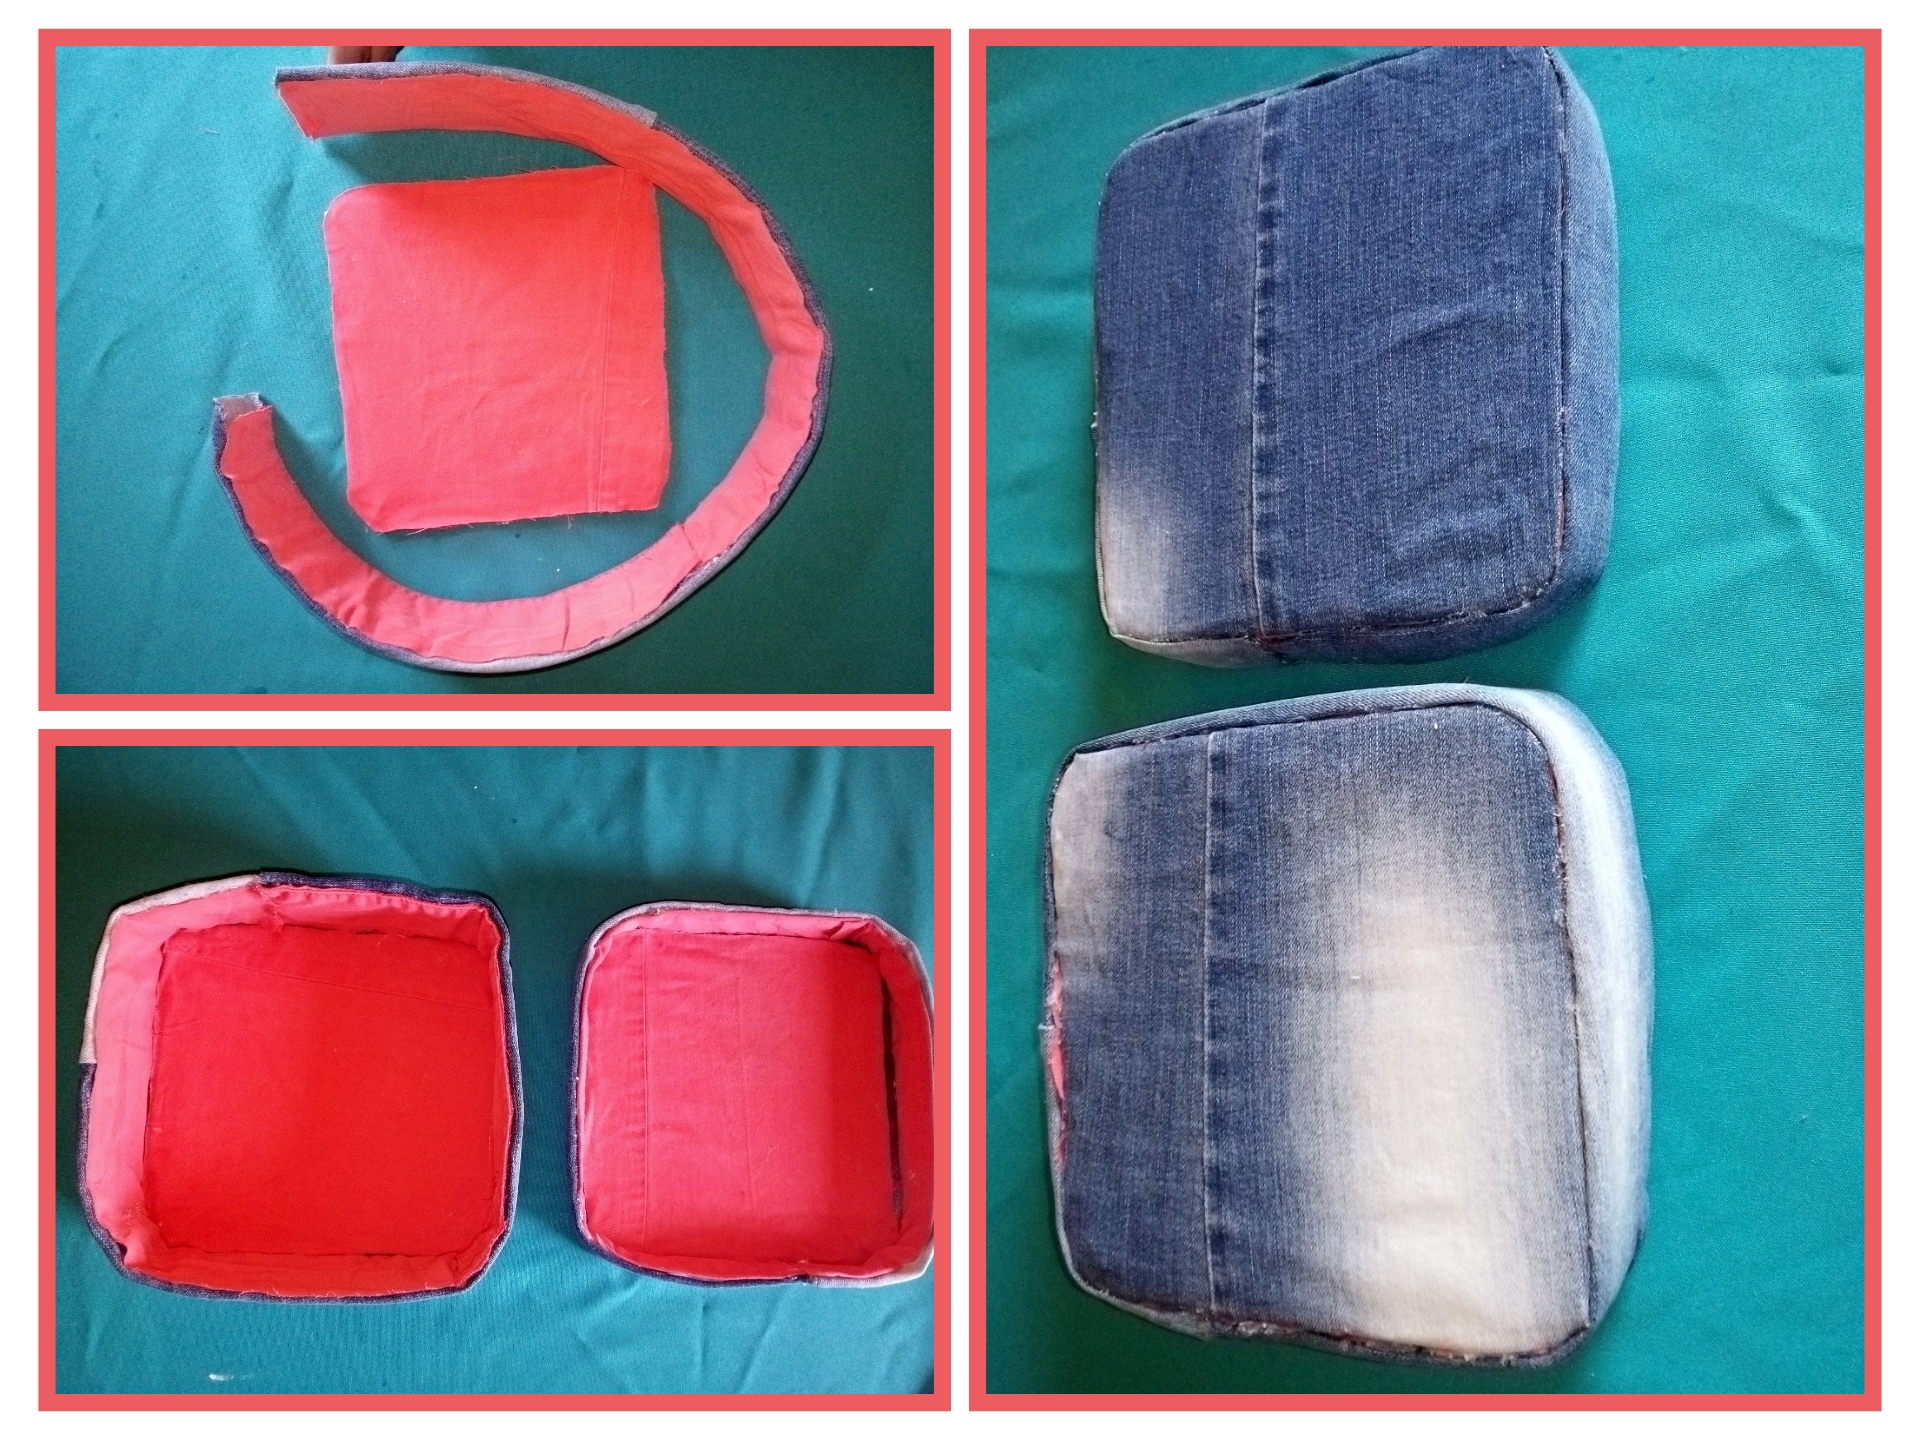 ### <center> Paso 4. // Step 4.</center> --- <div class = pull-right> To fix the lid with a piece of fabric we glue with hot silicone on the surface joining the lid. And for the handle, cover a strip of cardboard about 2 x 13 centimeters with denim and glue it on the lid of the cosmetic holder. </div> <div class = pull-left> Para fijar la tapa con un pedazo de tela pegamos con silicón caliente en la superficie uniendo la tapa. Y para el asa cubre con tela de jean una tira de cartón de unos 2 x 13 centímetros y pega sobre la tapa del portacosméticos. </div> 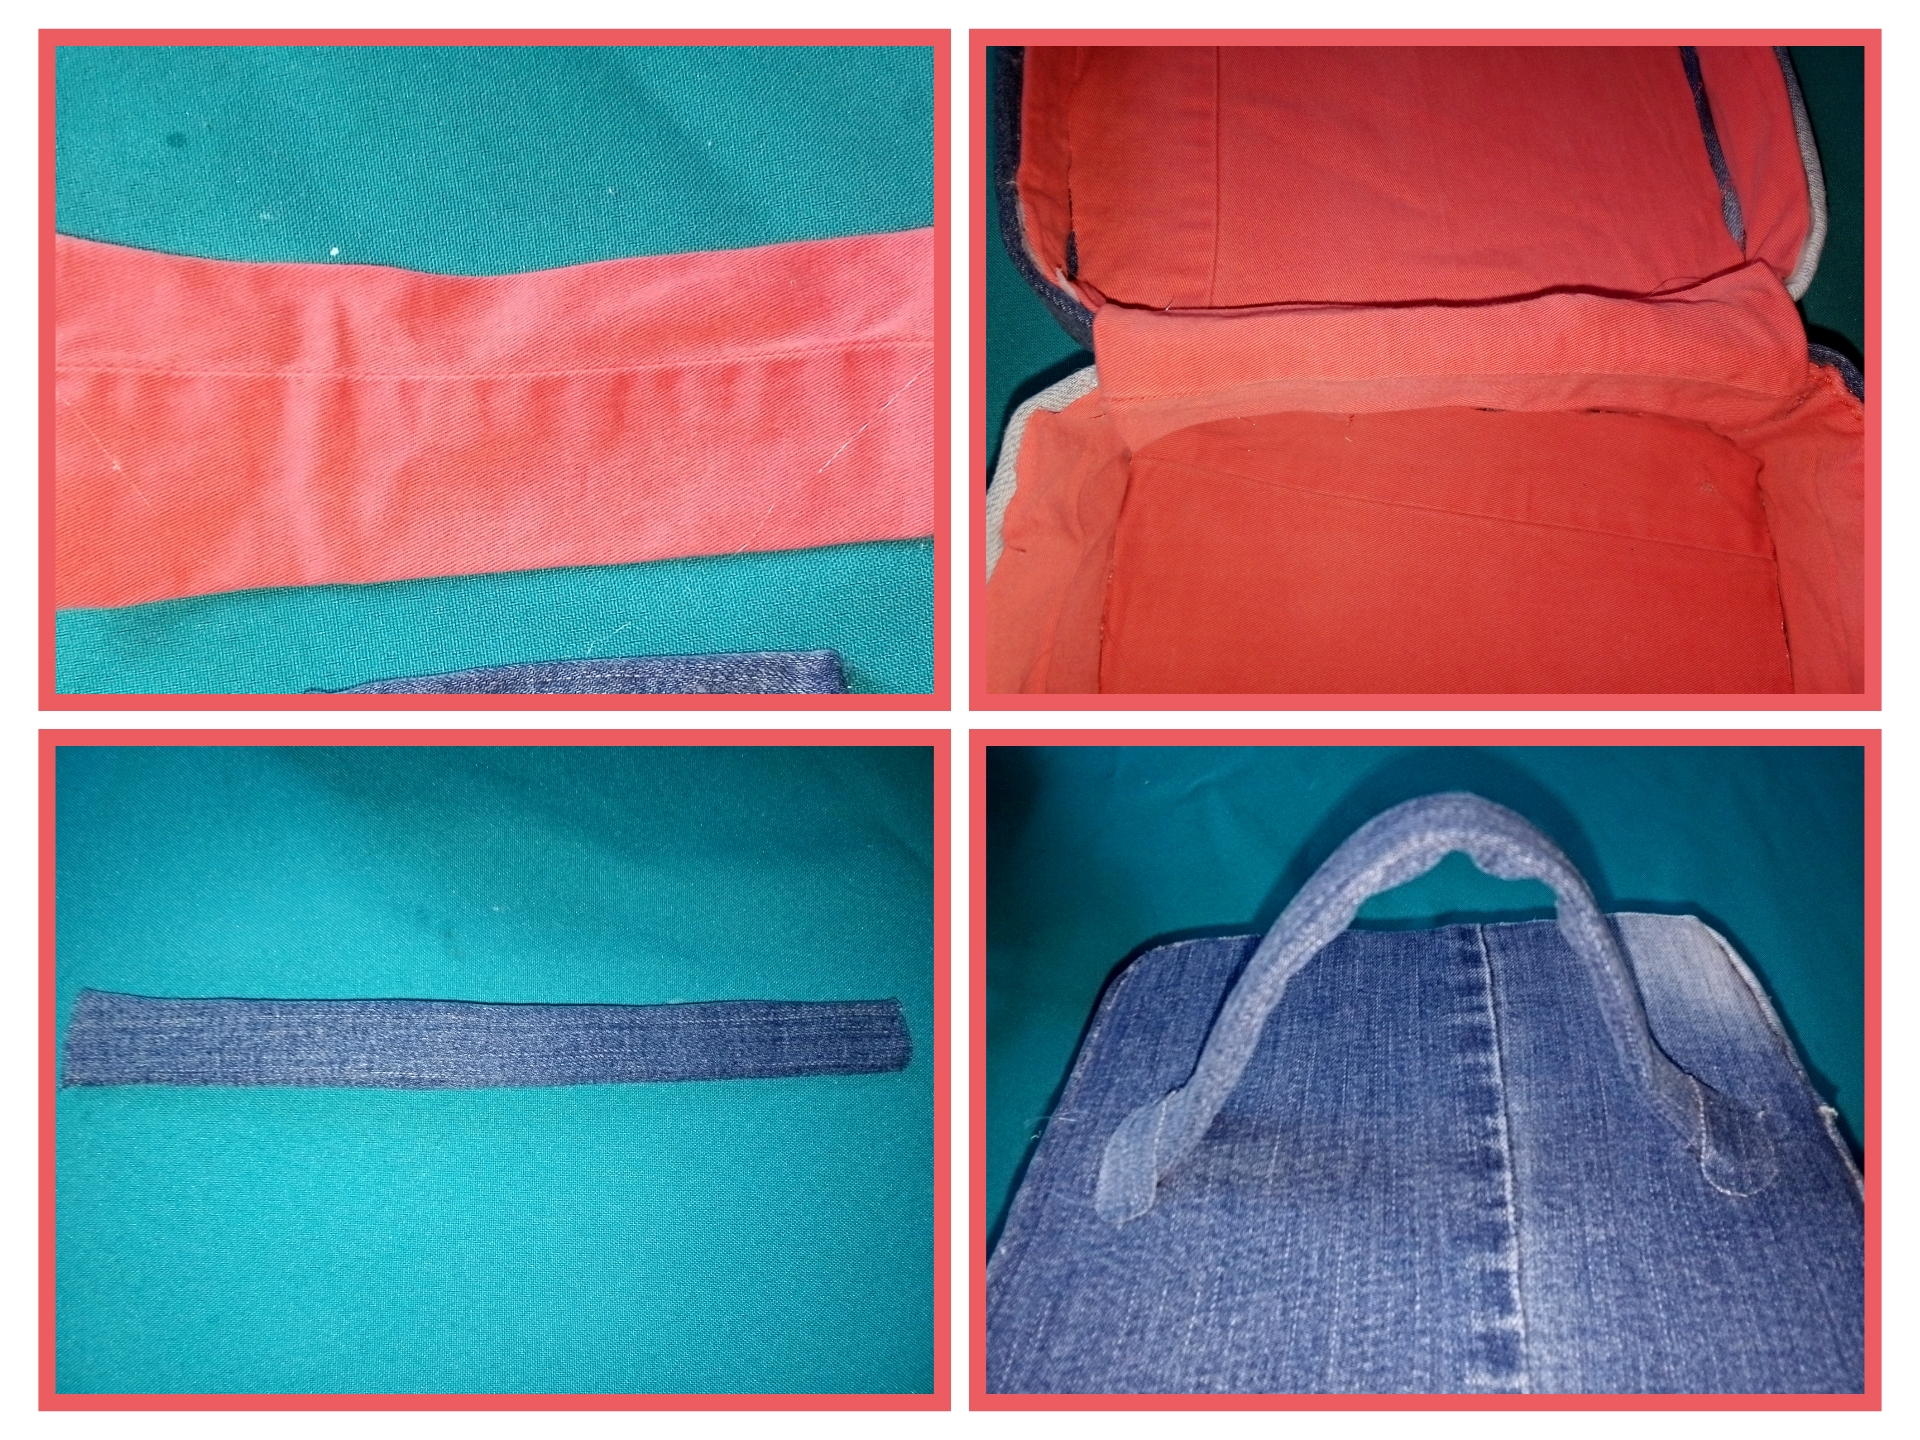 ### <center> Paso 5. // Step 5.</center> --- <div class = pull-right> Next and last step, make a strip of jeans so that the cosmetic holder does not open and glue it with a magic zipper. Inside and if you like paste a small mirror and to decorate the outside paste the decorative stones and ready to keep our things. </div> <div class = pull-left> Siguiente y último paso, haz una tira de jeans para que el portacosméticos no se abra y pega con un cierre magico. Por dentro y si gustas pega un espejo pequeño y para decorar por fuera pega laa piedras decorativas y listo para guardar nuestras cosas. </div> 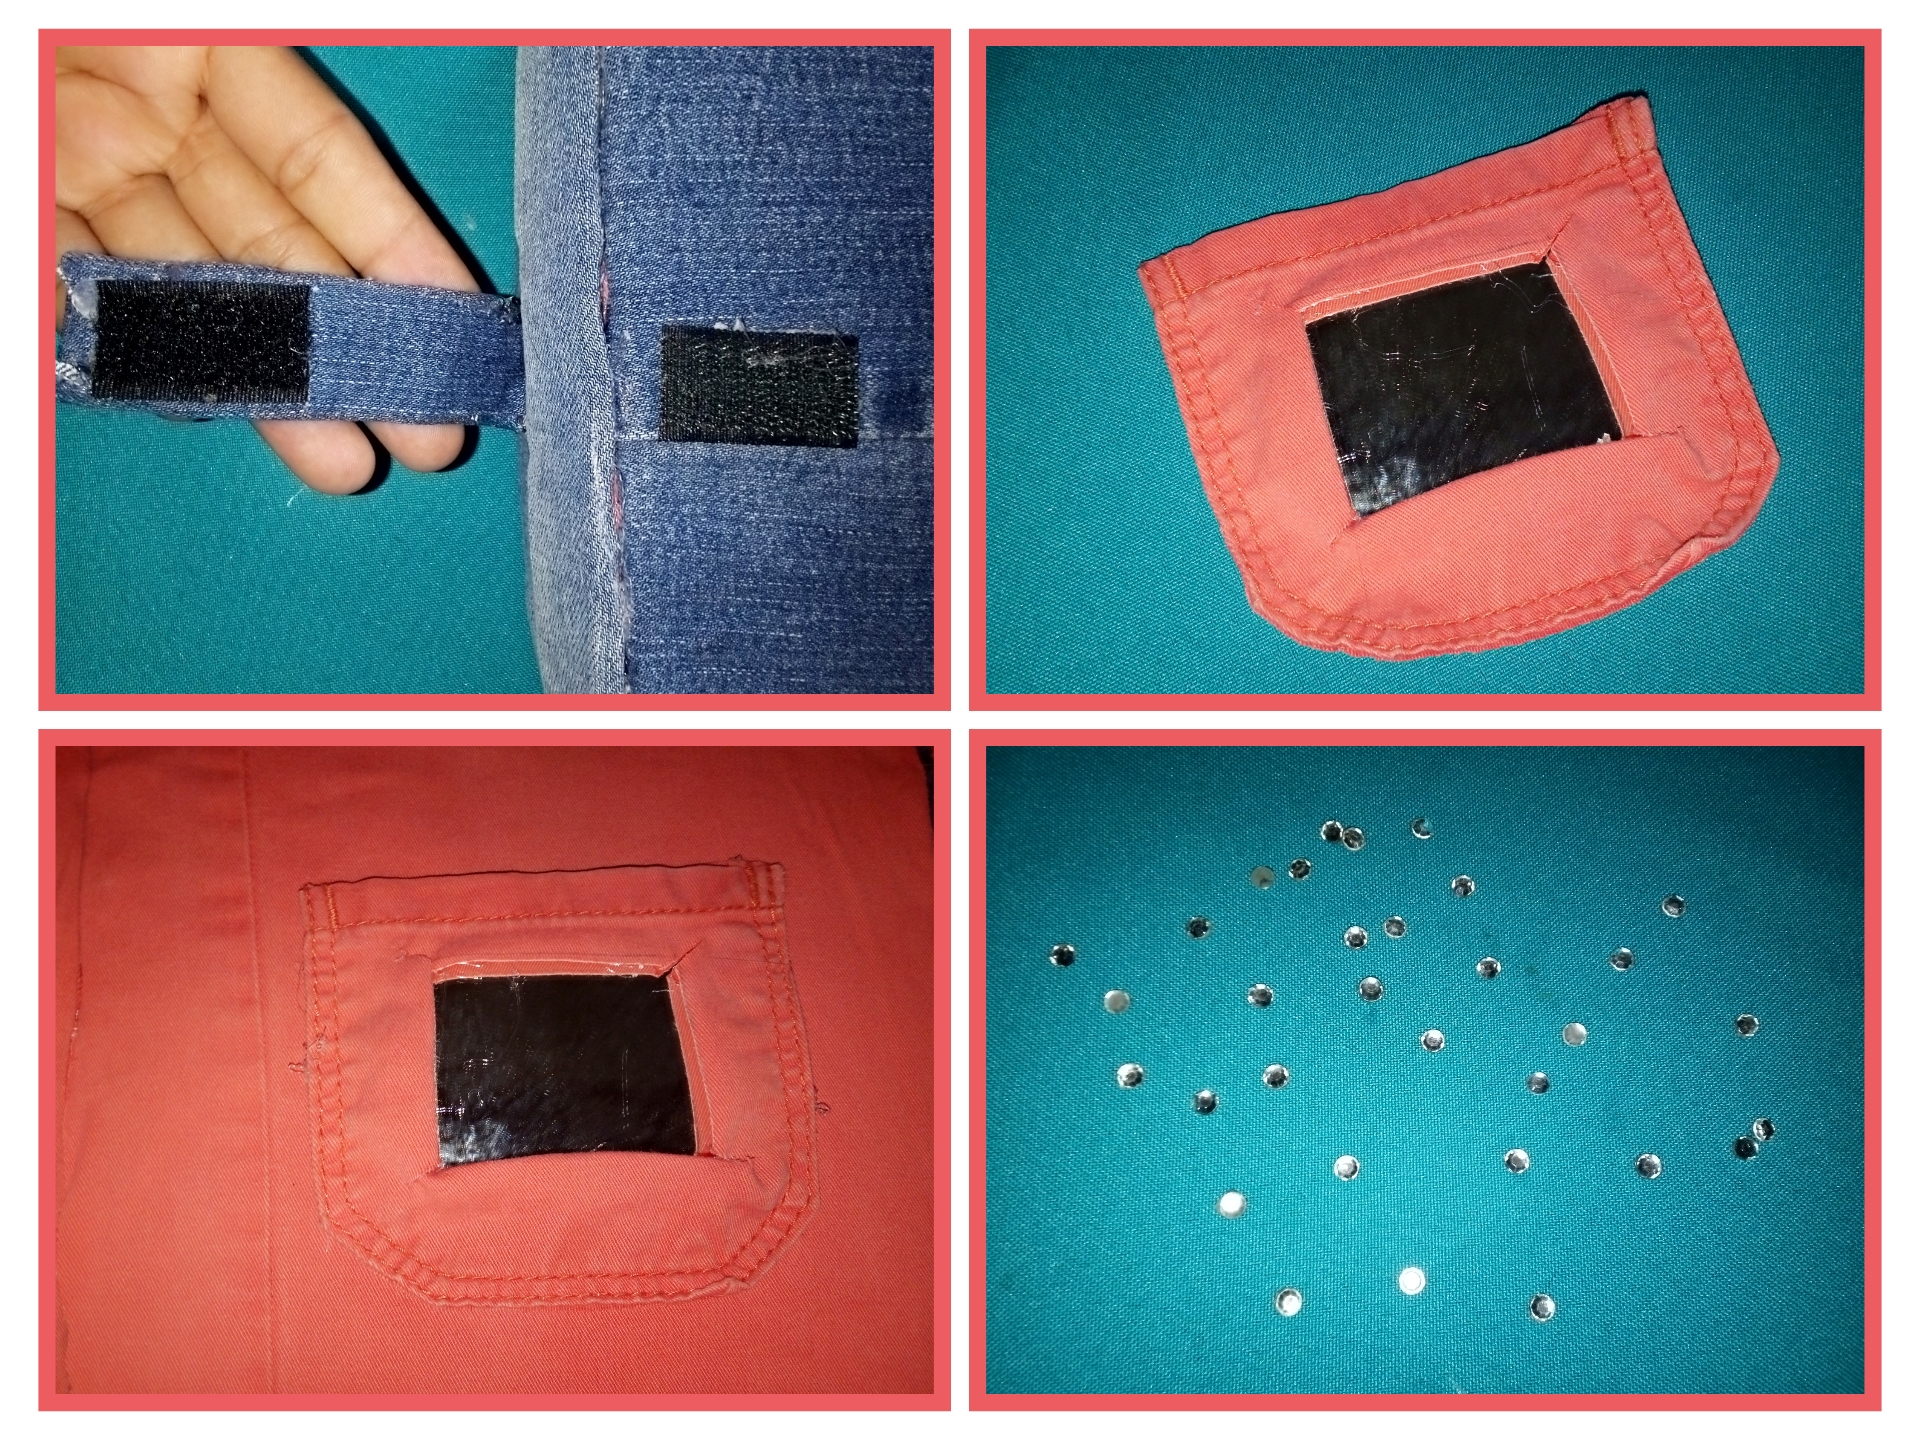 https://images.hive.blog/DQmQn6ZSnKcBTnsC3JN3Yv8EsVrPZdndhPszpXcBjudpArd/20230309_134052_0000.png ### <center>✨Final result. // Resultado final.✨</center> https://images.hive.blog/DQmQn6ZSnKcBTnsC3JN3Yv8EsVrPZdndhPszpXcBjudpArd/20230309_134052_0000.png 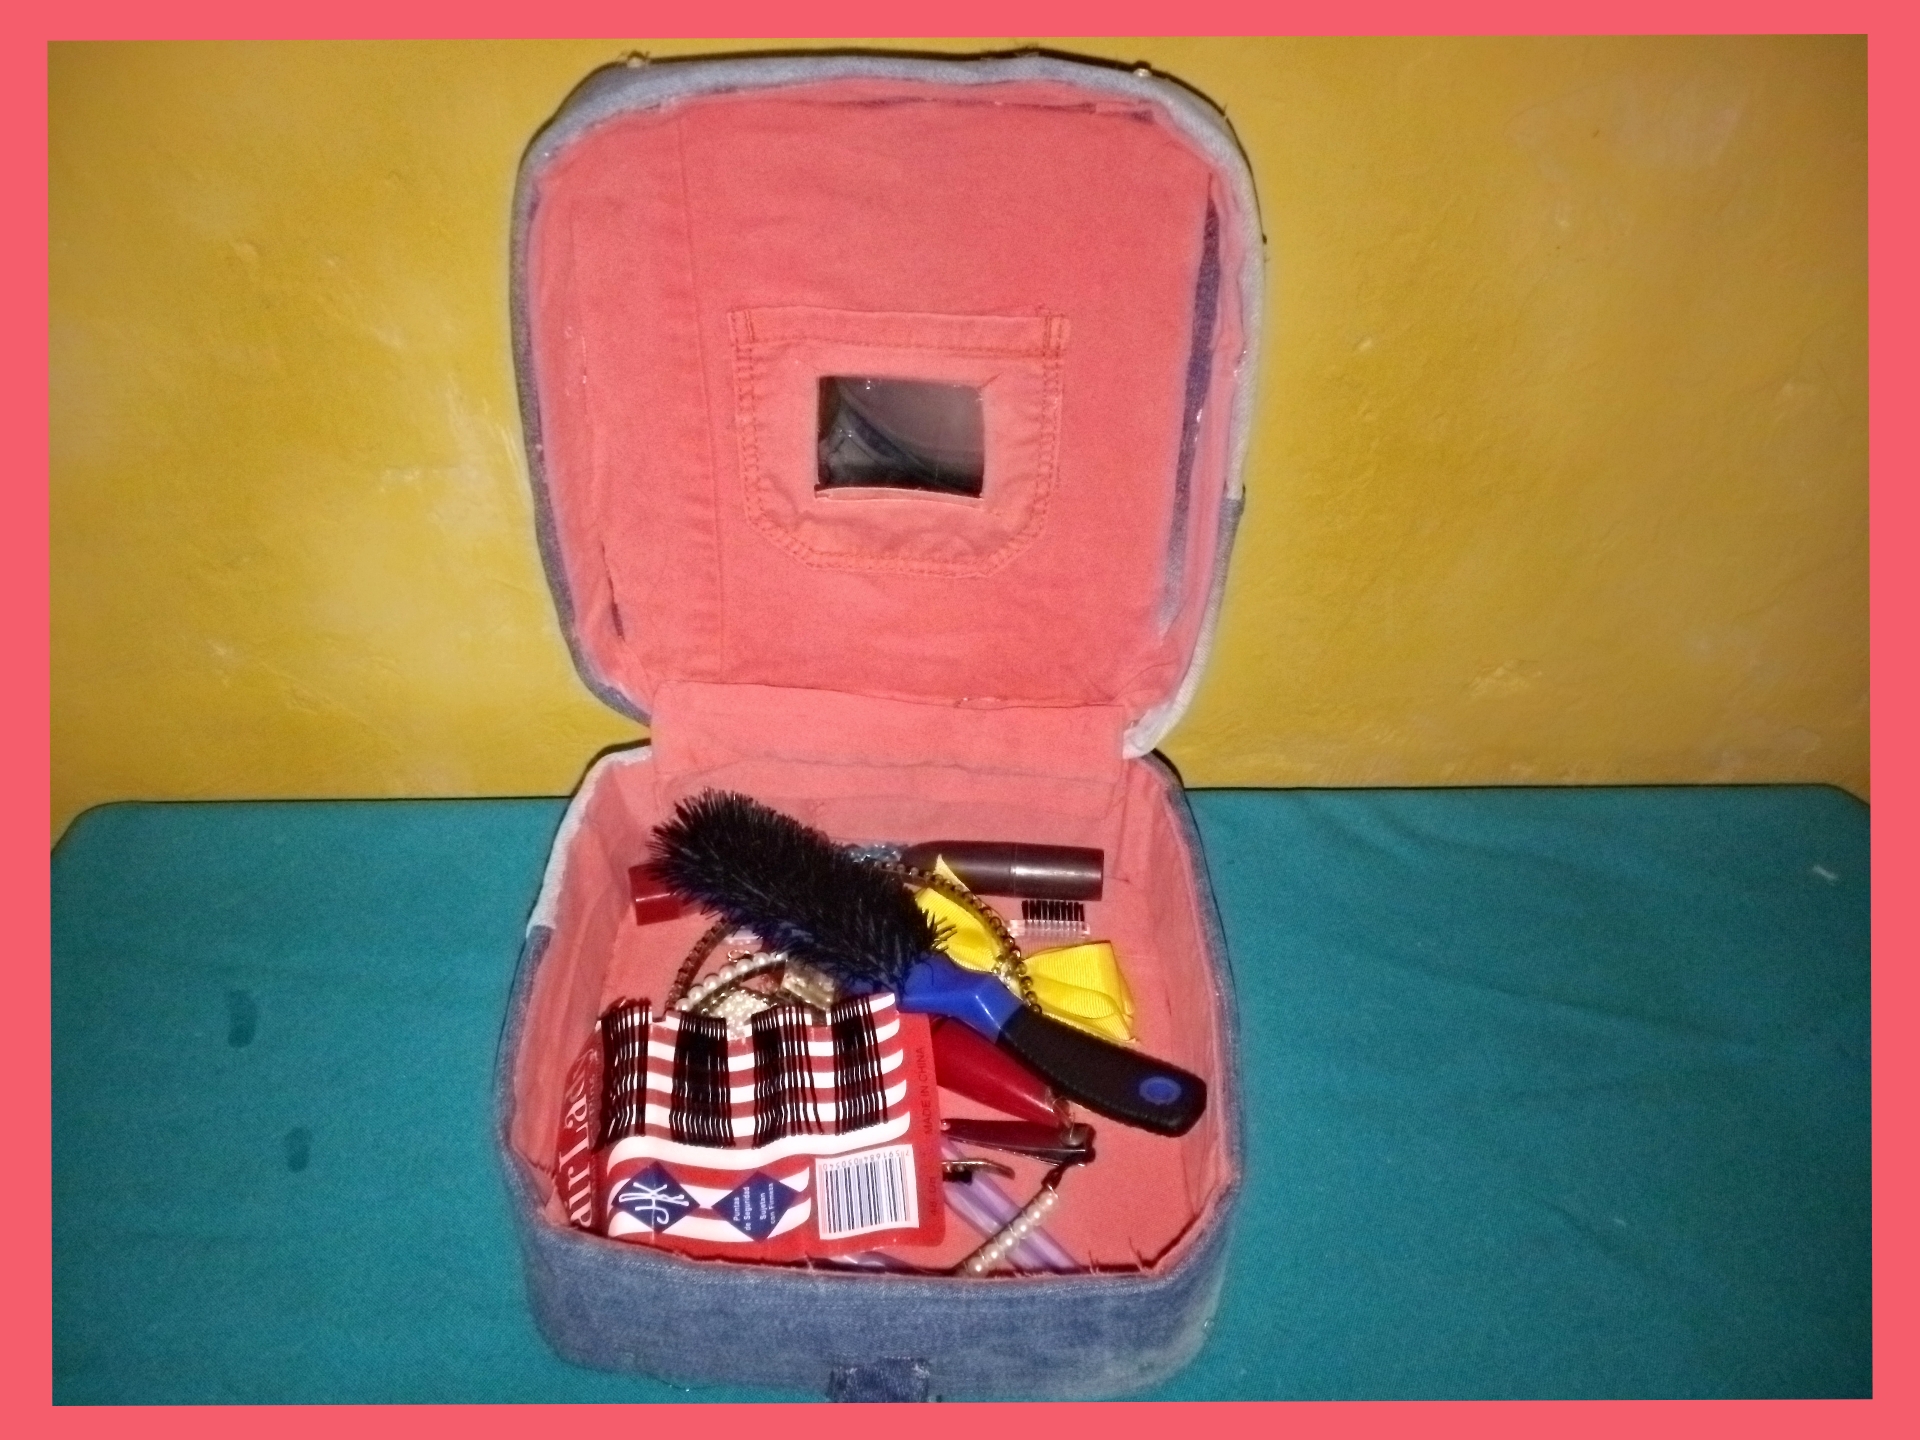 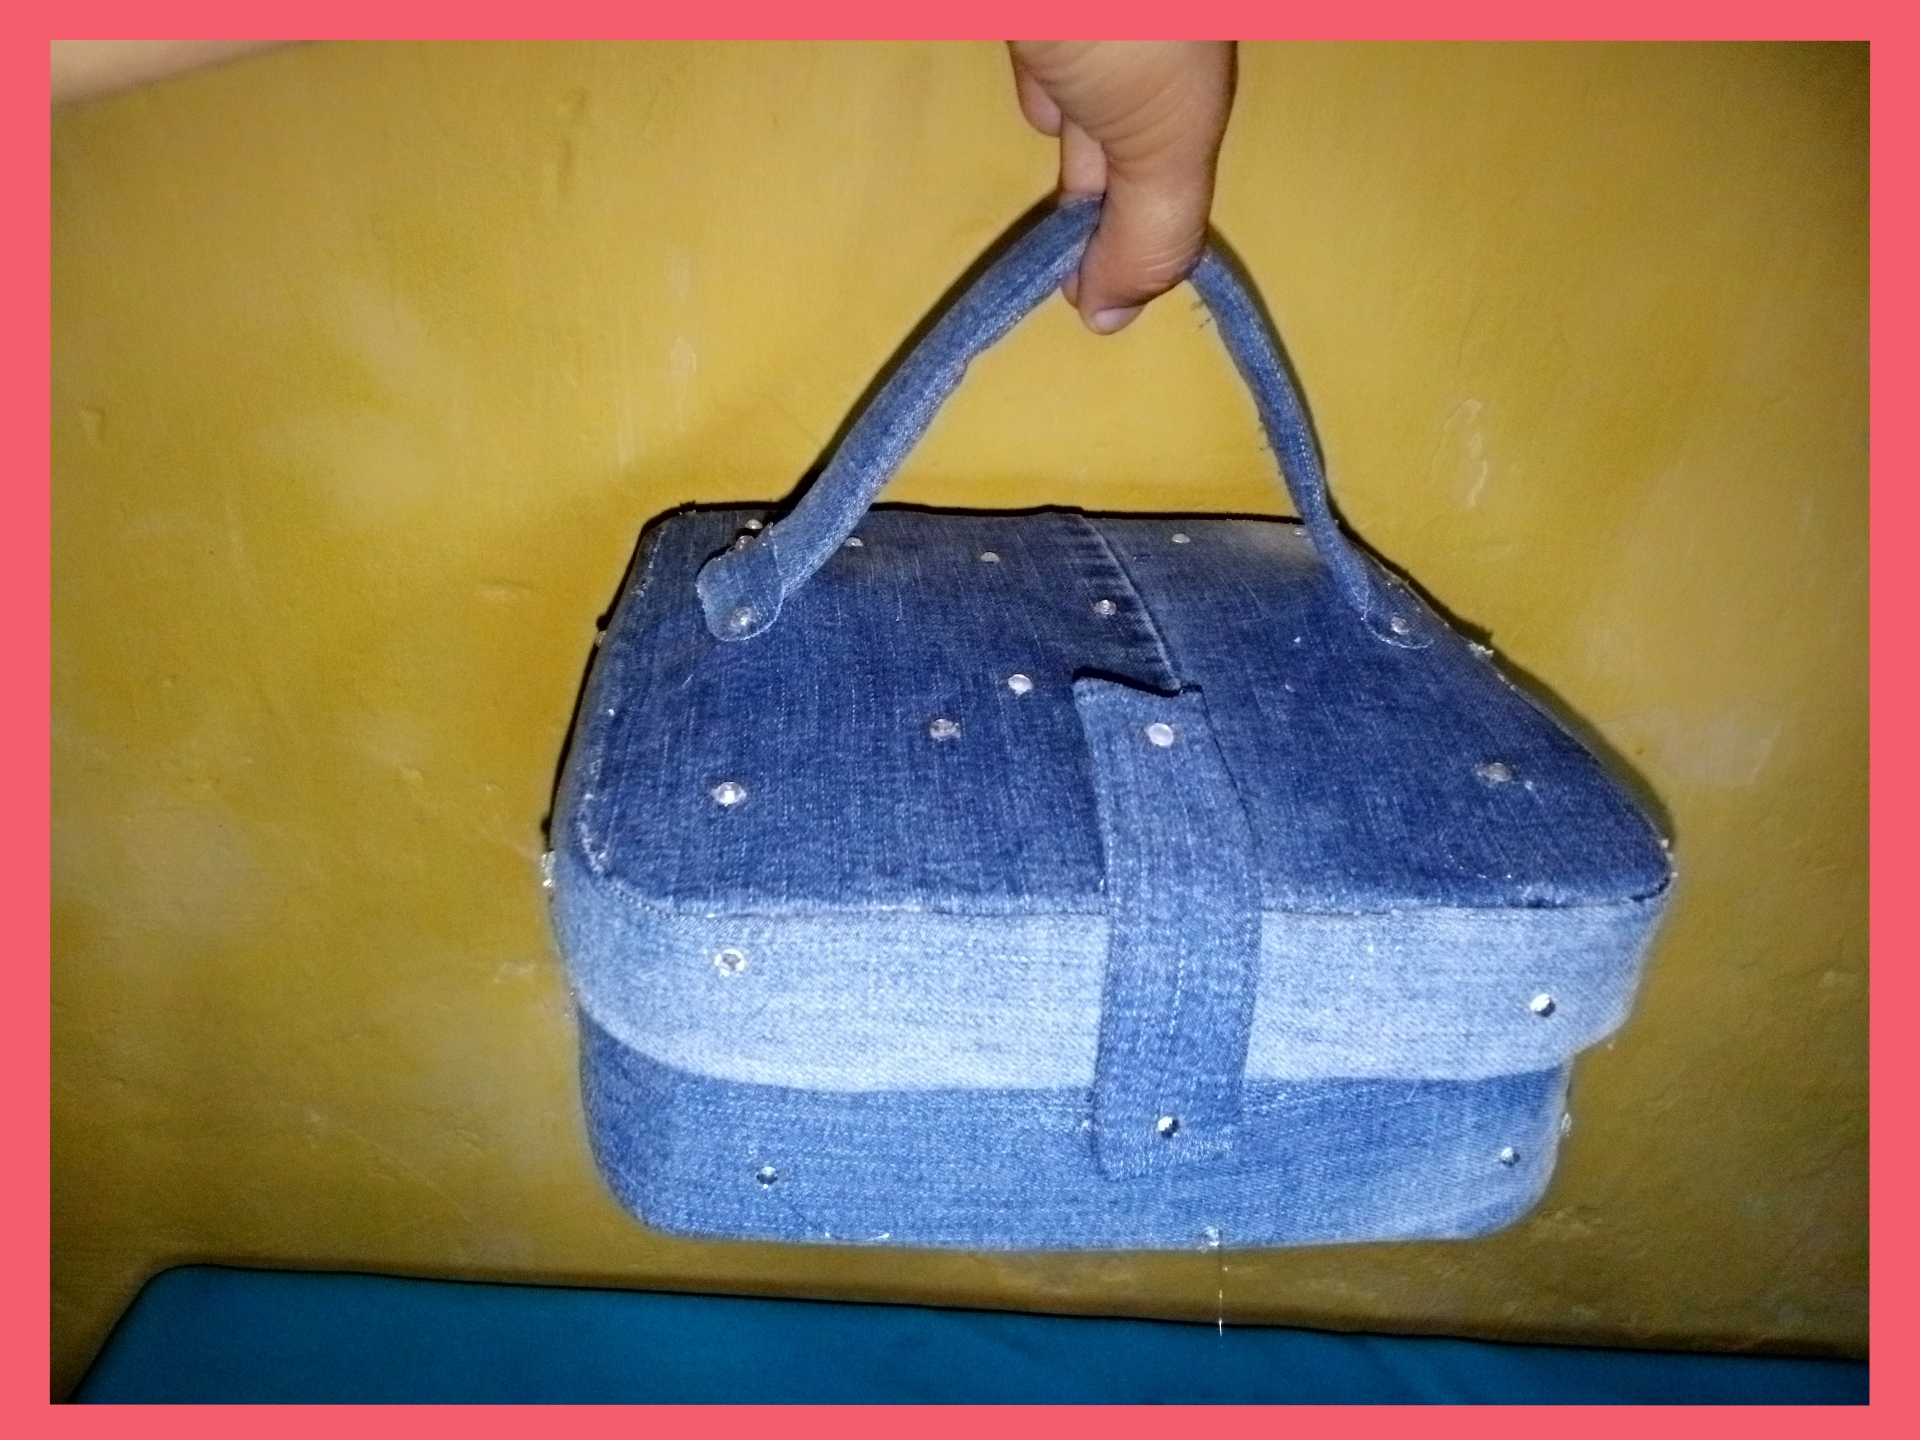 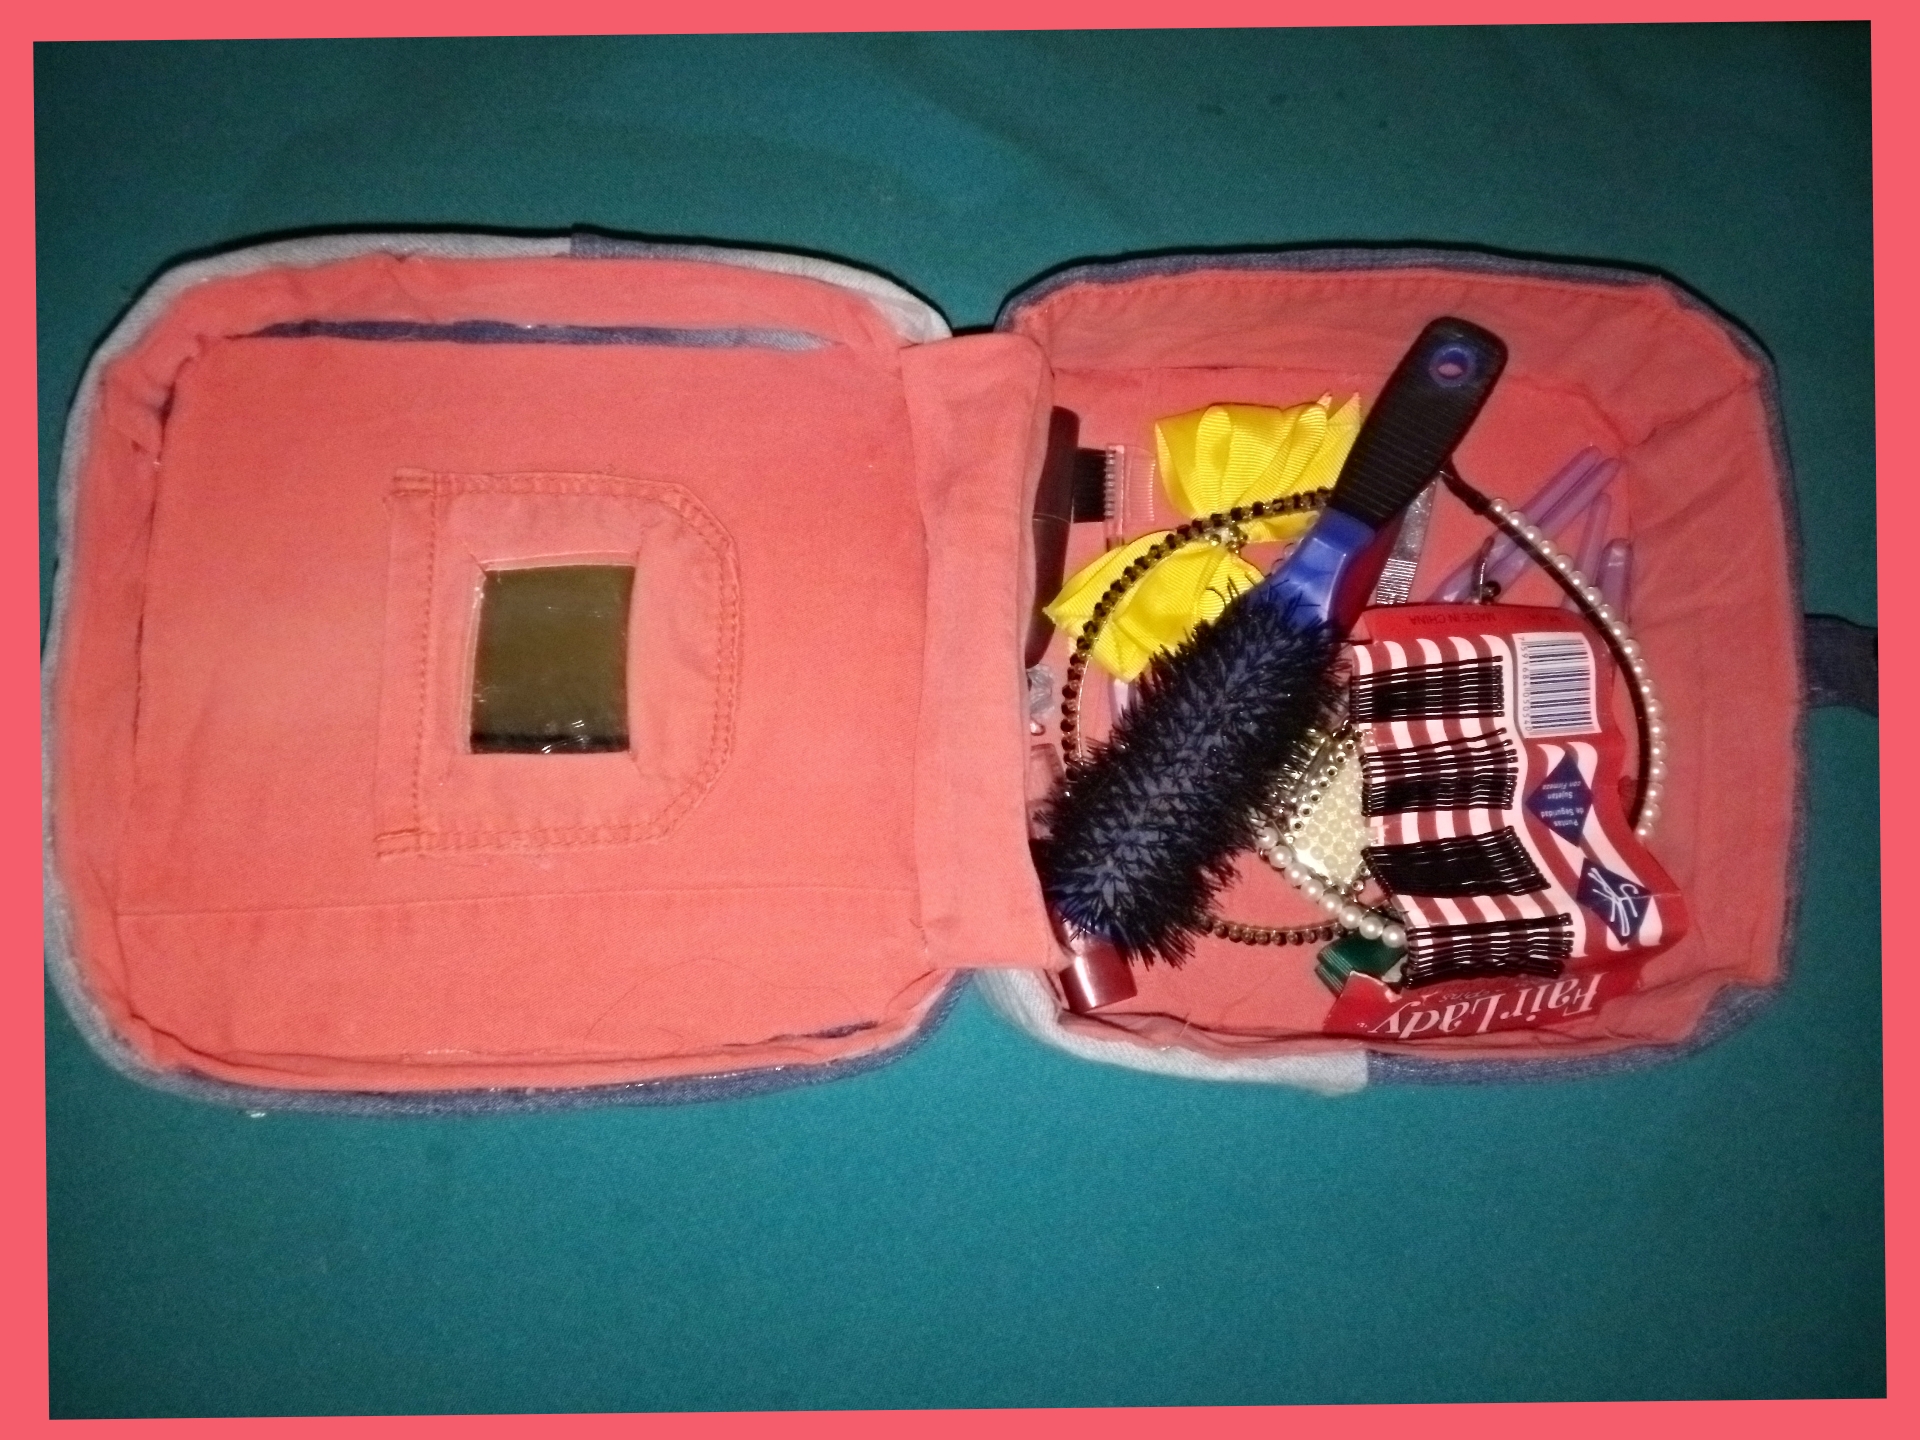 ## <center>Gracias por visitar.</center> ###### <center>Todas las fotos y el contenido son originales que hago diariamente para mi blog. Para La traducción uso [ deepl](https://www.deepl.com/es/translator-mobile) los marcos y separadores es usado de [canva]( https://www.canva.com/es_419/) .📷🖼️🤗</center> --- ## <center> Thank you for visiting. </center> ###### <center>All photos and content are originals that I make daily for my blog. For translation I use [ deepl](https://www.deepl.com/es/translator-mobile) the frames and separators are used from [canva]( https://www.canva.com/es_419/) .📷🖼️🤗 </center> https://images.hive.blog/DQmQn6ZSnKcBTnsC3JN3Yv8EsVrPZdndhPszpXcBjudpArd/20230309_134052_0000.png https://images.hive.blog/DQmezB1ZLMiLtuaZPzEwi7sGWvU8JcGfzmGPvjo4SY1PEWH/20230309_1253384.gif
👍 isnochys, millibot, microbot, lolodens, mvmoning2021, spongebob27, eustace-kidd, mustachio12, dondononardem, senseisar, eudaemon, noblebright, rizatormis15, keimo, hive-data, nnn1jls, bossdebz, takeru255, sawcraz.art, omg-is-biology, wisejg, tesmoforia, augusto-cordova, manuelgil64, amart29, osomar357, yeceniacarolina, perazart, franz54, fulani, kaux, helengutier2, mey12, doriangel, nabu.doconosor2, manclar.gaming, arjes, misticogama, malos10, roadstories, lunaticpandora, gabyrutigliano, fmbs25, meichan, nayita238, silher, guerreroots, mafalda2018, ronaldjfs, davidric, sarix, indianapatt, albaandreina, capybaraexchange, blackbird24, jennyzer, genice, magin.pintor, ramisey, yggdrasilwind, suezoe, culebro, art.caro, joeyarnoldvn, krommus, cryptosharon, kirito-freud, honeymoon-1611, damian-z, roadstories.trib, bilpcoin.pay, hiveshout, mryoung1979, travelnepal, yacobh, gabrieljr, fragozar01, rlathulerie, capp, sweetval, cyberspacegod, lycan1703, leidimarc, yonilkar, sergionatera, jolugo23, nurul-uli, r2cornell, gabimramirez, equipodelta, eleazarvo, ang.spc, janettbrito76, brume7, wito7, victor8, lauracraft, eduard20, alba21, yoe1974, yennysferm71, eylis, waivio.welcome,