The "Boxmount", creating my own case PART I
life·@lukas-s·
0.000 HBDThe "Boxmount", creating my own case PART I
# Servus ## Welcome back to my blog :) Today I wanted to show you how I created my **own PC-Case**. To be honest I started planning **6 Weeks ago** and haven't totally finished the build yet. Nevertheless I can show you my thought processes on planning the whole thing. ## How it started I have always loved to watch casemodding videos and loved the fact that you can create something epic and good looking on your own. The first thing I modified, was who guessed it, my first PC-Case. To be honest it *didn't turn out well* :). I tried to make my own side panel out of acrylic glass. My 14 years old me thought it would be a great idea to **remove the protective wrap** from the glass **before cutting** it. Resulting in the whole thing *full of scratches*. Then I glued that in with hot glue and it looked __like s\*\*t__. I tried saving it with a sticker bomb design. But *gave up* after 5 stickers, because I didn't have any more. Sadly I have no pictures, but here is a kitten.  Some time later I started looking at my XboX and decided to give it a go. And finally I managed to get my first good looking casemod going. 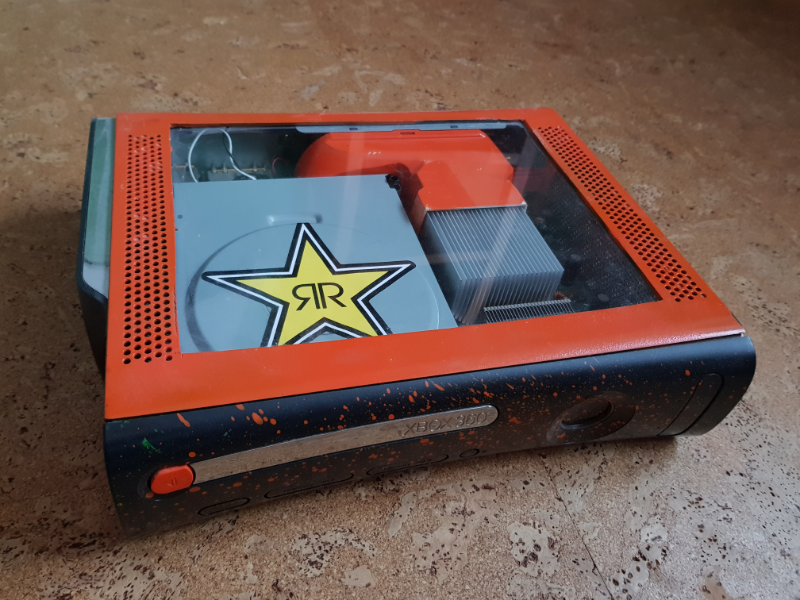 And now 2018 its finally time to not only mod a case, but to create a complete new one. ## What I wanted I saw some videos for **wall mounts** on youtube and quite liked them. The only problem I had was the *sheer size* of the thing. Way to big if you ask me. Some other cases I had a look at where the **super teensy tiny builds**. So I decided to make my build a hybrid based on both. <center style="display: block"> <div class="pull-right"> <img src="https://steemitimages.com/DQmU8zKm69zcpJ79ZYdKT8x4JrWy3RVqrtJXd6kktTSBgaM/wallmount_pc.jpg" /> <sub><a href="https://www.custompcguide.net/awesome-wall-mounted-custom-pc-with-beautiful-liquid-cooling-system/">Source: custompcguide</a></sub> </div> <div class="pull-left"> <img src="https://mygaming.co.za/news/wp-content/uploads/2016/06/DAN-1.jpg" /> <sub><a href="https://mygaming.co.za/news/wp-content/uploads/2016/06/DAN-1.jpg">Source: mygaming</a></sub> </div> </center> <br /> <br /> <br /> <br /> <br /> <br /> <br /> <br /> <br /> <br /> <br /> <br /> ## The Boxmount The best name I can think of for that hybrid is **"Boxmount"**. Why, you ask? Well, because it is a box with the **mainboard mounted on it**. The **powersupply** and all the **drives** are stored inside the box and the **mainboard** and **graphic card** are mounted ontop. The clue is to use a **PCIe riser** and mount the graphic card sideways. That will present it in a very nice and low profile manner. You will see what I mean by that later. ## Sketching it all out With the **basic idea** of what I want. I started to get some **modeling going**. I installed SketchUp and just **jumped right into it**. <div class="pull-left"> <img src="https://steemitimages.com/DQmPosVzNKEh5TEuLXLQ4ifQGfDVzRxvgLqXQWA5jEzszjc/PC_Geha%CC%88use_First_Back_Angle.PNG" /> </div> <div class="pull-right"> <img src="https://steemitimages.com/DQmYqNn3YxBVhRxCZvabJhTmKYq7ZWcUCsFbj1vkCmCdu2w/PC_Gehaeuse_First_Side.PNG" /> </div> And that's what turned out. The mainboard gets mounted ontop of the box. Underneath the motherboard is a **thin layer of acrylic glass**, because I want to add some **LEDs** to the mix. After some days of letting that set. I decided that I really don't want a *big CPU heat sink*. The graphic card is **nice and flat** but the CPU heat sink *rises up like a skyscraper*. Not what I intended to build. So I got my hands dirty again and **Sketched some more ideas Up**. <div class="pull-left"> <img src="https://steemitimages.com/DQmaEpSFMbd2Erm1xCWbK1wx2oaxonnpheBvoHg7gDUdide/PC_Gehaeuse_Final_Back_Angle.PNG" /> </div> <div class="pull-right"> <img src="https://steemitimages.com/DQmcptPXVLpokVxABrbwdt5KwgWJtK4NiNDVBmAqsUY6Tb1/PC_Gehaeuse_Final_Side.PNG" /> </div> And that's what I came up with. Now I am using a **Wakü** or **closed water loop** to cool the CPU and I realised my GPU is **way bigger** than the one I had in the previous SketchUp After letting that set for some time, I decided that its the one I want to build. ## To be continued So now that I knew what I want, it was time so get started with some sort of **prototype**. But that will be the topic for my next blog post. So stay tuned. <center>  </center>
👍 lukas-s,