How to build & run steem cli_wallet
steemit·@magicstone1412·
0.000 HBDHow to build & run steem cli_wallet
I am not a developer but I like playing around with something new by coding when I have free time. I have read [the topic](https://steemit.com/steemit/@liberosist/a-brief-guide-to-delegating-steem-power) of @liberosist but it's rather old to do with cli_wallet. Moreover, I can not download the cli_wallet from his link because it was expired. Therefore, I decide to do by myself with a little knowledge of Linux. After trying, I have built successfully the cli_wallet on Windows 10 and a [cheap Linux VPS](https://clientarea.ramnode.com/aff.php?aff=1439).
## What is steem cli_wallet?
[According to pfunk](https://steemit.com/steemhelp/@pfunk/a-learner-s-guide-to-using-steem-s-cliwallet-part-1),
> cli_wallet is the command-line program that connects to a Steem node synced with the blockchain to create/broadcast transactions and get info about the chain. It is useful for people who wish to interact with the Steem blockchain manually and directly to a node, rather than through steemit.com. Why? There are some Steem transactions and transaction variables that can't be done with Steemit's UI. Some might want to keep their more powerful active or owner account keys out of their web browser completely. It is also a way to get raw info about the blockchain directly from a node.
Okay, here we go
## Compile cli_wallet using Windows 10
**I. Requirements**
- Windows 10 with appropriated linux bash. You can read [HERE](https://steemit.com/steem/@magicstone1412/updating-bash-of-ubuntu-on-windows-10)
- RAM: 4GB+. Recommended 8GB+
- Basic Linux command line knowledge
**II. Step by step**
*Note: after "#" (octothorpe) is a comment*
1 - Run bash with admin right and update as usual
`sudo apt-get update -y`
`sudo apt-get upgrade -y`
2 - Install necessary package
```
# Required packages
sudo apt-get install -y \
autoconf \
automake \
cmake \
g++ \
git \
libssl-dev \
libtool \
make \
pkg-config \
python3 \
python3-jinja2
# Boost packages (also required)
sudo apt-get install -y \
libboost-chrono-dev \
libboost-context-dev \
libboost-coroutine-dev \
libboost-date-time-dev \
libboost-filesystem-dev \
libboost-iostreams-dev \
libboost-locale-dev \
libboost-program-options-dev \
libboost-serialization-dev \
libboost-signals-dev \
libboost-system-dev \
libboost-test-dev \
libboost-thread-dev
# Optional packages (not required, but will make a nicer experience)
sudo apt-get install -y \
doxygen \
libncurses5-dev \
libreadline-dev \
perl
```
3 - Compiling cli_wallet
```
# Move to local disk E on Windows 10
cd /mnt/e
# Clone latest steem folder from github and compile
git clone https://github.com/steemit/steem
cd steem
git submodule update --init --recursive
mkdir build
cd build
cmake -DCMAKE_BUILD_TYPE=Release ..
make -j$(nproc) cli_wallet
# Go to e:\steem\build\programs\cli_wallet\ directory
# to copy "cli_wallet" file to a desired location on your computer
```
**III. Running:**
```
# Move to the directory where you stored you cli_wallet
cd /mnt/d/steemit/
# Run cli_wallet by connecting to a Steem Full API Node
./cli_wallet -s wss://steemd.steemit.com
# Add a password to your wallet
set_password yourpassword
# Unlock wallet before using.
# Once you see unlocked >>> you now can go ahead
unlock yourpassword
# Import your your private active key.
# You can find it from your Steemit.com wallet.
import_key 5xxxxxxxxxxxxxxxxxxxxxx
# Verify if you add your account correctly
list_my_accounts
# To list all commands available in cli_wallet
help
# Detail of a command
gethelp command_name
```
**IV. Errors**
If you see errors like the photo below. Just change the new public node after the command `./cli_wallet -s new_public_node`. You can get one [here](https://steemit.com/witness-category/@bitcoiner/list-of-public-steem-full-api-nodes-and-example-usage)
<center>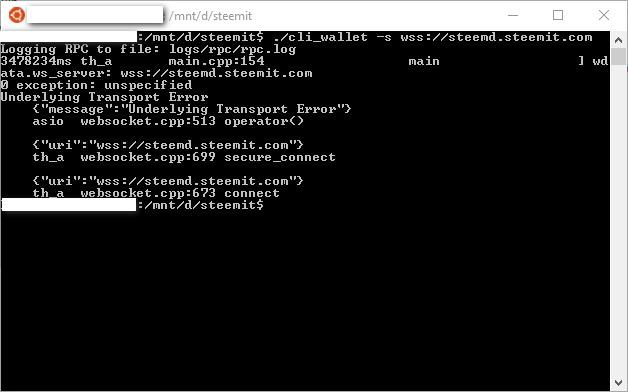</center>
## Compiled cli_wallet using VPS Ubuntu 16.04.3 x64
**I. Requirements**
- VPS at least 2GB+ RAM. You can choose a cheap VPS at [www.ramnode.com](https://clientarea.ramnode.com/aff.php?aff=1439) or [digitalocean.com](https://m.do.co/c/461e7db4021a)
- Basic linux command line knowledge
<center></center>
**II. Step by step**
You can do the same above steps on linux VPS.
In my case, I used the cheap VPS with only 2GB RAM so it was stopped during running the command `make -j$(nproc) cli_wallet` . To avoid this, you can do the following commands before running `make -j$(nproc) cli_wallet`
```sh
free
dd if=/dev/zero of=/var/swap.img bs=4096k count=1000
mkswap /var/swap.img
swapon /var/swap.img
free
```
Now you have cli_wallet
**III. Running**
Run the similar commands on Windows bash. But note that don't use `./` before telling "cli_wallet" to connect to a node. See below
<center>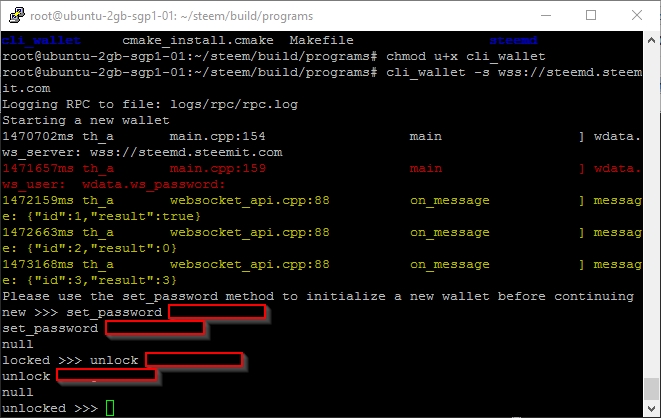</center>
Or you can download my [latest compiled cli_wallet.zip here](https://keybase.pub/magicstone1412/steemit/). Unzip and run on your machine!
***Reference:***
- <a href="https://magicstone1412.keybase.pub/steemit/compile%20cli_wallet.txt" target="_blank">Official steemit guide</a>
- [The Concise STEEM Witness Guide for Ubuntu 16 - July 2017](https://steemit.com/witness-category/@netuoso/the-concise-steem-witness-guide-for-ubuntu-16-july-2017)
- [A brief guide to delegating Steem Power](https://steemit.com/steemit/@liberosist/a-brief-guide-to-delegating-steem-power)
------
( ͡° ͜ʖ ͡°) => [.....magicstone1412.....](https://steemit.com/@magicstone1412)