ESP | ENG Tutorial: ¿Cómo elaborar un bolsito de tela para tus bolígrafos? 🪡🧵- Tutorial: How to make a fabric bag for your pens?
hive-189641·@marile21·
0.000 HBDESP | ENG Tutorial: ¿Cómo elaborar un bolsito de tela para tus bolígrafos? 🪡🧵- Tutorial: How to make a fabric bag for your pens?
<center>  Feliz noche comunidad de DiyHub encantada de estar por acá de nuevo compartiendo una vez más con ustedes en esta ocasión les traigo un bolsito de tela para guardar tus bolígrafos, marcadores, lápiz, saca puntas, borrador, etc, por mi parte se me hace útil para mi trabajo ya que siempre debo llevar mis materiales organizados y además cuidar de ellos para no perderlos durante el turno de trabajo. https://media.giphy.com/media/v1.Y2lkPTc5MGI3NjExM2w4bTdranptMjAxYmp4eWgwdnB2bmdxbjd4czk0M2Y1bTlwd3djayZlcD12MV9pbnRlcm5hbF9naWZfYnlfaWQmY3Q9Zw/WDBkE28IAmZn0qFQtm/giphy.gif *Creado en Canva y editado en Giphy* Este pequeño bolsito también sirve para la escuela, universidad o simplemente tu decides en que momento llevarlo en tu bolso, la idea es realizar este bolso con materiales que tengamos en casa. Con los materiales en casa y con nuestra imaginación podemos crear cosas bonitas y muy económicas ya que por mi parte no gasté nada de dinero solo la disposición y el tiempo para que quede bonito.  A continuación les muestro los materiales que utilicé y el paso a paso, les va a gustar es muy sencillo de realizar. ## *Materiales:* # * Retazos de tela. 👕 * Hilo. 🧵 * Aguja. 🪡 * Tijera. ✂️  ## *Paso a paso:* # 1 . Utilicé un retazo de tela me gusta su diseño floreado así que pensé que era ideal para este bolsito, primero se corta la tela del tamaño de tu preferencia más o menos se visualiza el tamaño que queremos que quede, yo medi con los lápices más grandes que tenía para asegurarme de que si ocupen el espacio correcto, marcamos y cortamos. 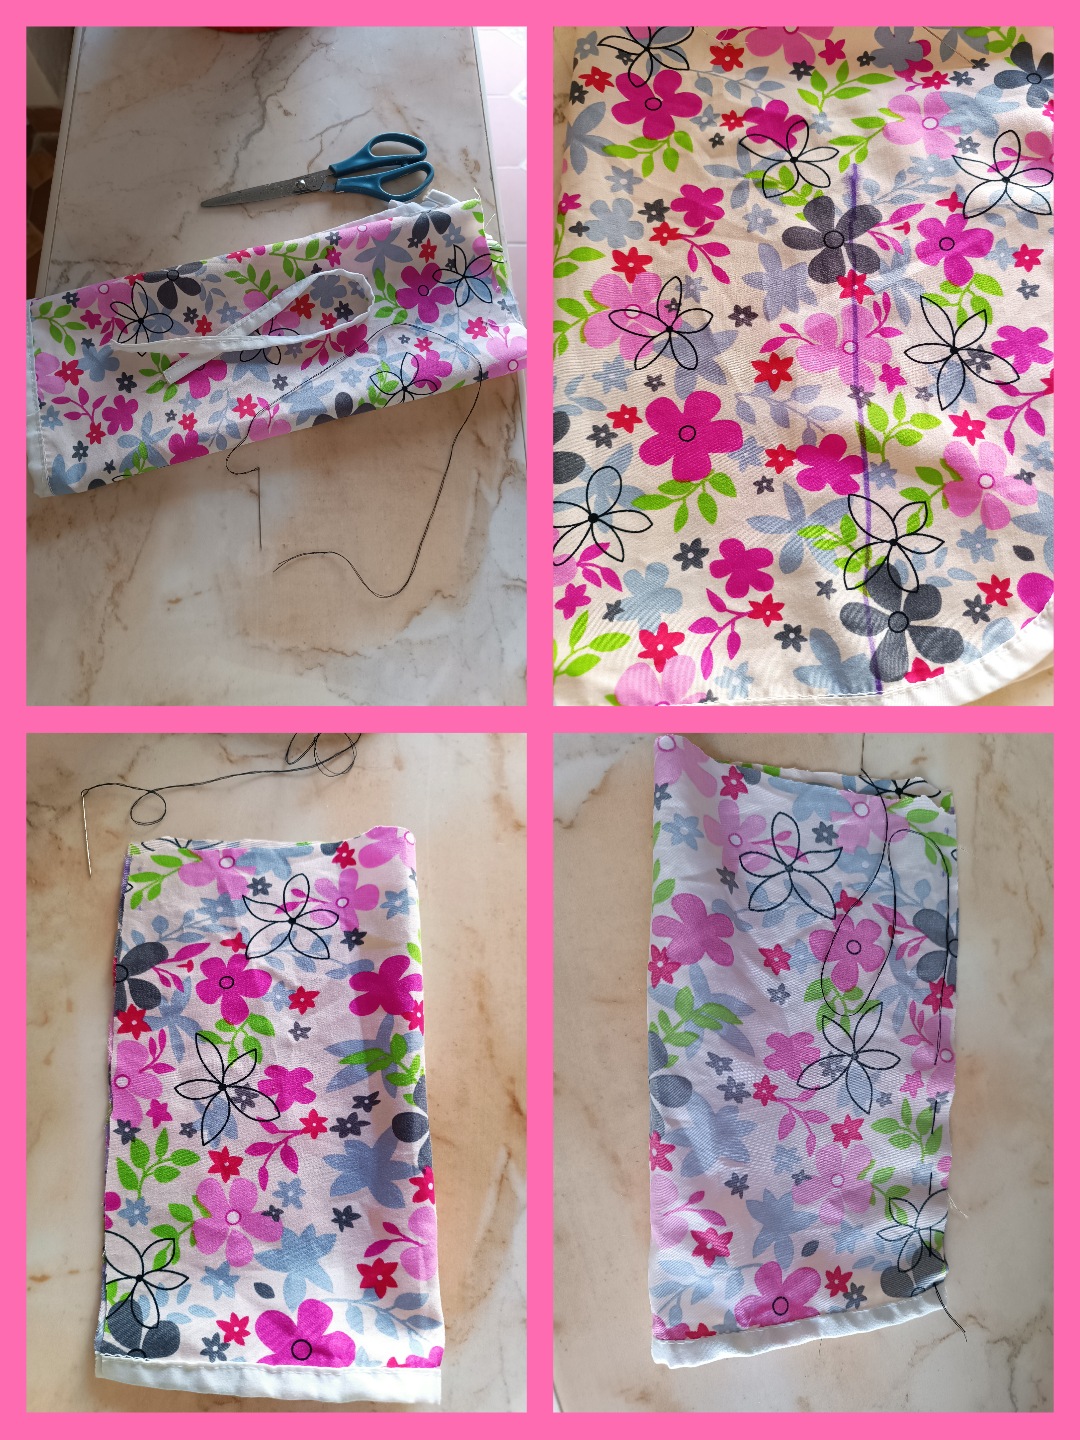 2 . Luego de cortar comenzamos a coser el lateral que está abierto por el reverso de la tela, luego de terminar pasamos a la parte inferior una vez que ya esté bien cosido va agarrando forma podemos voltear del lado de afuera para ver cómo queda y si hay algún lado que se tenga que reforzar con el hilo. 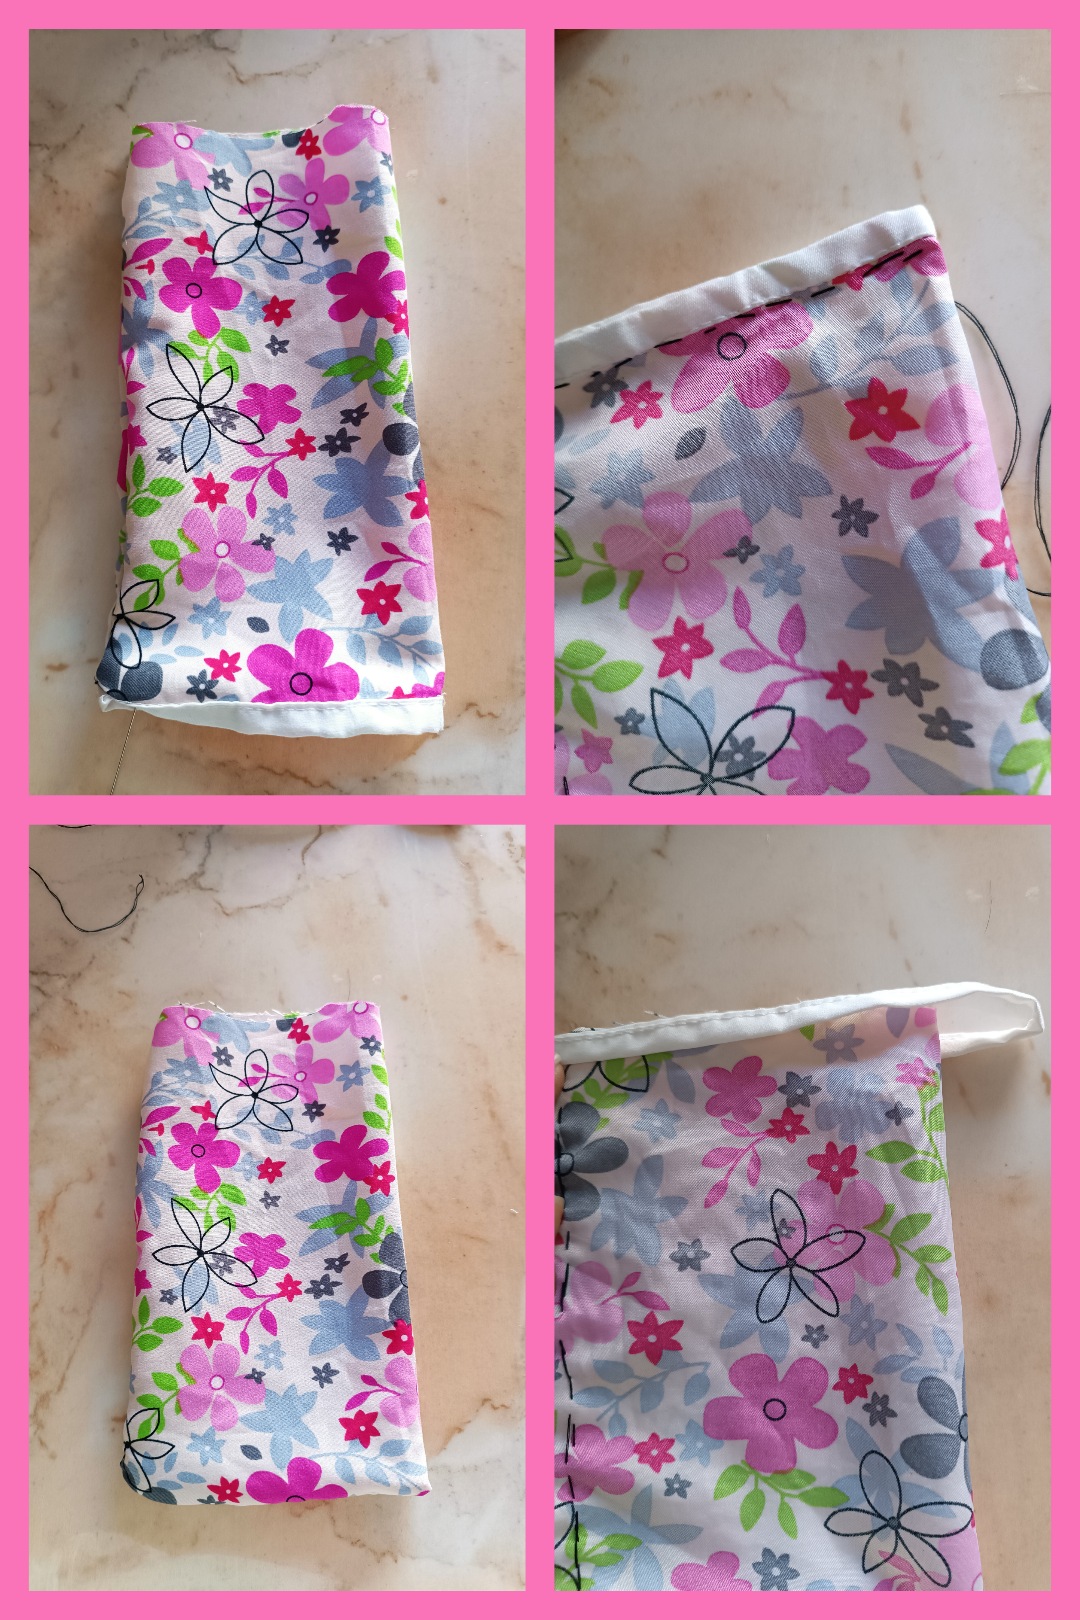 3 . Ya luego de coser los dos extremos procedemos a colocar una tira de tela en la parte superior esta se va a unir y coser las dos puntas, luego doblamos el sobrante de la tela hacia el lado de adentro y cosemos sin tocar la tira blanca, esto para poder cerrar el bolsito. 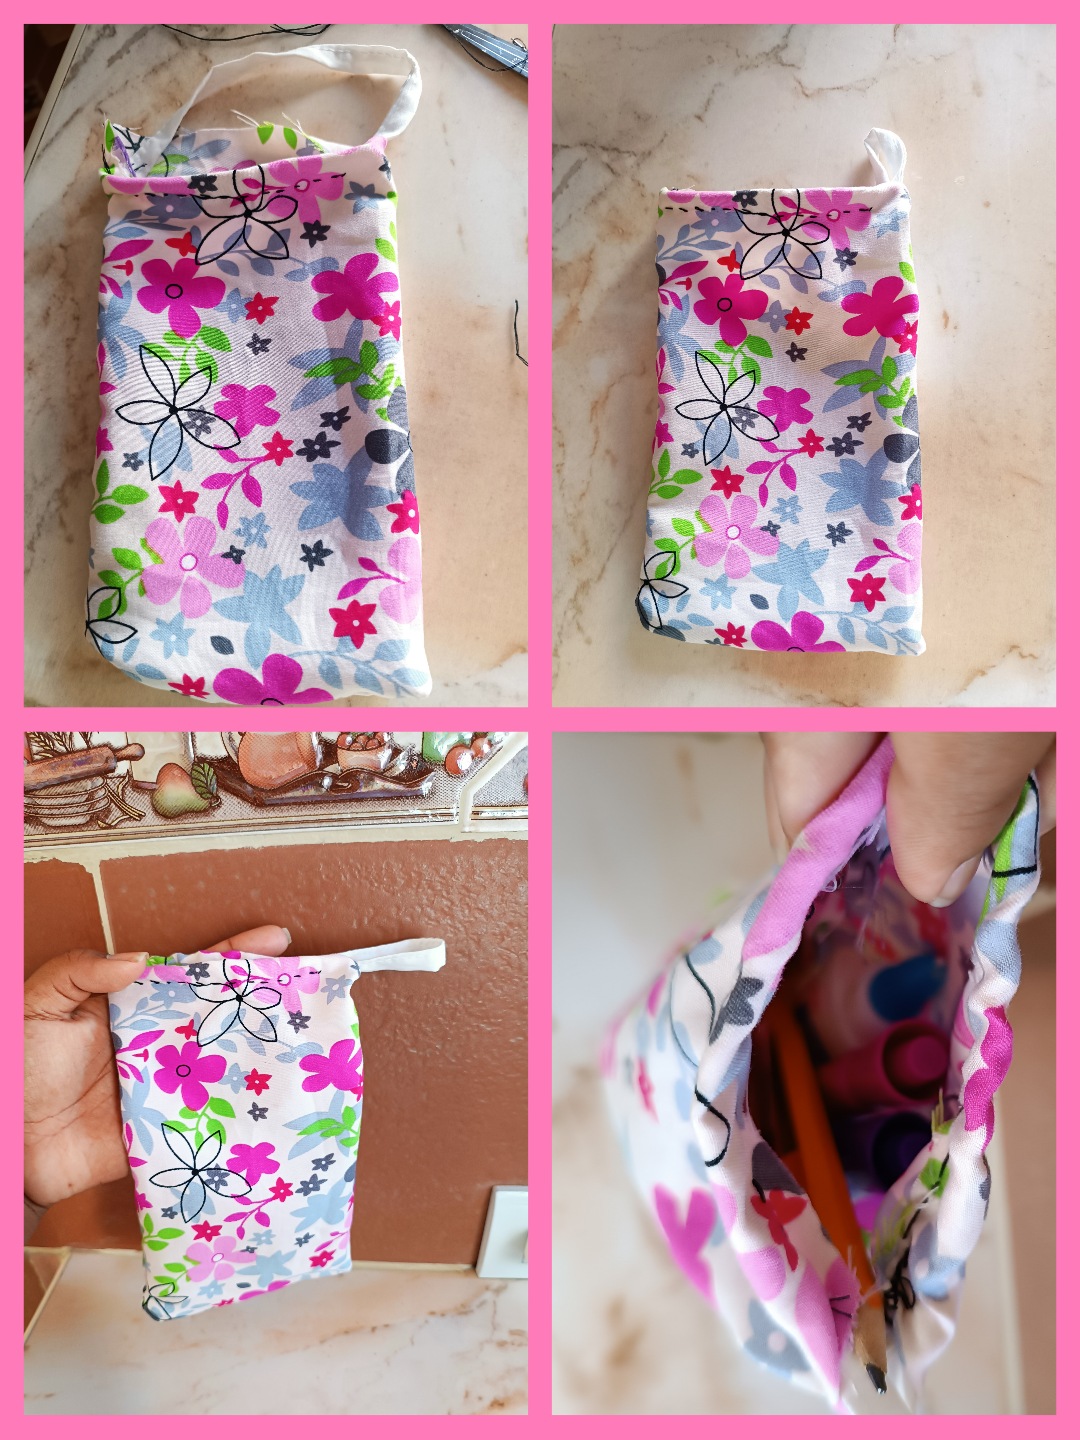 4 . Ya luego de haber colocado la tira podemos cerrar el bolsito y guardar nuestros materiales, recuerda que puedes utilizar la tela que desees y el color de hilo que más te guste, ya queda de acuerdo a tus gustos e imaginación. 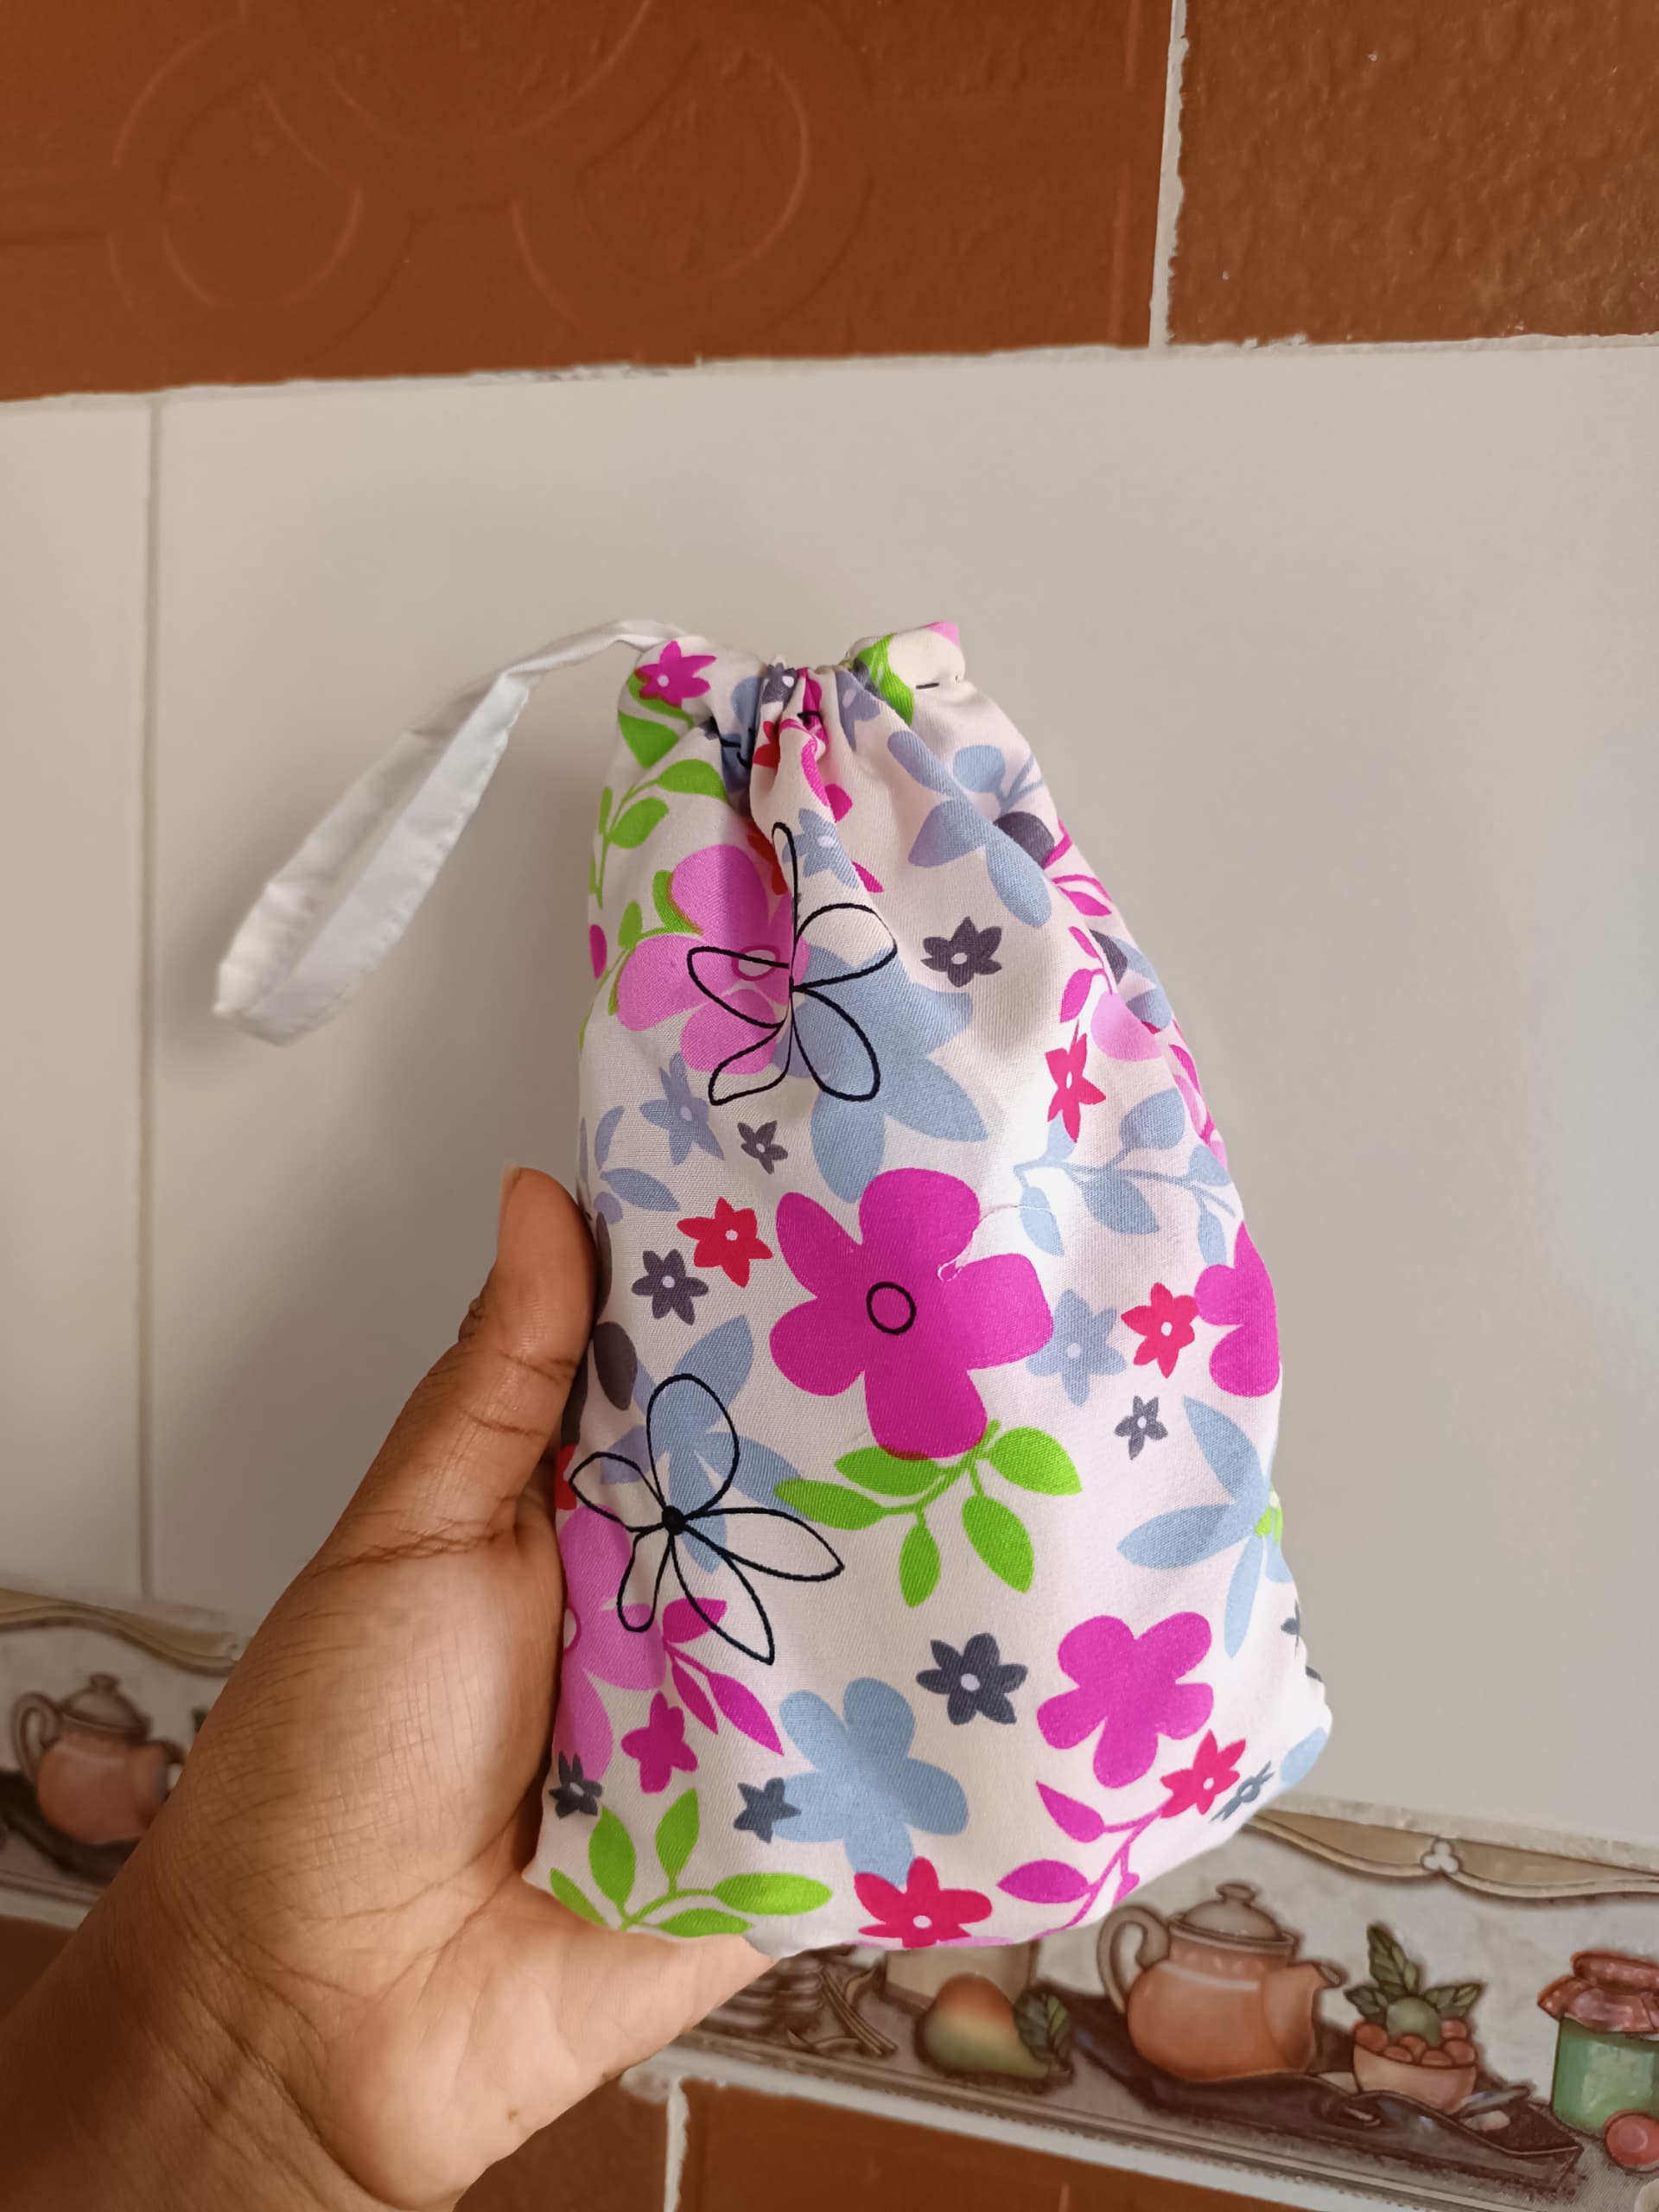 Me gustó mucho este bolsito es práctico y fácil de hacer, a pesar de que es cosido a mano en una máquina se nos puede hacer mucho más práctico incluso puedes realizar diferentes modelos para tu emprendimiento. 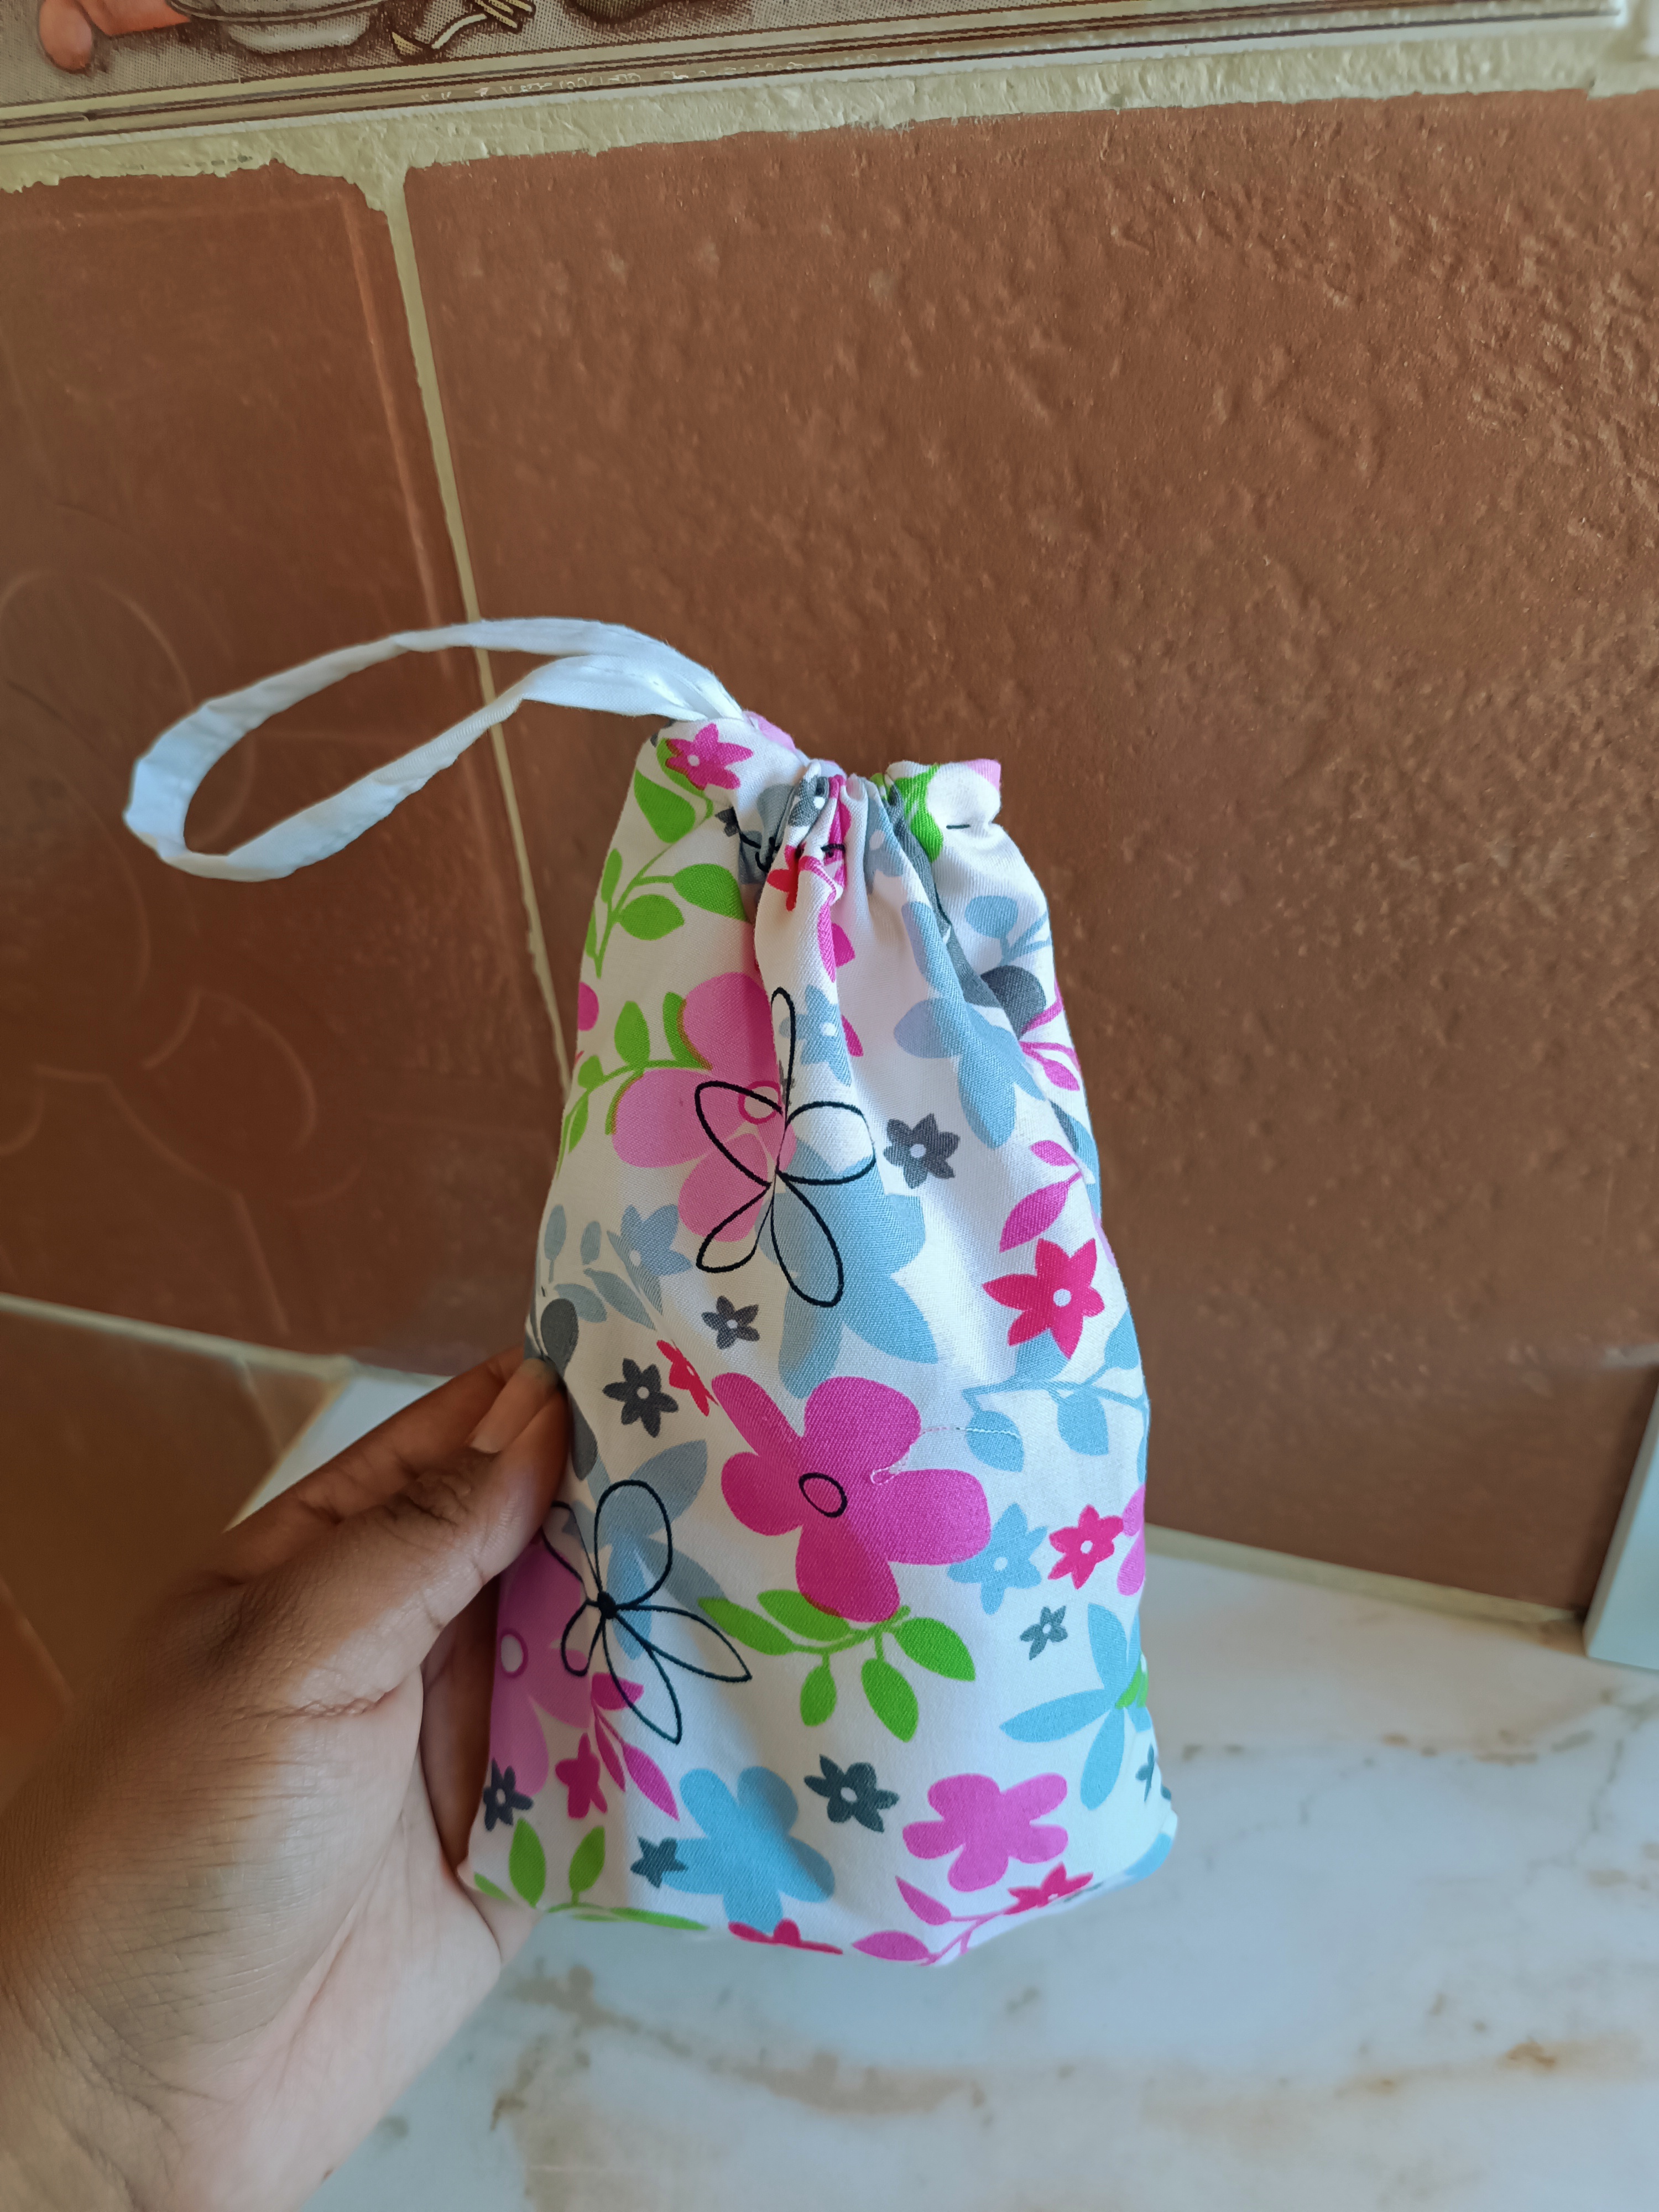  Gracias por visitar mi publicación, nos vemos en una próxima oportunidad. # *ENGLISH* # Happy evening DiyHub community, delighted to be here again sharing once again with you, on this occasion I bring you a cloth bag to store your pens, markers, pencil, sharpener, eraser, etc., for my part it is useful to me. for my work since I must always carry my materials organized and also take care of them so as not to lose them during the work day. https://media.giphy.com/media/v1.Y2lkPTc5MGI3NjExM2w4bTdranptMjAxYmp4eWgwdnB2bmdxbjd4czk0M2Y1bTlwd3djayZlcD12MV9pbnRlcm5hbF9naWZfYnlfaWQmY3Q9Zw/WDBkE28IAmZn0qFQtm/giphy.gif This small bag also works for school, university or simply you decide when to carry it in your bag, the idea is to make this bag with materials that we have at home and with our imagination we can create beautiful and very economical things since for my part I do not I spent no money, just desire and time to make it look beautiful.  Below I show you the materials I used and the step by step, you will like it, it is very easy to do. ## *Materials:* # * Pieces of cloth. 👕 * Thread. 🧵 * Needle. 🪡 * Scissors. ✂️  ## *Step by Step:* # 1 . I used a piece of fabric, I like its floral design, so it seemed ideal for this bag. First we cut the fabric to the size of your preference, more or less we visualize the size we want it to have. I measure with the largest pencils I have. I had to make sure that if they take up the right space, we mark and cut.  2 . After cutting we begin to sew the side that is open on the back of the fabric, after finishing we move to the bottom part. Once it takes shape well sewn, we can turn it on the outside to see how it looks and if there is any side that needs to be reinforced with thread.  3 . After sewing the two ends, we proceed to place a strip of fabric on top, this will be joined and sewn the two ends, then we fold the excess fabric inwards and sew without touching the white strip, this to be able to close the bag.  4 . After having placed the strip we can close the bag and store our materials, remember that you can use the fabric you want and the color of thread that you like the most, it is according to your tastes and imagination.  I really liked this bag, it is practical and easy to make, even though it is hand-sewn on a machine, it can be made much more practical, you can even make different models for your business.  Thank you for visiting my post, until next time.  *Contenido original. - original content.* *Los separadores fueron realizados en Canva y editados en Giphy - The separators were made in Canva and edited in Giphy.* *Las fotografias son tomadas con mi teléfono Redmi Note 11s y editadas en PicsArt - The photographs are taken with my Redmi Note 11s phone and edited in PicsArt.* Traducción de: Google traductor - Translation of: Google translator. .gif) </center>
👍 pataty69, munhenhos, realornah, savagebits, realnigga, cheersmate, gettinmoney, pingit, lookplz, sixsixsix, iod, onehundredmen, nullandvoid, maxhustle, hiveinvest, xenotype, greatpyramids, takingthew, youtakethatl, bigassdick, quitplayin, thegoldencobra, saltiberra, razielmorales, aera8, eylis, nurul-uli, ocd, roelandp, smartvote, waivio.curator, eonwarped, tomatom, laro-racing, lenasveganliving, martibis, hmayak, kaeserotor, gabilan55, josdelmi, jensenart, h3m4n7, jerusa777, pgm-curator, pinkchic, howo, ocdb, multifacetas, squareonefarms, rzc24-nftbbg, humbe, xeldal, cryptictruth, sanderjansenart, prosocialise, justinw, tristan.todd, askari, rt395, gniksivart, redrica, niallon11, ocd-witness, miroslavrc, javyeslava.photo, rima11, soychalbed, mariaser, ivycrafts, noctury, captainloken, the-grandmaster, vlad26, empo.voter, adol, walterjay, newsflash, leveluplifestyle, man-fred, enki, indigoocean, variedades, velinov86, meritocracy, hexagono6, partiesjohall, aprasad2325, oleg326756, batman0916, rawselectmusic, hanggggbeeee, emrebeyler, dpend.active, cielitorojo, elgatoshawua, madame-cyntaia, dlizara, caribdao, leogomez1414, the-burn, whitneyalexx, roleerob, fourfourfun, carilinger, zyx066, brujita18, detlev, jlsplatts, gabrielatravels, twosomesup, jeffjagoe, jayna, elchaleefatoe15, usainvote, beerlover, pradeepdee6, olaunlimited, meyateingi, omdjajlgcg, calendulacraft,