7GPU mining rig, software and configuration - Asus Prime 270a
mining·@noperope·
0.000 HBD7GPU mining rig, software and configuration - Asus Prime 270a
In previous post I was writing about hardware part of the rig setup, let's focus today on software part and how to successfully run 7 GPUs on same motherboard.  >Before starting, you should be aware that in the process you can easily brick your card or motherboard. You are doing it on your own responsibility. If you missed previous part it is available <a href = "https://steemit.com/mining/@noperope/7-gpu-mining-rig">here</a> <h2>BIOS Settings</h2> The first step after connecting the hardware is to update Bios to the latest version. - First make sure, that you don't have any GPUs connected. It can cause problems and PC will not go past POST screen. - Open the bios with F2 and go to advanced mode - F7. Asus has a great tool for updating bios to the latest version. It is called EZ Flash utility. - Proceed to Tools - select EZ flash utility -> download from internet. It will automatically download and install the latest version of bios - restart your PC. Boot back to bios with F2. Again open advanced mode with F7 - select button "Advanced" at the top - Select System Agent (SA) -> DMI/OPI Configuration, set max speed "Gen2" - Move to PEG port configuration and set link speed for all PCIe ports to Gen2 - Move back to Advanced menu, select PCH configuration -> PCI Express configuration and set the speed to Gen2 If you are planning to use 8 GPUs on the motherboard, you need to move back to advanced menu, select on-board devices and change configuration of M.2 port from Auto to PCIe and set bandwidth to X2. <strong>Above 4G decoding</strong> This is the most important step in configuration to enable multiple GPUs - Select option "Boot in the upper menu" - Search for option Above 4G Decoding and set it to Enabled. It is advisable to change the option Next boot after power loss to normal boot, so the PC will power on if electricity runs out. Save all settings and shut down the PC. <h2>Windows settings</h2> Boot into windows. Update it to the latest version and disable automatic updates. It is advisable to disable automatic driver installation for new devices, so you can install any version of drivers for your graphic cards. I used RX480, so tutorial will follow configuration for AMD drivers. <center> 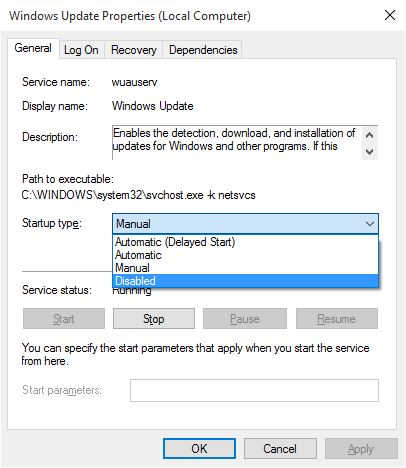 disabling updates - you will find it in: windows + R key, services.msc </center> <center> 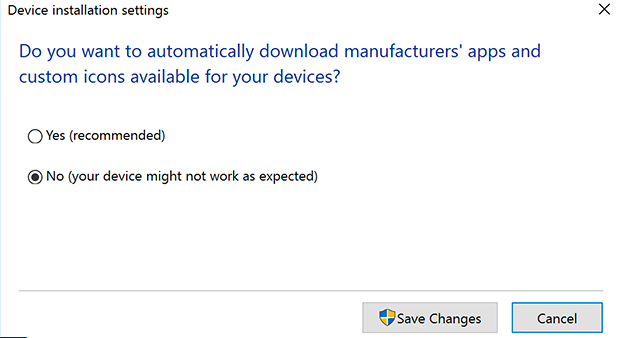 Disabling automatic driver installation - Control panel->System and Security->Advanced system settings->Hardware->Device installation setting </center> Another usefull setting is Automatic sign in, so you can schedule your rig to start mining without you powering it on. Press windows + R key and type "netplwiz". Uncheck the box Users must enter a user name and password to use this computer. <center>  </center> I joined my miner into <a href="https://eth.nanopool.org">nanopool<a/> with claymore's dual miner . Nanopool has a great settings configuration tool, where you select your options and .bat file gets generated automatically. <a href ="https://eth.nanopool.org/help">Follow this link</a> and generate .bat file with your details. <a href="https://github.com/nanopool/Claymore-Dual-Miner/releases">Download claymore's dual miner</a>, unzip it and put in on C drive. Copy downloaded configuration file from nanopool and paste it into claymore miner folder. Double check your wallet address, you don't want to send your hard earned ethers to someone elses account. If you wish so, you are most welcome to use this wallet address 0xedbd3d84a946ff2ad8d81f8f311837a9cffd9b36 :) Set the miner to start automatically with task scheduler. Press windows + R key and type Taskschd.msc. Select create task. Name it as you wish, select run with highest privileges and move to triggers. Add new trigger "At logon" and move to Actions. Select New action and browse to your start.bat file in claymore folder, that you downloaded earlier from nanopool. Confirm with OK and save the task.  Now it is time to restart your rig and connect graphic cards. If everything went well, You will boot into windows. In your device manager you should see all GPUs as standard VGA device. Download the <a href="http://support.amd.com/en-us/download">latest drivers</a> and run the installation from device manager. <h2>Basic BIOS modding</h2> For this part you will have to download: - <a href="https://www.techpowerup.com/gpuz/">GPU-Z</a> - <a href="https://github.com/caa82437/PolarisBiosEditor">Polaris Bios editor</a> - <a href="https://www.techpowerup.com/download/ati-winflash/">ATI Flash</a> - <a href="https://www.monitortests.com/atikmdag-patcher-1.4.5.zip">Atikmdag Patcher</a> - <a href="https://www.msi.com/page/afterburner">Afterburner</a> First lets start with downloading your original BIOS file, so we can revert the changes if necessary. Open GPU-Z and click on save BIOS button. Name it biosOriginal.rom and save it on a safe place. Save BIOS once again and name it biosModded.rom. We will use this one for modifiying. <center> 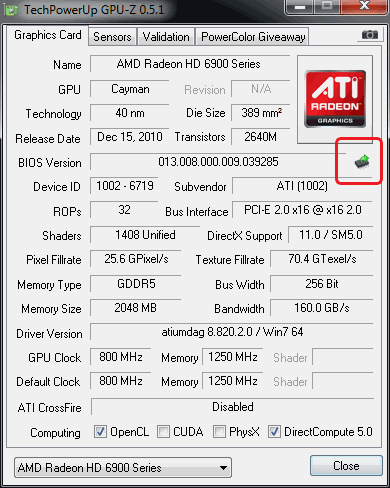 </center> Open it with Polaris bios editor and copy the following straps: RX480 - 4GB -> copy 1500 strap version to 1625, 1750 and 2000 - 8GB -> copy 1750 strap to 2000 RX580 - 4 GB -> copy 1:1500 to 1:1625, 1:1750, 1:2000 and the 2:1500 to 2:1625, 2:1750, 2:2000 - 8 GB -> Copy 1:1750 to 1:2000 and 2:1750 to 2:2000 <center> 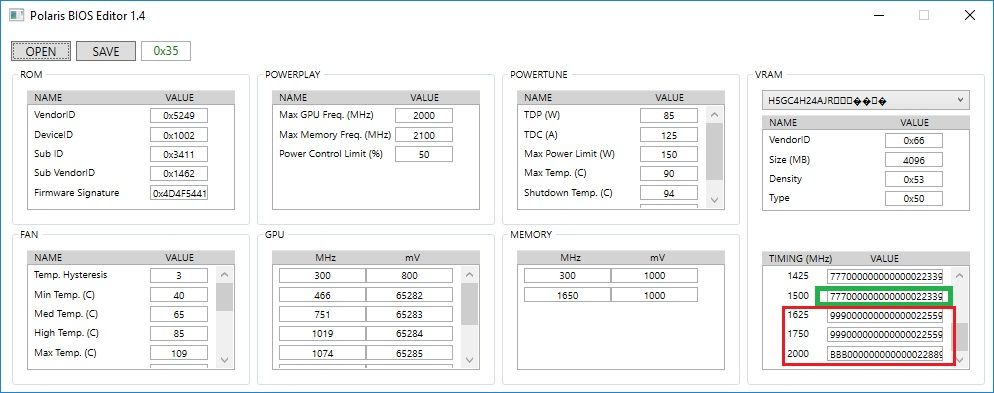 </center> Save the modded BIOS and close Polaris. For this step it is advisable to not run more than 3 GPU at the same time, so disconnect all (when system is OFF) and leave 3 connected. Run ATI Flash as administrator. Select Load image, point it to your modded BIOS .rom file and click Program. Do the same for all the cards. Do not restart the system! wait until you finish all the cards and run Atikmdag Patcher as administrator otherwise your cards will not run (error 43 in device manager). <center>  </center> This will modify AMD drivers to skip signature check and run with modded BIOS. Restart the system. Now everything is ready to start mining. After restart run your miner and count your shares. Happy mining and good luck!