Change image with mouse & keyboard in Pygame By albro
hive-169321·@albro·
0.000 HBDChange image with mouse & keyboard in Pygame By albro
<center></center>
<p>In this part, I'll talk about images and sounds and tell how I use them in the program. I'll also tell you how to move the image with the mouse and zoom it in and out. I do all this with pygame methods. So let's start working soon.</p>
<h3>Load Images</h3>
<p>Images can be loaded and saved using the <code>pyagme.image</code> module. The <code>load</code> method loads an image from the file system and returns a <code>Surface</code> object. The <code>convert</code> method optimizes the image format and makes drawing the image faster:</p>
<pre><code>img = pygame.image.load('hive.gif')
img.convert()</code></pre>
<p>The image we use must be in the same folder as the program. The <code>get_rect()</code> method returns a <code>Rect</code> object from an image. In the example below, only the size is set and the image position is set to <code>(0, 0)</code>. In the second line, I set the center of the <code>Rect</code> to the center of the page:</p>
<pre><code>rect = img.get_rect()
rect.center = w//2, h//2</code></pre>
<p>We use 3 objects to work with images:</p>
<ul>
<li><code>screen</code> object: This object is a <code>Surface</code> object that represents the application window.</li>
<li><code>img</code> object: It's a <code>Surface</code> object that is used to display the image.</li>
<li><code>rect</code> object: It's a <code>Rect</code> object. This object is a rectangle containing the image. (Because the images may not have smooth corners and actually have complex shapes, we place it in a surrounding or enclosing rectangle.)</li>
</ul>
<p>I color the background gray. Then I draw the image in the window, draw a red rectangle around it, and finally update the page with <code>update</code> to show all the changes:</p>
<pre><code>screen.fill(GRAY)
screen.blit(img, rect)
pygame.draw.rect(screen, RED, rect, 1)
pygame.display.update()</code></pre>
<p>The complete code to display the image is below:</p>
<pre><code>import pygame,sys
from pygame.locals import *<br />
RED = (255, 0, 0)
GRAY = (150, 150, 150)<br />
pygame.init()
w, h = 640, 300
screen = pygame.display.set_mode((w, h))
running = True<br />
img = pygame.image.load('hive.gif')
img.convert()
rect = img.get_rect()
rect.center = w//2, h//2<br />
while running:
for event in pygame.event.get():
if event.type == QUIT:
running = False<br />
screen.fill(GRAY)
screen.blit(img, rect)
pygame.draw.rect(screen, RED, rect, 1)
pygame.display.update()<br />
pygame.quit()</code></pre>
<p>By running the above code, the following image will be displayed:</p>
<center>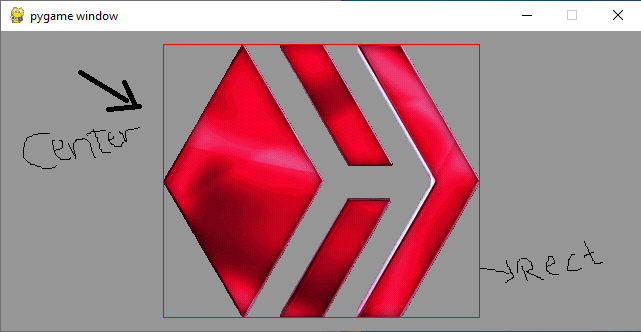</center>
<h3>Move the image with the mouse</h3>
<p>At the beginning of the program, I define a boolean variable named <code>moving</code>. If the mouse button is pressed and the mouse is inside the image, I set it to <code>True</code>:</p>
<pre><code>elif event.type == MOUSEBUTTONDOWN and rect.collidepoint(event.pos):
moving = True</code></pre>
<p>If the mouse button is released, I set moving to <code>False</code> again:</p>
<pre><code>elif event.type == MOUSEBUTTONUP:
moving = False</code></pre>
<p>When the mouse moves, and moving is <code>True</code>, then I move the image according to the relative movement amount (<code>event.rel</code>):</p>
<pre><code>elif event.type == MOUSEMOTION and moving:
rect. move_ip(event.rel)</code></pre>
<p>I move the following image:</p>
<center></center>
<pre><code>import pygame, sys
from pygame.locals import *<br />
RED = (255, 0, 0)
GRAY = (150, 150, 150)<br />
pygame.init()<br />
w, h = 640, 400
screen = pygame.display.set_mode((w, h))<br />
running = True<br />
img = pygame.image.load('hive.gif')
img.convert()
rect = img.get_rect()
rect.center = w//2, h//2<br />
moving = False<br />
while running:
for event in pygame.event.get():
if event.type == QUIT:
running = False<br />
elif event.type == MOUSEBUTTONDOWN and rect.collidepoint(event.pos):
moving = True<br />
elif event.type == MOUSEBUTTONUP:
moving = False<br />
elif event.type == MOUSEMOTION and moving:
rect.move_ip(event.rel)<br />
screen.fill(GRAY)
screen.blit(img, rect)
pygame.draw.rect(screen, RED, rect, 1)
pygame.display.update()<br />
pygame.quit()</code></pre>
<h3>Rotate and resize the image</h3>
<p>The <code>pygame.transform</code> module provides methods for resizing, rotating images. To modify the <code>img</code> image, I store the original image in a variable called <code>img0</code>:</p>
<pre><code>img0 = pygame.image.load(path)
img0.convert()</code></pre>
<p>To show the rectangle image, I add a green border to the main image:</p>
<pre><code>rect0 = img0.get_rect()
pygame.draw.rect(img0, GREEN, rect0, 1)</code></pre>
<p>Then I center the image on the screen:</p>
<pre><code>center = w//2, h//2
img = img0
rect = img.get_rect()
rect.center = center</code></pre>
<p>First, I define the global <code>scale</code> and <code>angle</code> variables:</p>
<pre><code>angle = 0
scale = 1</code></pre>
<p>I use the <code>R</code> key to increase the rotation of the image by 10 degrees. If you press the <code>SHIFT</code> key, the degree of rotation decreases. With the <code>rotozoom()</code> function, rotation and resizing can be used together. We always change the main image (<code>img0</code>). Rotating or resizing the image too much will reduce its quality:</p>
<pre><code>if event.type == KEYDOWN:
if event.key == K_r:
if event.mod & KMOD_SHIFT:
angle -= 10
else:
angle += 10
img = pygame.transform.rotozoom(img0, angle, scale)</code></pre>
<p>We use the <code>S</code> key to increase the amount of resizing. Each time you press the <code>S</code> key, we will increase the size by ten percent. If you press the <code>SHIFT</code> key, the amount of resizing will decrease.</p>
<pre><code>elif event.key == K_s:
if event.mod & KMOD_SHIFT:
scale /= 1.1
else:
scale *= 1.1
img = pygame.transform.rotozoom(img0, angle, scale)</code></pre>
<p>As the image changes shape, the enclosing rectangle also changes its size. The image is re-centered:</p>
<pre><code>rect = img.get_rect()
rect.center = center</code></pre>
<h3>Return the image to the original state</h3>
<p>To return the image to its original state, I use the <code>O</code> key:</p>
<pre><code>elif event.key == K_o:
img = img0
angle = 0
scale = 1</code></pre>
<h3>Rotate the image</h3>
<p>I use the <code>H</code> key to rotate the image horizontally:</p>
<pre><code>elif event.key == K_h:
img = pygame.transform.flip(img, True, False)</code></pre>
<p>And I use the <code>V</code> key to rotate the image vertically:</p>
<pre><code>elif event.key == K_v:
img = pygame.transform.flip(img, False, True)</code></pre>
<h3>Image edge detection with Laplacian</h3>
<p>The <code>laplacian</code> function helps us to identify the edges of an image:</p>
<pre><code>elif event.key == K_l:
img = pygame.transform.laplacian(img)</code></pre>
<p>The image is below:</p>
<center>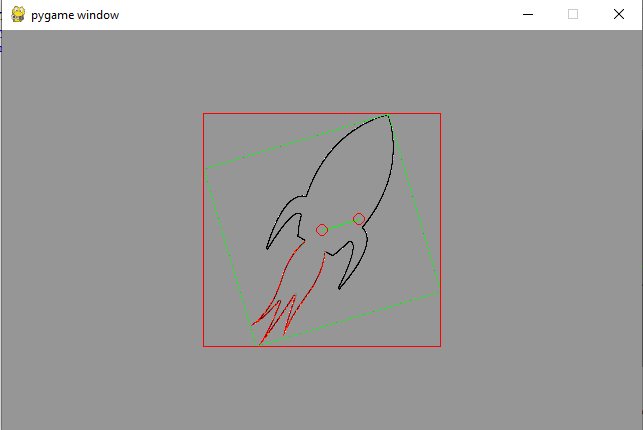</center>
<p>The scale2x function doubles the size of a pixel:</p>
<pre><code>elif event.key == K_2:
img = pygame.transform.scale2x(img)</code></pre>
<center>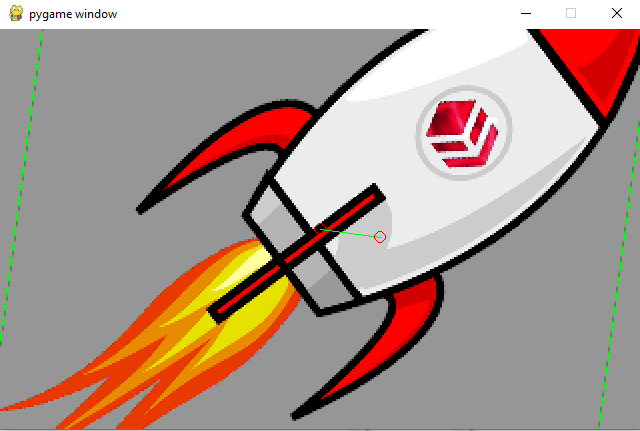</center>
<h3>Change the shape of the image with the mouse</h3>
<p>In this section, I show how to use the mouse to change the size and rotation of an image. First, I enter the <code>math</code> module:</p>
<pre><code>import math</code></pre>
<p>At the beginning, I save the initial position of the mouse:</p>
<pre><code>mouse = pygame.mouse.get_pos()</code></pre>
<p>When the mouse moves, I update the mouse position and calculate the <code>x</code> and <code>y</code> coordinates relative to the center of the image. I also get the distance from the mouse to the center, <code>d</code>:</p>
<pre><code>elif event.type == MOUSEMOTION:
mouse = event.pos
x = mouse[0] - center[0]
y = mouse[1] - center[1]
d = math.sqrt(x ** 2 + y ** 2)</code></pre>
<p>The mathematical function <code>atan2(y, x)</code> allows to obtain the rotation angle. To use this function, we need to convert radians to degrees. Using <code>d</code>, I calculate the size of the <code>scale</code>:</p>
<pre><code>angle = math.degrees(-math. atan2(y, x))
scale = abs(5 * d / w)
img = pygame.transform.rotozoom(img0, angle, scale)
rect = img.get_rect()
rect.center = center</code></pre>
<p>Finally, to draw the deformed image, first I paint the background with the desired color (gray), then I draw the deformed image in the window and draw a red rectangle around it. To create visual effects when changing the shape of the image with the mouse, I do the following two things:</p>
<ol>
<li>I draw a green line between the center of the image and the mouse position.</li>
<li>I place two circles, one in the center of the image and the other in the mouse position.</li>
</ol>
<pre><code>screen.fill(GRAY)
screen.blit(img, rect)
pygame.draw.rect(screen, RED, rect, 1)
pygame.draw.line(screen, GREEN, center, mouse, 1)
pygame.draw.circle(screen, RED, center, 6, 1)
pygame.draw.circle(screen, RED, mouse, 6, 1)
pygame.display.update()</code></pre>
<p>Look carefully at the image below.</p>
<center>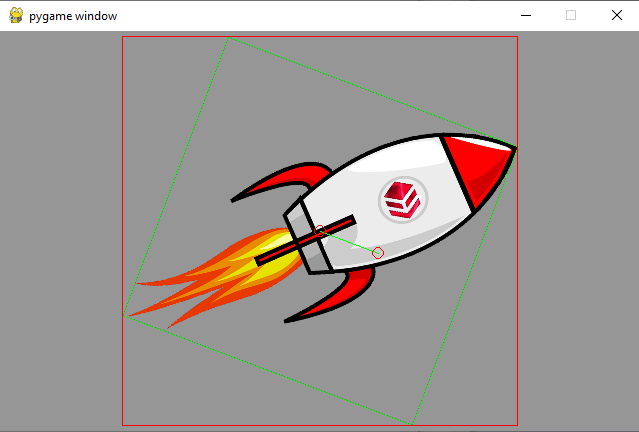</center>
<pre><code>import pygame
import math, sys, os
from pygame.locals import *<br />
RED = (255, 0, 0)
GREEN = (0, 255, 0)
GRAY = (150, 150, 150)<br />
pygame.init()
w, h = 640, 400
screen = pygame.display.set_mode((w, h))
running = True<br />
module = sys.modules['__main__']
path, name = os.path.split(module.__file__)
path = os.path.join(path, 'hiverocket.png')<br />
img0 = pygame.image.load(path)
img0. convert()<br />
rect0 = img0.get_rect()
pygame.draw.rect(img0, GREEN, rect0, 1)<br />
center = w//2, h//2
img = img0
rect = img.get_rect()
rect.center = center<br />
angle = 0
scale = 1<br />
mouse = pygame.mouse.get_pos()<br />
while running:
for event in pygame.event.get():
if event.type == QUIT:
running = False<br />
if event.type == KEYDOWN:
if event.key == K_r:
if event.mod & KMOD_SHIFT:
angle -= 10
else:
angle += 10
img = pygame.transform.rotozoom(img0, angle, scale)<br />
elif event.key == K_s:
if event.mod & KMOD_SHIFT:
scale /= 1.1
else:
scale *= 1.1
img = pygame.transform.rotozoom(img0, angle, scale)<br />
elif event.key == K_o:
img = img0
angle = 0
scale = 1<br />
elif event.key == K_h:
img = pygame.transform.flip(img, True, False)<br />
elif event.key == K_v:
img = pygame.transform.flip(img, False, True)<br />
elif event.key == K_l:
img = pygame.transform.laplacian(img)<br />
elif event.key == K_2:
img = pygame.transform.scale2x(img)<br />
rect = img.get_rect()
rect.center = center<br />
elif event.type == MOUSEMOTION:
mouse = event.pos
x = mouse[0] - center[0]
y = mouse[1] - center[1]
d = math.sqrt(x ** 2 + y ** 2)<br />
angle = math.degrees(-math. atan2(y, x))
scale = abs(5 * d / w)
img = pygame.transform.rotozoom(img0, angle, scale)
rect = img.get_rect()
rect.center = center<br />
screen.fill(GRAY)
screen.blit(img, rect)
pygame.draw.rect(screen, RED, rect, 1)
pygame.draw.line(screen, GREEN, center, mouse, 1)
pygame.draw.circle(screen, RED, center, 6, 1)
pygame.draw.circle(screen, RED, mouse, 6, 1)
pygame.display.update()<br />
pygame.quit()</code></pre>👍 pars.team, bgmoha, elector, goldfoot, botito, tobor, hadaly, dotmatrix, curabot, chomps, freysa, lunapark, weebo, otomo, quicktrade, buffybot, hypnobot, psybot, chatbot, psychobot, misery, freebot, cresus, honeybot, dtake, quicktrades, droida, chessbrotherspro, vjap55, eniolw, doudoer, eumorrell, rosmarly, oabreuf24, fernandoylet, misterlangdon, larsito, nazom, raca75, emrysjobber, lk666, chainableit, lemouth, steemstem-trig, steemstem, roelandp, dna-replication, minnowbooster, howo, robotics101, stemsocial, oluwatobiloba, sustainablyyours, tsoldovieri, abigail-dantes, vagabond42069, justtryme90, lamouthe, metabs, curie, edb, valth, dhimmel, mobbs, samminator, alexander.alexis, sankysanket18, madridbg, fragmentarion, kingabesh, flugschwein, deholt, chubb149, plicc8, inibless, techslut, walterjay, kenadis, r00sj3, anikekirsten, branbello, intrepidphotos, pab.ink, dexterdev, alexdory, francostem, de-stem, temitayo-pelumi, stem.witness, zeruxanime, afarina46, jsalvage, oahb132, pboulet, noelyss, akipponn, helo, aidefr, splash-of-angs63, enzor, sco, yoghurt, emiliomoron, geopolis, melvin7, gadrian, marcuz, cowpatty, jtm.support, nazer, krrizjos18, zonguin, croctopus, gaottantacinque, meanroosterfarm, zirky, greenforever, cribbio, aabcent, lpv, doctor-cog-diss, gasaeightyfive, michelle.gent, palasatenea, steemcryptosicko, aicu, thelordsharvest, pedrobrito2004, rocky1, tanzil2024, sidalim88, therealwolf, merlin7, videosteemit, pandasquad, stahlberg, bil.prag, certain, martibis, didic, qberry, hiveonboard, smartsteem, communitybank, kgakakillerg, miroslaviv, bitrocker2020, sumant, tinyhousecryptos, sergiomendes, steemvault, steemstorage, matilei, clpacksperiment, kevinwong, gabrielatravels, aichanbot, yadamaniart, doifeellucky, frissonsteemit, steveconnor, minerthreat, iamsaray, tawadak24, checkyzk, lorenzopistolesi, cheese4ead, drhueso, yixn, vittoriozuccala, sarashew, tfeldman, iansart, superlotto, rambutan.art, dawnoner, investingpennies, djlethalskillz, neneandy, lichtblick, justyy, enjar, failingforwards, cryptononymous, bartosz546, hetty-rowan, the.success.club, benwickenton, steem4all, utube, photohunt, thecryptodrive, metroair, serylt, cnfund, epicdice, therising, perpetuum-lynx, revo, zipporah, baltai, peterale, baboz, driptorchpress, takowi, minas-glory, dbddv01, sunisa, atomcollector, bscrypto, acidtiger, steemiteducation, musicvoter2, cosplay.hadr, rt395, sc000, bflanagin, treefiddybruh, jmsansan, broncofan99, punchline, altleft, schoolforsdg4, redrica, torico, leomarylm, thelittlebank, the100, sbtofficial, cryptocoinkb, steemwizards, notb4mycoffee, silverwhale, arunava, hairgistix, gloriaolar, orangeandwater, cloh76, dynamicrypto, vonaurolacu, cugel, simsahas, federacion45, greddyforce, gunthertopp, neumannsalva, zyx066, dcrops, traderhive, pipiczech, detlev, meno, fineartnow, educationhive, hadrgames, albuslucimus, tggr, steemean, cryptofiloz, aries90, the-burn, modernzorker, princessmewmew, fotogruppemunich, meritocracy, atexoras.pub, sunsea, armandosodano, the-grandmaster, empath, gogreenbuddy, stayoutoftherz, trippymane, reverio, irgendwo, diabonua, mind.force, coindevil, indigoocean, deanlogic, jjerryhan, goblinknackers, brianoflondon, carn, jossduarte, hive-127039, podping, rmach, mcsvi, jude9, forykw, mproxima, sanderjansenart, mafufuma, vixmemon, revueh, grapthar, atheistrepublic, dondido, lightpaintershub, jerrybanfield, alt3r, bigtakosensei, lordvader, juecoree, stem-espanol, lorenzor, sandracarrascal, ydavgonzalez, tomastonyperez, elvigia, erickyoussif, andrick, giulyfarci52, aqua.nano, iamphysical, azulear, miguelangel2801, josedelacruz, uche-nna, fran.frey, psicoluigi, fatkat, walterprofe, lettinggotech, beerlover, acousticguitar, drsensor, dandays, kieranstone, nfttunz, gribouille, eric-boucher, stevenwood, afifa, robertbira, nicole-st, privex, flatman, ennyta, endopediatria, stea90, bluefinstudios, careassaktart, photographercr, gamersclassified, lifeof.abdul,